Plex Media Server on Ubuntu Linux
Getting Plex up on Linux is not hard, but even if you have some understanding of Unix-like operating systems there are a lot of little issues to figure out. This brief guide is meant to get you up and running quickly: I did the forum searches so you don’t have to.
It is important to note that this guide assumes that your server will be behind some other firewall and not exposed directly to the internet while you’re installing Plex.
Also, this guide is not meant to cover security issues, general Linux system administration, or to be a Linux distro war battlefield. ![]() There are a lot of ways to do things in Linux and this is not the only way to go!
There are a lot of ways to do things in Linux and this is not the only way to go!
I’ve done this setup a few times lately but I am sure my notes missed something, or missed the best way to do something. Please let me know if you see anything to fix.
Why Ubuntu?
Ubuntu has an enormous community that makes it easy to look up how-tos, and it is well supported by Plex.
What You Need
- A modern 64 bit PC with an AMD or Intel CPU and at least 4 GB RAM, plus a keyboard, mouse, and display that you can use at least temporarily.
- A Gen 6 or later Intel CPU with iGPU is dandy for Quick Sync transcoding support.
- An SSD or HDD that you can dedicate entirely to Linux.
-
- How big? Depends on your library size and what metadata features you use. Roughly speaking, you might get away with 256 GB if you don’t turn on features like video thumbnails. 500 GB or bigger would be safer, though. That’s just space for Plex and the system… not your media!
- A USB thumb drive, at least 8 GB
Create the Ubuntu Desktop Installer
You want to install Ubuntu Desktop 20.04 LTS. “LTS” means “long term support,” and it is the most stable version.
Note: 22.04 is now the current LTS release and you should probably use that.
Why install the Ubuntu desktop version, and not the GUI-less server version? Because it is very convenient to have a GUI, especially if you don’t know anything about command-line life. There’s no downside beyond using a little extra disk space.
The Ubuntu installer instructions are here. Basically, you download an ISO, use another utility to make that ISO into a bootable thumb drive, then boot off the thumb drive to install the OS.
https://ubuntu.com/tutorials/install-ubuntu-desktop#1-overview
The instructions will direct you to get an installer image here:
https://ubuntu.com/download/desktop
Remember, get 20.04 LTS! Grab the ISO and use a utility like Balena Etcher to make your bootable installer thumb drive as described in step 3… but don’t boot it up yet.
Configure Secure Boot in the UEFI BIOS
Modern PCs support a “Secure Boot” feature which makes sure that critical drivers are signed by a trusted publisher. Windows requires that Secure Boot is active. Ubuntu will let you install the system with or without Secure Boot, but once you make a Secure Boot decision you are stuck with it.
In this guide I recommend turning Secure Boot ON for a few reasons.
- It is required to install some Ubuntu software you might want, like Nvidia drivers, and this is a decision you must make up front.
- The GPT partition scheme required by Secure Boot is the modern standard. Using the old MBR standard could cause problems later, depending on what you want to do with the system.
- My specific motherboard required Secure Boot to be ON to support the Intel iGPU, so I may as well document the procedure.
So, start your PC and get into the UEFI BIOS. Find the Secure Boot setting and turn it on. Any related configs should be left on default or standard settings.
Installing Ubuntu
With your thumb drive ready and Secure Boot turned on in the UEFI BIOS, you’re ready to actually install Ubuntu.
Return to step 4 in the official install instructions
Boot off your thumb drive.
https://ubuntu.com/tutorials/install-ubuntu-desktop#4-boot-from-usb-flash-drive
Once the installer comes up, select Install Ubuntu and pick your keyboard layout.
Step 5
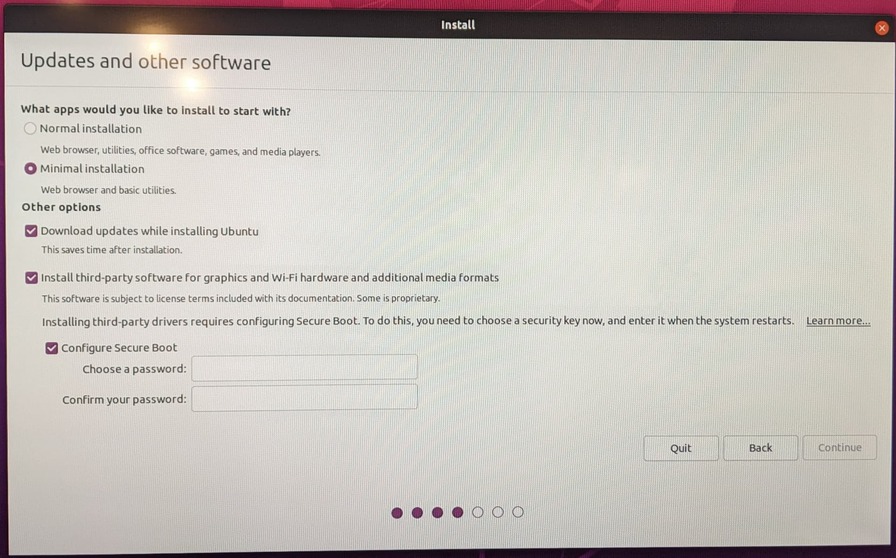
You can choose from a “normal installation” and a “minimal installation.” If this machine is to be mostly dedicated to Plex and other server chores, choose the minimal installation. If you want to check out other Ubuntu software, you can pick the normal installation. You can always uninstall things later.
In this step leave ON the options to download updates and install 3rd party software.
This step should also prompt you to complete Secure Boot setup, which is necessary for some 3rd party software. Make sure Configure Secure Boot is checked and enter a password, which of course, you’ll write down somewhere. Once that is done, hit Continue.
Step 6
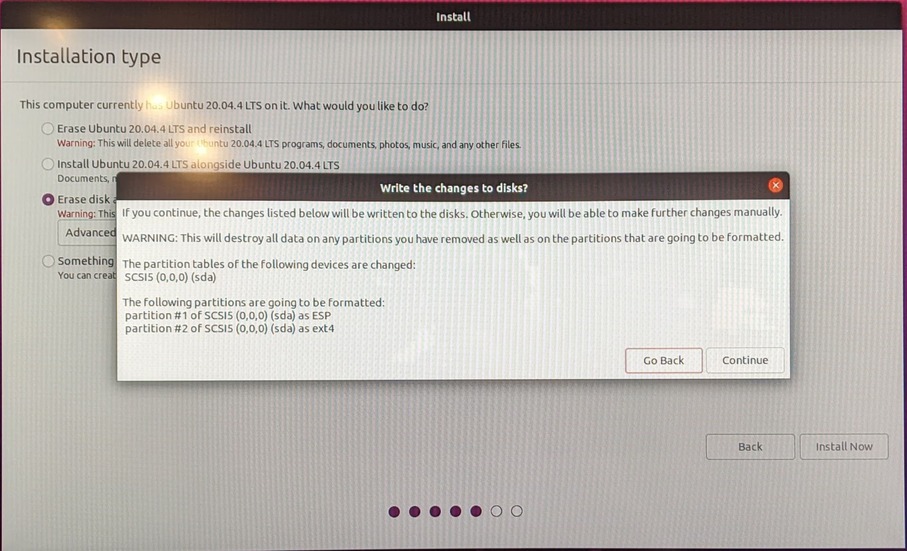
Choose “erase disk and install Ubuntu.” Under “advanced features,” don’t select anything.

Click “install now” and “continue” and the Ubuntu installer will partition the disk.
Step 7
You’re skipping step 7 unless you decided to play with encryption settings in step 6.
Step 8
Set your location, so your time zone is correct.
Step 9
Here, you will set up your user account and the name of the computer. I use short names for everything, I set Ubuntu to log in to the desktop automatically, and during this setup period, my password is “12345” or “password” because I’ll be typing it a lot to finish setup. Remember, we are on our own LAN still with no direct internet exposure, so a weak password is OK for now!
Continue through this form and wait for setup to complete. You’ll be asked to remove the thumb drive and reboot.
Finish Secure Boot setup
When Ubuntu restarts you should find yourself at an unfamiliar menu titled “Perform MOK management.” We need to provide the Secure Boot password we earlier provided to the Ubuntu installer. This is only done once.
- Choose “Enroll MOK”
- Choose Continue
- Choose Yes
- Enter your Secure Boot password
Boot should continue.
You can see the enrollment process in this video starting at 7:28.

Install Ubuntu Support Software
In a few more moments you’ll be at the Ubuntu desktop. If you’ll be using the computer for desktop tasks as well as a Plex server, you may wish to connect your online accounts when prompted. If this machine is mainly a Plex server, skip all of that. Answer the other setup questions however you like. (I did not turn on Live Patch, but it should be harmless.)
![]()
At the last step of desktop setup, when Ubuntu shows you their software store, you may notice they offer you the Plex server. Don’t touch it! We’re not installing the Snap store version because it uses some different settings compared to the .deb package that is more commonly used. You’ll find that the Plex for Linux how-tos you look up may need adjustments to work on the Snap version. That’s a hassle you don’t need.
By default the desktop version of Ubuntu is missing some useful software that we will want to add before we install Plex. We’ll do this at the command line. Right click on the Ubuntu desktop and choose “Open in terminal.” We’ll type some commands into the terminal to install software.
Mini Command Line Lesson
Many of the commands we enter below are all prefaced withsudo. What does that mean? It’s a way to tell the system, “do this command as if the user was actually the all-powerful superuser.” This is necessary for installing software, or creating a new file or directory in a protected area. You’ll notice that when you usesudoto issue orders, the system will periodically ask for your password to confirm who you are. We could log in as superuser ‘root’ and not keep sayingsudo, but there are reasons not to do it that way. One reason is that it’s much easier to make damaging mistakes if every command has superuser privileges.
Install ssh server
By installing the ssh server we can connect to the Ubuntu box from our other devices. Once you are past initial Plex setup and goofing around with the Ubuntu desktop you may find you’re happy taking care of Plex from the command line, and you don’t need to Ubuntu desktop at all. That’s when you can unplug the monitor and do everything remotely, so let’s make sure we’re ready for that day.
In the terminal, enter:
sudo apt install openssh-server
You’ll be asked for your password and then after the system fetches the package, you’ll be asked if you are sure you want to continue. See the yes/no question? The “Y” is uppercase and the “n” is lowercase. To say “yes” you can enter Y, y, or just hit Enter–that will do the uppercase option. Hit enter to continue setup.
Setup should complete without further input. To make sure the ssh server is running, enter:
sudo systemctl status ssh
The text that follows should confirm the server is active. We’ll get back to using it later.
Install net-tools
We also need to install some basic networking utilities. Do this command, answering yes to any installer questions.
sudo apt install net-tools
Install htop
htop is a command line process viewer. You can use this to see what Plex or any other programs are doing. To install, do:
sudo snap install htop
We’re installing the Snap store version because the
aptversion is older and lacking useful features.
htop can do a lot, but here is one quick example – this shows all processes with ‘plex’ in the name.
htop -F plex
You can also launch htop without any arguments and filter by name with its menu system.
Install tuptime
tuptime is a utulity that tracks reboots, intentional and otherwise. Install it now so if you are worried your system is flaky, you can check the logs to see if you had uncommanded reboots.
sudo apt install tuptime
To see the report, do:
tuptime -t
Install psensor
psensor is a simple GUI app that will monitor processor temperature. The GUI is a little flaky but it’s still the easiest way I have found to get a temperature chart. I like to use it on a new install to make sure I didn’t screw up mounting the heat sink. Once psensor is installed, you can find it in the Ubuntu desktop app folder. You may also start it from the command line, but it requires the GUI to run.
sudo apt install psensor
Give your Ubuntu server a static LAN IP address
Probably, some gadget on your LAN has a DHCP server, and hands out IP addresses to all your devices. You want to tell your DHCP server to always give your Plex server the same IP address. This will let you more easily connect via ssh, and it will also enable you to do port forwarding to access Plex from the outside world. How to do this varies depending on what kind of router you have but generally you tell the DHCP server “watch for a device with this hardware network address, and always give it this IP address.” So, let’s find your Ubuntu server hardware address, AKA “MAC address.”
In the terminal, do:
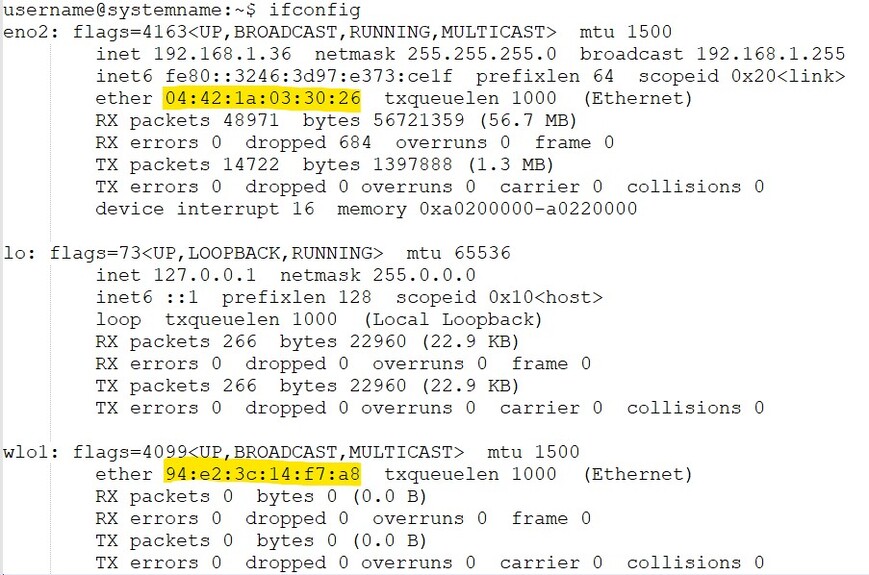
ifconfig
This will spit out a lot of text, one block for each networking device. An ethernet device may be named “en” plus something and wifi may be “w” plus something… but the exact names may depend on your hardware. (“lo” is called the loopback device, ignore it.)
In the network device blocks, the MAC address is prefixed with “ether.” Find the MAC address for the networking interface you plan to use, and note it so you can set up a static IP at your router. In this example, I have highlighted MAC addresses for my ethernet and wifi adapter.
If you have made the changes on your router’s DHCP server, you can restart Ubuntu to pick up the new IP. Use the Ubuntu GUI menu in the upper right corner, or use the terminal:
sudo reboot
Or, you can get an updated IP address from the command line.
sudo dhclient -r
sudo dhclient
Optional: Switch to a comfy chair
At this point you should have ssh server running, and a static LAN IP. You can walk away from the Ubuntu display, sit in your favorite computer chair and use a terminal program like PuTTY, KiTTY (Windows) or the Mac OS terminal to connect to your Ubuntu system and continue setup… we don’t need a mouse any more!
You can also keep going with a terminal window on the Ubuntu desktop.
Install Plex Media Server & Support Software
On a web browser go to the Plex Media Server download page and copy the link to the 64bit Ubuntu installer. (BTW, Firefox comes with Ubuntu!)
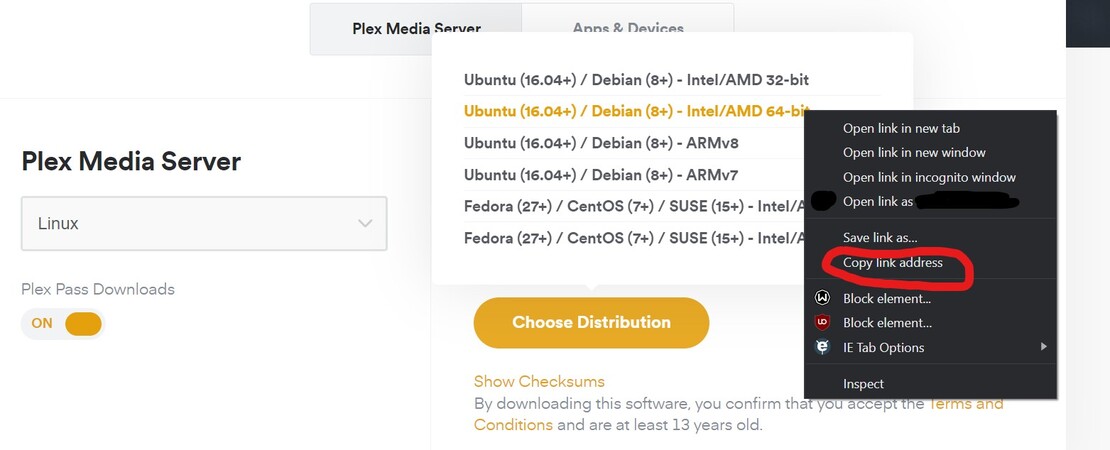
In the Ubuntu terminal we will download the installer file with wget, and then install it with dpkg. So, in the terminal, do:
wget <PASTE IN THE HTTPS LINK TO THE .DEB FILE>
sudo dpkg -i <NAME OF THE .DEB FILE YOU JUST GOT>
Notes for this step:
- Don’t include the < > in the commands above!
- By default our terminal session begins in our Ubuntu home directory and that is a fine place to download that installer file.
- In the install step, you won’t type the long file name! Enter
sudo dpkg -i pland then hit the Tab key. It should autocomplete the whole file name! Then hit Enter to install it.- Once Plex Media Server is installed stop and read the messages from the installer. It may list Intel drivers you should install. Copy this text somewhere temporarily so you can refer back to it.
To verify the server is running do:
sudo systemctl status plexmediaserver
If that looks good, remove the installer file.
rm <NAME OF THE .DEB FILE YOU JUST GOT>
You can now access Plex at http://localhost:32400 (if you’re still on the Ubuntu desktop) or from another device, via the machine’s static IP address, same port. But don’t dive in to Plex configuration yet, we’re not quite done with setup.
Set up the Plex repository
By making some changes to system files, you can easily get and install Plex Media Server updates. Plex has provided good instructions here. Follow the first instructions for “DEB-based distros.”
Once the repo is set up, you can update Plex and everything else with these commands:
sudo apt-get update
sudo apt-get upgrade
Install Tautulli
Tautulli is free software that gives you a lot of extra stats about your Plex install. The detailed transcoding stats can be especially helpful. Tautulli is free and easy to install so we may as well throw it on there. In this case, we will use the Snap store, as that’s the author’s official method. In the terminal, do:
sudo snap install tautulli
Tautulli can now be used at port 8181. Get Plex set up before you play with Tautulli though, it is pointless without a Plex server.
Plex Pass users with Intel GPUs: Install Intel drivers for Quick Sync
Plex supports hardware acceleration of video transcoding on Intel CPUs with a GPU featuring “Quick Sync.” In practice, most say that Quick Sync processing looks OK at Gen 6 and later.
Remember that not all Intel CPUs have a GPU. Model numbers with “F” on the end omit the GPU for sure. If you want Quick Sync–and you do–carefully check the model number of your CPU.
For Plex, Quick Sync requires different Intel drivers for different CPU generations.
Gen 10 and newer CPUs
As of this writing in April 2022, per @ChuckPA the most recent drivers you can use with Gen 10+ CPUs are version 21.49. Gen 11 and 12 may still have some problems regardless. Gen 10 seems to be OK. The driver situation will surely improve and I will try to keep this article updated.
To install the Intel 21.49 drivers, follow the directions in this Github post. You will use wget <link> to get all the listed .deb files, and then install them in the listed order with sudo dpkg -i <filename>. (Remember tab completion! Don’t type or even copy & paste those long filenames!)
Gen 9 and earlier CPUs
After installing Plex Media Server, the installer will print instructions telling you what Intel software to install. Refer to that material.
For either case, you may check the status of the installed Intel software:
dpkg -l | sort
Look for Intel software you just installed. You want to see “ii” in the leftmost column. This indicates a good install.
It can’t hurt to restart Plex Media Serverat this point:
sudo systemctl restart plexmediaserver.service
Lastly, make sure hardware acceleration is turned on in your Plex server settings, which requires a Plex Pass.
Make your media visible to Plex via SMB file sharing
If you have a NAS or a Windows machine with SMB shared folders, you can mount those shares on Ubuntu, and Plex can see your remote media files. To do this, we need to edit a special system file /etc/fstab and add a new line for each shared folder. It’s easiest if all your media is shared under a master folder like “media” but if you want a different share for each kind of media, you do you.
Let’s start by picking a place to mount (attach) the shared folder. We’ll go to the /mnt directory, which is empty and provided for this purpose. We’ll then make a new empty /mnt/media mount point directory, which will later be connected to our network drive. (The name of the mount point is not magic–it can be anything, it is coincidental that it is “media” and the name of the file share is “media.”) In the terminal, do:
cd /mnt
sudo mkdir media
Now, let’s design the magic config line that mounts a network drive. Open a text editor. Copy in this template. It’s all one line, though the forum may do a line wrap!
//LAN-IP-ADDRESS/SHARE-NAME /PATH/TO/MOUNT cifs username=USERNAME,password=PASSWORD,file_mode=0644,dir_mode=0755 0 0
Note that this mount method prevents Plex from writing to the file share. That’s how I like to do it. If you want Plex to be able to modify or delete files, you’ll need to give your shared folder setup the right permissions and set the
file_modeanddir_modedirectives correctly. That’s beyond the scope of this post but see the other guides linked below.
Your actual config line will need to plug in the IP address of the file server, the name of the shared volume, the path to the mount point (the directory we just made), and the file sharing username and password. Edit the template with your values. It might look kind of like this:
//192.168.1.29/media /mnt/media cifs username=myusername,password=supersafepassword,file_mode=0644,dir_mode=0755 0 0
Once your line is saved in your text editor, get back to the terminal. We’ll change to the /etc directory, make a backup copy of /etc/fstab, and then edit the original.
cd /etc
sudo cp fstab fstab.bak
sudo nano fstab
Now you are in the text editor nano editing /etc/fstab. Arrow key down all the way to the end of the file. The cursor should be on an empty line, after a line that starts with /swapfile. Paste your config line in as the last line in the /etc/fstab file. Make sure the line doesn’t break! All the directives need to be on one line! Make your terminal window wider if needed. It’s OK if there are empty lines after it, though.
When your line is in place, hit Ctrl-x to exit nano. It will ask if you want to save changes. Hit “y” and you’ll exit the program.
You can verify that your /etc/fstab looks good by printing it in the terminal.
cat fstab
Important: Your file shares aren’t actually available yet. /etc/fstab changes won’t take effect until you reboot.
More about disks and file sharing
For more information on adding adding other hard drives and network shares, refer to these other how-tos.
Reboot and Configure Plex
At this point you should be able to reboot the computer to bring up the file shares. Visit Plex at port 32400, and start configuring your server. When you set up your libraries, you should see your file server; if not, you have to check your file server and /etc/fstab configuration. This can be the least fun part of setup, but you can find a lot of help in the how-tos linked above.
Optional: Set the transcoder temp directory to your ramdisk
Ubuntu includes a handy automagical RAM disk which you may be able to use as the transcoder temporary directory. This could be nice to save wear on your SSD, but it isn’t really necessary. Even a mechanical HDD is fast enough for transcoding temporary space.
If you want to try it out, the Plex web app, in Settings > Server > Transcoder, set the Transcoder temporary directory to /dev/shm.
In my experience a 4k transcode might take ~600 MB of RAM, so be mindful of your installed RAM and expected transcoder usage. If you have any problems using the ramdisk temp directory, just delete /dev/shm from the above field and save your settings.
Should you let Plex watch music libraries?
Plex includes this setting, which is off by default.

In Ubuntu 20.04 the limit referenced in the help text is actually quite high. It’s possible that you can safely turn this on. You can verify that this is true for your system with this procedure from @ChuckPa :
After setting up all the watch directories, keep DEBUG logging on (VERBOSE OFF), restart the server and let it run for 2-3 minutes. Now download the logs ZIP file and examine “Plex Media Server.log” Make certain there are no “No space left on device” errors. This is indicative of too many directories for the kernel to monitor.
If you find errors, refer to this procedure.
Set up remote access
If your server is happy, you are done with setup, and you want to reach Plex from the Internet, you’ll need to set up port forwarding on your router or firewall device. Send traffic on your public IP TCP port 32400 to the static LAN IP of your Plex server, port 32400. In the Plex server remote access settings, manually specifying port 32400 might help too.
When testing, use an external web utility to see if port 32400 is responding. Don’t trust the Plex red/green light. It can be flaky.
You should also give your account on an exposed Plex server a better password than “password.” Remote Plex users will never get a chance to try your Ubuntu password… Plex does not expose your Ubuntu user account to the world. But if a catastrophic vulnerability were found in Plex Media Server, or in any other software you exposed to the Internet, your password strength could become a factor. So, in the terminal, change it to something gnarly. Enter this command and follow the prompts.
passwd
Enjoy Plex!
Having installed Linux and learned the command line, you’re basically Neo at this point too. Congrats!