Server Version#: 1.32.8.7639
Player Version#:
Tuner Make/Model: HDHomeRun
Guide/Lineup name:
Using XMLTV?:
Channel number/Name:
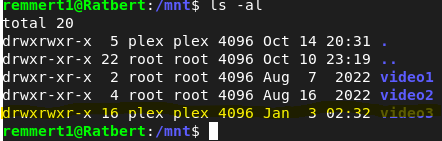
I have a Raid 5 setup.
It is mounted as: /mnt/video3
Under that I have a folder called TV-Shows
When I schedule a show to record I get “No write access to destination”
It used to work and I am not sure when it stopped.
I am running Ubuntu.
I have looked at and tried setting owner/group and permissions.
The command: “id plex” returns the following:
uid=999(plex) gid=995(plex) griup=995(plex)
I have tried all of the following permissions/owner/group settings with no success:
/mnt = plex:plex 775
/mnt/video3 = plex:plex 775
/mnt/video3/TV-Shows = plex:plex 775
Thanks for the tip.
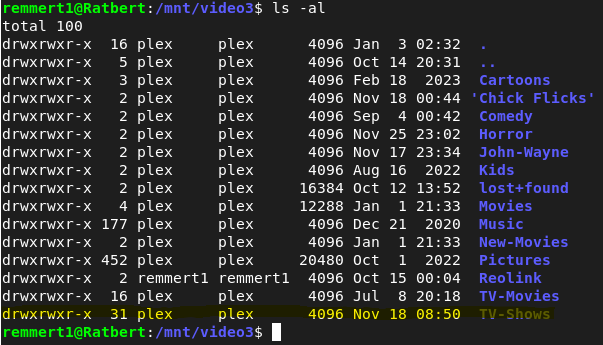
I unmounted the drive and fixed the permissions on video3 and remounted then just to make sure I rebooted.
Here are the permissions now.
I then scheduled a show to record and still receive the same error.
The other two mounts (video1 & video2) are old and can (should) be removed. There is nothing associated with them. They are commented out in the fstab file.
Sorry for the confusion, the color of the “ls” that is a highlight color from my cut/paste just to make the folders stand out.
Here is the fstab file:
One thing you have there is the nofail option. It’s suppressing the real error(s) from printing.
In your RAID volumes, you used the proper /dev/mdxxx entry.
Why are you not using /dev/sdxx now?
If this is a USB device, which can change device node, UUID=<uuid-from-blkid> is the best way to mount that.
Are you 100% certain the filesystem label (sudo blkid /dev/xxxxx) is /mnt/video3 ?
I think it’s just not finding the disk to mount it properly
It is a hardware RAID. I am using a High Point RAID controller. There are 4 - 8TB drives in a RAID 5 configuration.
This is what shows up in the Ubuntu Disk utility
Notice the OS sees it as /dev/sda ? (the very first HDD volume)
– In /etc/fstab, change LABEL=/mnt/video3 to /dev/sda
– (it’s not partitioned? just the raw block device from the controller ?)
Yes, please remove the nofail. Given it’s already showing as mounted – something in the OS (perhaps systemd) is already mounting it incorrectly
If this is a HDD array, you can also remove the ,discard (SSD only)
Please also share a mount | grep sda and share this. It’ll let me see how it’s currently mounted
fyi, you don’t need screenshots.
Highlight and COPY the terminal window text
type ``` on a line in the reply window (the key by the ~)
The drive I am using are 8TB SATA drives.
I removed “nofail” and rebooted with no problem.
However, when I changed “/mnt/video3” to “/dev/sda” and rebooted it would not boot and went into a maintenance mode. I had to change it back for it to boot.
I then tried to remove the “,discard”. It rebooted with no problem, but when I launched Plex player on my desktop and tried to play a moved it would keep pausing/buffering. I put “,discard” back in and rebooted, started the movie again and it worked fine.
Here is the output from the “mount | grep sda” command
/dev/sda on /mnt/video3 type ext4 (rw,realtime,discard)
I don’t understand that HW raid but it sounds slow if it can’t keep up with a simple transcode.
Per the man page:
       discard
           If set, causes discard/TRIM commands to be issued to the block device when blocks are freed. This is useful for SSD devices and
           sparse/thinly-provisioned LUNs.
Is this what you have your HW RAID configured for?
8x 8TB SATA-3 drives (RAID 6 config) should deliver 6x200 MB/sec == 1.2 GB/sec. Nominal performance is 600 MB/sec which is still FAR more than needed for transcoding.
This is why I don’t understand why it’s slow
Can you please tell me the exact make and model number of the controller so I can read the specs and config manual?
Is Plex running as plex or your username ?
(you are using the snap package)
Snaps have a lot of restrictions. We will likely switch you over to using the .DEB package or reconfigure the mount to work with the snap. (The DEB package is the best way)
Jan 06, 2024 10:14:49.127 [140646821952312] INFO - Plex Media Server v1.32.8.7639-fb6452ebf - Ubuntu snap x86_64 - build: linux-x86_64 snap - GMT -05:00
Jan 06, 2024 10:14:49.127 [140646821952312] INFO - Linux version: 22.04.3 LTS (Jammy Jellyfish), language: en-US
Jan 06, 2024 10:14:49.128 [140646821952312] INFO - Processor: 8-core AMD FX(tm)-8150 Eight-Core Processor
Jan 06, 2024 10:14:49.128 [140646821952312] INFO - Compiler is - Clang 11.0.1 (https://plex.tv 9b997da8e5b47bdb4a9425b3a3b290be393b4b1f)
Jan 06, 2024 10:14:49.128 [140646821952312] INFO - ./Plex Media Server
PS: I’m very sorry for assuming you were using the DEB package. We could have saved a lot of time.
I’m going to write out each command and explain what each does
Nothing we do here will risk what you currently have
We’re going to create the native package version of your current installation and set it up to use what you already have defined.
sudo snap stop plexmediaserver
Open browser to https://plex.tv/downloads
– Download the 64 bit Ubuntu DEB package
– It should save into your Downloads directory
sudo dpkg -i ~/Downloads/plexmedia*_amd64.deb
– This will make certain you have PMS installed on the host using the native package
– If you type dpkg -l | grep -i plexm and see you have plex installed, you can skip this step but having 1.32.7 or 1.32.8 is advisable
sudo systemctl stop plexmediaserver
– we’re going to stop what you just installed so we can transfer your server data from the snap package area to the native package area
This is a multi-part sequence. Be careful with each step (# is a comment)
# Get root shell
sudo bash

# Move the empty "Library" out of the way for now
cd /var/lib/plexmediaserver
mv Library Library.unused

# Get into where the SNAP "Library" is stored
cd /var/snap/plexmediaserver/common

# Copy it to where the DEB package expects it
tar cf - ./Library | (cd /var/lib/plexmediaserver ; tar xf - )

# Change the ownership to be proper `plex:plex`
chown -R plex:plex /var/lib/plexmediaserver
We’ve copied all the data over to the DEB area and are ready to start Plex
The only thing we still need to check is writeability to /mnt/video3 but now we can manage that outside the snap restrictions
Start Plex sudo start plexmediaserver
Confirm it comes up and is still 100% your server. You shouldn’t see any difference
If you now want to test about recording, you can do that now
FUTURE:
We’ll remove and purge the SNAP package once all is confirmed. You don’t want both trying to restart at system reboot (it’ll be a mess)
Thanks!!
Everything worked great until step 8.
“sudo start plexmediaserver”
I get sudo: start: command not found
Should the command be: systemctl start plexmediaserver?