Optimal Handbrake for Plex Settings (2019)

Right… my problem is every day I live I go more blind. The last thing I want to do is start fooling around with filters and then wondering which one is better. I use the default LapSharp and we’re all enjoying the results.

For the most part - barring a horific DVD - I can’t tell the difference in 480p and 720p and that’s good enough for me.

The LapSharp filter is also fast. May add 2 minutes to a 10 minute, per hour, encode. I can handle that.

1 Like

Then I’d say stay that way, if it ain’t broke, don’t fix it… When it comes to things like Animation, I will put the Unsharp to Medium and the tune to Medium because animation lines are thicker and it helps make colors pop a bit more… But for things with whispy hair and textures, Fine (For DVD) or Ultrafine (For HD and above), with “Light” is overall more pleasing to me… because it retains the textures of things, rather than stomping all over them… and my eyes can thankfully still see textures… that may change in a few years, but I am milking it for all it’s worth and trying to drink as much carrot juice as possible the closer to 40 I get (Next year ugh)

I am really enjoying the latest HB. Apart from the ASS nonsense.

I have just the one 480p and one 1080p profile - it’s basically drag, drop and go.

Amazing.

Yeh, I have a 480, 1080, and 720 profiles (720 is for stuff I DVR that is only broadcast in 720). But the 480 and 1080 I have 2 of each, one for live action and one for animation.

And then I have Staxrip for UHD… So many more options, and a much steeper learning curve… but, it transcodes about 30% faster than Handbrake…

I want to make a script that monitors a folder, reads the dimensions using media info, and then auto-adds it to handbrake based on those dimensions… I will just have 2 folders, one for Animation and one for Live action that I rip into… then it will all be automated besides putting in the disk and click the makemkv button… heh… I am super lazy…

I do 720 now and then, but I just knock it down from 1080 by changing either side (1280 or 720) - HB knows exactly what to do.

For those ‘new fangled’ 720s - set the width. HB will figure out the height, but do try to be as accurate as possible - a fiddle of the crop may be in order at times.

yeh, I just keep things in their source resolution… if I could have everything 1080 I would… 4K would be excessive for Animation, but if I could have all of my live action in 4K HDR I would…

Right, but when you’re bringing 1080 down to 480 and run into a 2:35, be sure to maintain the 720x480 base. In a Custom setup with proper cropping HB will determine the correct width (960/Other). Maintain the 480p - it’s all the vertical resolution you get - use it wisely… like all of it…lol

Great post guys, very informative. I’m just getting back in to using HB and just starting with Plex.
Would you say these presets are still the way to go for DVDs?

I’ve started with H.265 MKV 480p30 as a baseline and then made the following adjustments:

  • storage size = 720x480
  • Cropping = custom (all zeros)
  • Sharpen = Unsharp, preet = medium, tune = fine
  • framerate = same as source
  • average bitrate = 1050
  • 2-pass encoding
  • turbo first pass

If you want to keep it simple, stick with “Constant Quality”.

tl;dr CQ is “one-pass” but it tries to distribute all of your precious bits intelligently. So, let’s say, a scene with very little movement would require fewer bits than the lobby scene from the Matrix.

IMO unless you really need to have predictable filesizes (like trying to, let’s say, fit a film on a single CD) then 2-pass isn’t really better/worth it.

In terms of the filters… that’s personal taste. I don’t really like a lot of deblocking/sharpening, so I disable it almost entirely. But, then again, there are some folks who really hate film grain and love DNR. YMMV.

For a DVD source I’d use RF 20-22. For a Blu-ray source RF 22.

If you set cropping to all zeroes, you’re going to encoding a lot of wasted “black bars” areas. IMO there’s not really a good reason for that.

I think Juice wasn’t telling you not to use the cropping. Just to double-check that auto-crop hasn’t chopped off part of your movie.

If you click on the summary area you can see how it looks. For me I’ve only seen HandBrake really overcrop on a handful of extremely dark (as in color palette) films. Usually it’s pretty spot-on.

My recommendation:

Start with a lower quality preset for your first try (as in your first try using Handbrake. Not with each DVD).

If it’s a DVD from the USA, use “Very Fast 480p30”. If it’s a DVD with a framerate of 25, use “Very Fast 576p25”.

This will give you some reasonable defaults.

Under dimensions, I’d stick with “Auto Crop”. It will try and crop out the black bars and save you some bits.

For “Storage Geometry” I just check “optimal for source”, and leave Anamorphic on “Automatic”.

Here’s a screenshot of those settings when I loaded the DVD “Hard Boiled” into the Handbrake preset “Very Fast 576p25”.

Click over on Summary and you can see if Handbrake was over-zealous with cropping:

If you want to compare, uncheck “Auto Crop”, zero out the dimensions, and click back over to Summary:

Like I said, HB usually does a good job.

For filters, on a Blu-ray I’d toggle everything off but some DVDs can be interlaced (shudder). You can leave it on Default and unless it detects those things it won’t apply the filter. I leave deblocking off here.

If you really, really want to you can tweak some of the video settings. I still recommend keeping the defaults just so you have a reference of how the quality/image has changed once you monkey with the settings.

The only exception being set Framerate to “Same as source”. A “PAL” DVD is going to be 25fps and an “NTSC” DVD is going to be 29.97/30fps.

If you want, lower RF down to 20 (lower number = theoretically higher quality). But lowering the slider also increases how long it will take to encode in an exponential way. Going below that, for me personally, I’d have to sit squinting inches at my monitor with both sources side-by-side to notice differences. Sitting ten feet away on my couch it would essentially be impossible for me.

You know how in a movie someone will be flipping a lightswitch and they don’t know what it does, but then the neighbor’s TV keeps turning off and on? That’s kind of what is going on here. Each setting is enabling flags/switches for the x264 codec that will be applied when you encode your video.

So when you make a change, it alters the settings in the hopes of giving you an endproduct with perceived higher quality results.

Looks good to me, but use LapSharp at it’s Default settings - that’s all you’ll ever need.

Using HEVC (bad idea, BTW - DVD file sizes are already small enough) you could probably halve that bit rate - or encode in 264 - which is what I would do.

HEVC would help - if you were encoding 4K material.
HEVC is a PITA and for DVDs a bloody waste of time.

For audio, that depends on a lot of things.

Do you want to:

  1. Keep all audio tracks
  2. Keep all audio tracks of a specific language
  3. Keep only one track for each language

and

  1. Keep the audio in its original format (assuming your playback device can handle it)
  2. Keep the audio in its original format with some specific codecs, and “fallback” to encoding it as a different format
  3. Convert the tracks to something else like AAC

In my case, Hard Boiled has an English dub in addition to the original Cantonese. It also has a stereo track for each, and an English commentary track.

If you want to keep all audio tracks, change “Selection Behavior” to “All Tracks Matching Selected Languages” and add “Any” to the Selected Languages column.

Then click over to “Track List” and click the “Reload” button to load the audio tracks/changes you’ve made.

With the defaults, it only grabbed the first track on the DVD, the English dub:

Changing it to “All matching” and “Any”, then clicking reload:

Now we have five tracks.

Deciding on how to encode the audio can be confusing. Using the defaults encodes ALL tracks you select to AAC:

If your playback device supports DTS/AC3/etc. you can use “passthrough” instead to keep the original audio without any conversion. Where it says “Auto Passthrough” choose your codecs:

In this case, I’ve chosen AC-3 and DTS. The “Fallback” will be used if it encounters a format other than those. For example, if this DVD had a DTS-HD track, it would encode it as an AAC track instead.

Under “Audio Encoder Settings” choose AC3 passthrough to only passthrough AC3 tracks, DTS to only passthrough DTS, etc. I just use “Auto” so that any track matching the above Auto Passthrough settings don’t get converted.

Go back to “Track list” and click “Reload”. Now notice how all the previous tracks are “passthrough”, not “AAC”:

For subtitles, I really hate burned in subs. So for “Burn-In Behavior” I choose “None”, and I uncheck the boxes for “Burn-In for deficient player”.

The “Foreign Audio Scan Pass” can theoretically scan for “forced” subtitles that will only display parts of the audio that aren’t in English/your language, but I’ve never really seen it work so I just don’t bother.

The “Selection Behavior” is similar to how audio works. I use “All tracks Matching Selected Languages”.

Under “Selected Languages” I add English, as that’s unfortunately the only language I understand.

You don’t have to add every subtitle track, or any. But I like seeing the differences between “dubtitles” and “subtitles” (subtitles tend to be more accurate, since dubs take a lot more liberty with translations).

Click “Track List”, then “Reload”. Now you’ll notice the Vobsub (DVD subtitles, Blu-ray are “PGS”) is “passthrough”, so the subtitle track will be added to my encode without being altered.

One reason not to use passthrough would be if your playback device isn’t very powerful/doesn’t have hardware to help it with these types of subs. Counter-intuitively, Vobsub and PGS are actually images. On a lot of devices that means Plex will have to transcode them into the video on the fly, which takes more processing power.

I like not burning in the subs because it leaves room for a lot more flexibility. You could even decide later to add a different subtitle track. The use case for that varies, but in my case I’ll sometimes find out a better translation has been done. If I’ve burned in the subtitles I’d have to re-encode the entire video from the original source. If it’s just a “track” I can replace it.

If you don’t care if the subtitles appear for all audio tracks and can’t imagine ever needing to do that, you can go ahead and burn-in the subs if you want. Then when you playback the video they’ll just be, well, part of the video.

Chapters is a bit self-explanatory. I don’t really find it matters much since I just click play and FF in the movie if I want to get to a certain part. If you don’t want HB to generate Chapters, uncheck the box.

Finally, under Tags you can give your movie some metadata. On some players (like VLC) this can be displayed along with the video. Since Plex will add its own metadata it looks up this isn’t super critical.

I know that seems like a lot, but you really only have to go through it once. When you find settings you like, you can save them as a “Preset”. Then when you load a new video to encode, you click your preset, and all those settings are filled in automatically.

For example, if you wanted to use ALL the settings I just described, you could import this preset (unzip it first):

DVD RF20 AC3_DTS passthrough Eng subs.zip (1.3 KB)

Which would use autocrop, auto anamorphic, defaults for the filters, RF 20 and “same as source” for the video, AC3/DTS passthrough on the audio, and passthrough for English subtitles.

If you use Handbrake to do ANYTHING other than Burn In Subs - HB makes ASS subs out of UTF-8 - and ASS subs transcode on everything I own.

I mux in srt subs AFTER HB has done it’s work with Xmedia Recode.
That way HB doesn’t get a chance to mess 'em up. I’m already normalizing the audio track(s) with XR - so it’s not a big deal to mux in some subs on that last pass before the library.

Honestly though, if your use case is watching it on your TV, then for the vast majority of folks just choosing a preset and tweaking basic settings like RF would be enough, and indistinguishable unless you really scrutinize the sources and have an eye for it.

I like the challenge of tweaking things and finding that Goldilocks level of quality/filesize/encode time. But if it’s not your bag, load a preset and be done with it.

There’s a reason a lot of the “optimal” Handbrake guides are from several years ago, the presets and codecs/software themselves have gotten better.

If you do just want to use a preset, I would say one interesting thing to try is the speed slider. Similar to how it can be hard to tell the difference between RF 20 and RF 22 (depending on the source) if you’re playing it back on a TV, it can be really hard to tell the difference between veryfast/fast and slow.

And, up to personal preference as all things encoding, if you can barely tell the difference or you can’t, why take longer for the encode?

If you’re being naughty and ripping rented DVDs or Blu-rays, you’d probably want to rip something in the highest possible quality first. But in that case just make a backup of the disc itself. Otherwise the entire game is deciding on tradeoffs between your time, how well you perceive image quality, and your hardware.

This isn’t true. If you use passthrough it doesn’t change or alter the subtitle at all.

Here’s a screenshot of the DVD from my example, that I just encoded using the exact settings I mention:

And mediainfo:

Vobsubs are literally images, so to convert them to anything else would require OCR. None of the builds I’ve tried have OCR features, so I’m puzzled how you’re converting them to anything, with handbrake.

What settings do you use where they get converted to .ass?

Further proof, I extracted the vobsub track from the mp4, then loaded it into Subtitle Edit:

Since .ass is still text-based, I genuinely don’t even see how you’d convert it automatically, with or without Handbrake unless you were using OCR of some kind (which is why Subtitle Edit automatically brought up the OCR screen when I loaded it).

Did you mean Handbrake converts text-based subtitles to .ass/substation alpha?

Because if you’re using DVDs/Blu-rays, the subtitles are going to be Vobsub/PGS, which are image formats.

Yep - every single time.

There is NO scenario wherein I will include Image based subtitles. That would be pure madness for a guy who is creating media to Direct Play.

ALL subs are painfully and meticulously converted (or gathered - at: https://subscene.com/ or simiilar) to UTF-8 - so they will Direct Play on everything in the known universe - until they go through Handbrake, get turned into ASS subs and transcode on everything I own.

We just don’t play the game that way.

I use HB to burn forced subs - that’s where HB’s sub handling ends - due to the way it mishandles text subs.

1 Like

Gotcha! That make sense.

My preferred container is MKV, so I always deal with subs after the fact. Easy enough to use MKVtoolnix to add in whatever you want later, especially so I can double-check the language coding at the same time so Plex can correctly use features such as subtitle playback with foreign audio.

I’ve been using Subtitle Edit and Tesseract to OCR Blu-ray subs, and it’s really remarkable how well it works.

I don’t always burn forced subs.

Like for a movie with only a couple of lines of foreign language I will burn those - and remove their counterparts from the full set so they won’t bump heads. If an item has a whole bunch of foreign dialog I include both forced and full subs 'cause we can only play one track at a time and there’s no bumping heads. <—and I don’t like having to hand edit all that much - if I don’t have to.

I know I’ve probably already added TMI for the average person, but I find the subject interesting and maybe it will help other folks with the same questions.

The DVD I used as an source actually makes for an interesting example because the source material is notoriously in bad condition (a lot of HK action films from John Woo’s heyday are in pretty bad condition).

The reasons that’s interesting is you can see what a non-ideal encode looks like to begin with, and then it’s clearer what Handbrake is doing when it does things like deblocks it.

Here’s a screenshot of a frame from the source (and sadly, one of the better releases) DVD.

You can see there’s lots of blockiness. In some places it’s almost comical, like if you look at Chow Yun-fat’s pants. They’re not supposed to be “checkered”,

Oof. Chow Yun-fat also has a powerful aura of pixels around his head:

Now, here’s what it would look like using the settings I mentioned above, which are basically Very Fast 576p25:

The pants aren’t as blocky, it’s kind of smoothed (or smeared) out:

It’s a similar situation with the noise around his head:

But a lot of the detail is gone, too.

Here’s one with my preferred settings for the DVD:

It kept a lot more detail and is closer to the (unfortunately bad) original. But, that also means it kept the same flaws too. My personal preference is weighted towards the source material even if it’s non-ideal. I like preserving film grain, too.

The pants have had a touch of deblocking. You can see some wrinkles that aren’t present in the Very Fast preset:

His face also still has cheekbones and a chin, but also some of the noise around the head:

These were just quick screengrabs. For a “real” or official comparison I’d make sure each frame/screenshot/crop/zoom is exactly the same, but I’m just trying to point out basic differences.

When you adjust the CQ, Tune, Profile, or Level, Handbrake makes adjustments to the parameters for the encode behind the scenes. A lot of changes. And those affect things like where to focus more bitrate, strength of deblocking/sharpening, etc.

For example, let’s say you apply the “Film” tune. That tells Handbrake to set a deblock level of “deblock=-1,-1”, which means it’s actually less aggressive with deblocking than the default.

Where if you choose “Animation” it sets “deblock=1,1” so it’s more aggressive with the deblocking. In this case animation=2D, it wouldn’t be ideal for CG.

Profile kind of controls the “tools” available in the encoder toolbox. Not every playback device can make use of every technique/algorithm/magic sauce that a codec uses, so this restricts some settings depending on the profile you choose.

It would be kind of like if you wanted to give someone a zipped file, but the system knew, based on their computer’s specs they wouldn’t be able to unzip it, so it disables that ability. Zipping the file would save space… but if they can’t use it what’s the point?

Let’s take “bframes”. Bframes can help with motion/compression by only storing data that changes between frames.

If you were using the “Placebo” preset, bframes would be set to “bframes=16” (too high for almost any human, fwiw). BUT, if you set the Profile level to “baseline”, you can’t use bframes. So no matter what your encode will be set to “bframes=0”.

Similarly, Level places a “cap” on certain features. Again, if you were using Placebo it would tell the encoder to use more “reference frames”. So it would set “ref=16”. BUT, if you set the Level to “1.0”, it would cap the number of reference frames at “ref=1”.

So when the encoder needs to perform tasks where it compares frames, it would only ever use a single other frame from the video to make its guesses. Kind of like how a survey size can affect its accuracy, but require more time/energy/effort, more references can improve quality but drastically increase encoding time.

The Level also limits things like the “VBV buffer” and “VBV maxrate”. In this case 1.0 would be the tragically low max values of “vbv-bufsize=218” and “vbv-maxrate=80”.

So you’d use things like Profile and Level to set limits for compatibility purposes. These days “High” and “4.1” seem to be the general consensus, but if you have a lot of older devices you may want to use different settings. Or, if your devices handle everything you throw at it regardless, you could just set it all to auto and let the encode guess which brackets to put you in.

The speed preset, you guessed it, also enables/disables specific features and sets certain limits in Handbrake with the hope of controlling how long it will take to encode a file.

Let’s take “submotion estimation” as an example. That’s kind of what techniques and how much effort the encoder will go to in order to preserve detail/have a higher quality image/smaller filesizes when dealing with motion scenes in your video. Placebo adjusts this setting (and many others) so that they’re very, very high, so in this case it would set “subme=10”, the max value for that setting, and it’s expontentially slower than even 8 or 9.

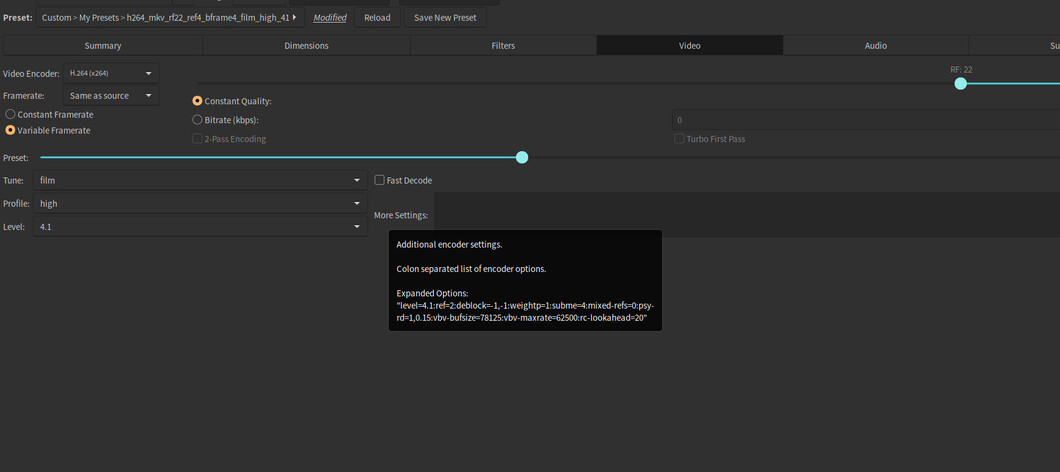
To get really into the weeds, you can see the types of settings being changed whenever you enable or disable an option by hovering your mouse in the “More settings” area of the Video tab.

That can also help tell you if Handbrake is ignoring an “advanced setting” you manually type into the “More Settings” area, such as if you’re asking it to do 16 reference frames but the Level you’ve chosen uses just 1 reference frame.

And further down the rabbit hole you can read about all the various options a codec has, like h264:

Whew! For me, in my completely subjective opinion and use-case, I’ve settled on these settings in my preset:

h264_mkv_rf22_ref4_bframe4_film_high_41.zip (1.6 KB)

But if you’re not OCD about it or curious like I am, and you’d rather spend more time watching movies than encoding them (YOUR LOSS!), “Fast 1080p30” provides a really good template that you can make tweaks to, such as changing the framerate to “Same as source” or selecting different audio tracks and codecs.

Or maybe “HQ 1080p30 Surround” and changing the framerate to “Same as Source” and moving the Preset slider to “Fast” or “Faster”.

In my examples the “Very Fast 576p25” preset took 8 minutes to encode (yay Ryzen 3700x!) with a filesize of 1.1gb, my custom DVD preset took about 30 minutes and resulted in a filesize of 1.7gb (with a single AAC audio track), and the original DVD video is 7.2gb.

Placebo would be clocking in at 90 minutes, and with a much higher quality source at a higher resolution like a Blu-ray you’ll grow old waiting for an encode to finish (remember, all things being exponential when you adjust for quality/effort/resolution).

Also to clarify, using the 1080p preset won’t make your DVD 1080p or try to “upscale” it, it just sets a maximum resolution. So if you use the preset on a DVD (480p/576p) source or 720p source, it’ll just make its best guess for cropping and resolution to maintain a picture as close to the original aspect ratio as possible.

Compare that to just throwing on the “Fast 1080p30” preset with zero changes, and you get an encode that took 13 minutes, resulted in a filesize of 1.4gb (pretty much what you’d expect between “very fast” and all my custom settings), and doesn’t look that different, especially if you consider the time and energy I took to read through a lot of pages/posts on Handbrake:

So you might want to just use that instead and get on with your life instead.

To my eye, I prefer my preset, but other folks might hate it. So that’s the basics of “best” or “optimal”, the personal tradeoffs between encoding speed, filesize, and quality that you want. But beyond the presets you quickly hit diminishing returns all the way down.

tl;dr after ALL that, essentially I’m saying just slap on Fast 1080p30 and be done with it unless you want to invest more time/energy into tweaking things to your exact preferences, because there’s no real one-size-fits-all answer.

Okay, I’m done, I swear! No more updates.

Thanks for the detailed suggestions and explanations, I read the whole post, not just the TL;DR!

My primary aim is to digitise my DVD collection (roughly 300 DVDs) and they’ll be viewed mainly through Plex.
I have a 55 inch 4k TV so do want the quality to be as close to the original as possible, however I’d like the file sizes to be around 750MB.

I’m happy to not rip the subtitles and alternate audio tracks, keeping only the forced subtitles that are automatically displayed during DVD playback for English language films where a character may speak in a different language momentarily.

In regards to file format, I lean towards MP4, however that is just because that’s what I was used to back in the day when I first started ripping.

For file compatibility, as I mentioned they’ll be played via Plex apps on the TV and a variety of iOS devices, so I’m happy with any format supported by Plex.

Unfortunately my hardware takes an age to encode (mid-2012 MacBook Pro), but I would like to encode quickly.
Using the very fast 576p25 for a 90 min film took around an hour to encode, too long but not sure what I can do with the hardware I’m working with.