The following article is created due to my experience struggling to migrate a PLEX server from Windows 7 to Windows 10. I am boing to take you through a few additional steps that are not in the PLEX article I will be posting a link too.
Microsoft announced their end of life end of support for their Windows 7 platform. If you are like myself, I held out till the very last minute and frankly I was not going to migrate to Windows 10 as with my experience older hardware (like mine) have ISP speed issues on Windows 10. BTW that seems to a common issue most users have been struggling with as well. But then I started thinking what if there is a security vulnerability that does not get patched and leaves all my data unprotected (now paranoia is taking over) and this is where it all began.
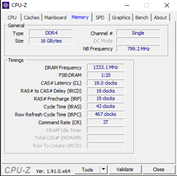
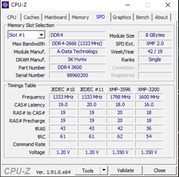
Okay if I am going to do all of this lets look at a faster drive and so I settled on a new Samsung 860 EVO 2.5in SATA III SSD, 2TB and then I looked at the various memory modules available and the 3600Mhz where priced almost the same as the 2400Mhz chips. I settled Spectrix D60G RGB 16GB DDR4-3600 C18 Dual Channel RGB RAM Kit (2x 8GB), Tungsten Grey (I mean for an extra $10-$15 difference why not).
One of the reasons I upgraded my memory was it only had 8GB and when running Plex with a few clients we were betting very close to consuming all 8GB of memory and who doesn’t like a machine that is a little more responsive.
Step 1:
Installed the new memory modules then loaded Windows 10 Pro on my new SSD.
Set the power options in Control Panel to my desire.
Step 2:
Next, I downloaded all the applications I needed/use on my Plex server:
- Firefox 64bit
- Notepad ++
- VLC 64bit
- Adobe Flash Player
- Antivirus and Firewall
- Plex Media Server
- Python 2.7.17 - https://www.python.org/downloads/release/python-2717/
- NSSM (The Non-Sucking Service Manager) - https://nssm.cc/download
- Tuatulli for PLEX
- Webtools
These are the most common ones I use. Install Firefox first then I customize the browser to always open google and I add the New Tab Homepage addon (https://addons.mozilla.org/en-CA/firefox/addon/new-tab-homepage/) This will always make subsequent tabs google as well.
Next, I install Notepad ++, VLC, Adobe Flash Player, Antivirus and Firewall
Install Plex Media server (Here are additional steps not listed in PLEX writeup):
Important: BEFORE you start your file backup and/or migration
With my personal experience when I started copying my files I ran into an issue where windows would not copy certain files with extreme long names. Here is how I got around that issue.
Step 3:
- On your Windows 7 machine go to regedit , this link will provide info on how to access (https://www.computerhope.com/issues/ch001348.htm)
The following is an important Note: BE VERY CAREFUL when in register you can break your OS in here and cause lots of damage.*
-
Next select HKEY_LOCAL_MACHINE

-
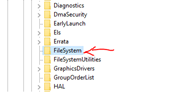
Expand the selection and select System , ControlSet001 (or which ever is displayed on your pc)

-
Expand Control and scroll down till you find FileSystem

-
Once the file system is selected in Windows 7 you won’t see an entry for LongPathsEnabled so you will need to create one.
To create a new entry, you will need to follow these steps:
i. Right click within the white space (anywhere) where all the registry entries are located and select new>
ii. Roll over to DWORD (32-bit) Value and click to add a new entry.

iii. Now in the “New Value #1” add the following text LongPathsEnabled (exactly as I have it here).
![]()
iv. Next we need to set the value string, to do so double click the new entry. A new window opens and under Value data: change the value from 0 to 1 and click OK to save your new entry.

v. Reboot your Windows 7 machine. Now make the same changes on your Windows 10 machine.
Also look at the following links:
a. https://www.ghacks.net/2016/05/27/microsoft-260-long-path-limit/
b. https://helpdeskgeek.com/how-to/how-to-fix-filename-is-too-long-issue-in-windows/
c. Windows Group Policy: https://social.technet.microsoft.com/Forums/ie/en-US/535ec156-de98-43ed-8c46-10a9773c8b12/gpo-enable-win32-long-paths?forum=winserverGP
Step 4:
PLEX Migration doc: (https://support.plex.tv/articles/201370363-move-an-install-to-another-system/?_ga=2.96084572.1729204162.1578280137-428946867.1578280137)
-
On your old Windows 7 machine copy the Plex Media Server (PMS) directory from C:\Users(your_user_name)\AppData\Local\Plex Media Server 2he path might differ from your user and/or installation directory. Copy the entire Plex Media Server folder to the backup directory or drive of your choice.
Note: The file size of the folder will depend on the amount of content you have. -
Backup your Plex Media Server registry from the following location:
HKEY_CURRENT_USER then select Software and expand the folder and select Plex, Inc.


-
Expand the Plex, Inc. folder and select the Plex Media Server subfolder.

-
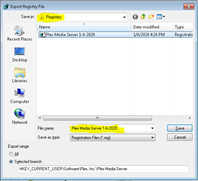
The following step is important, we only want to export the registry for this folder Plex Media Server right click the Plex Media Server folder and select export.

-
Save the registry in the backup location of your choice, create a folder and name it so you know it’s a registry, so it’s not copied to your Plex Server PMS folder on the new server.
Step 5: Complete the following before copying your backup… Very Important!!!
-
Install Plex Media Server software on the new Windows 10 machine.
-
Start/launch the Plex Media Server on the new Windows 10 machine now that your old data is backed up.
-
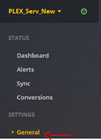
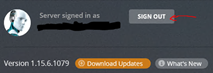
Under Settings > Server > General in Plex Web App, sign out of the server (if you’re signed in) and then sign back in. This will update connection information for your apps to use and will also ensure you have a valid certificate to make use of secure connections.
-
Copy your entire PMS directory you backed up in step 4 to your destination folder on the new Windows 10 server. C:\Users(your_user_name)\AppData\Local\Plex Media Server the path might differ from your user and/or installation directory. This might take some time depending on the size of your backed-up data.
Only proceed to the next step when the PMS folder have been copied. -
Restore your registry backup on new Windows 10 machine to Plex Media Server registry from the following location: HKEY_CURRENT_USER then select Software and expand the folder and select Plex, Inc.
-
Expand the Plex, Inc. folder and select the Plex Media Server subfolder.
-
In my Plex Media Server Registry I deleted all the files in this location because I have had issues with duplicate servers that were created every time, I imported my PMS folder. So, highlight every file in this location and delete. You will receive an error that 1 file can’t be deleted that’s okay. In the next step we will replace all these files with our reg backup.
Example of files below:

-
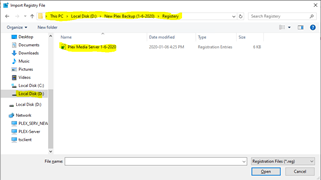
With the Plex Media Server folder highlighted select File and Import… from the menu
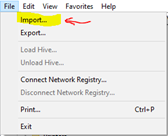
-
From the Import Registry File option dialog window select your registry file location and import the data
Step 6: Launching your Plex Media server
-
Now start your Plex media server. On fist glance you will see Plex Media Server Updating library, please wait… notification on first start up.

-
Next you will see all your libraries are in place, folders, content etc. and everything works but there are 2 servers with the same name Indirect and Nearby (inactive and active).

-
If you sign out and try to claim the server it will just sign back in and display the same above listed 2 servers.


I rebooted my new windows 10 server to see if that would make a difference and that did not help me in any way. This is an annoyance I want to be fixed as I am that precise, to someone else it might not be a big deal but to me I need to have this perfect.
- Here is what I found that seemed to work, shutdown the Plex services and exit the app. Launch Plex web app again and go to Settings and select the 2nd PLEX server as depicted below and select remove server.

This step can only be performed when the server displays unavailable. If it is in nearby status you can’t remove the server. Great that works for now however I found that when the app is shutdown, or the server pc rebooted it will auto detect the inactive server and you will see it show up again. This could be a bug in the Plex software.
Step 7: Setting Plex up as a windows service
Okay if you are like me then you want to automate your Plex server so when a reboot is performed due to win updates or power failure you want Plex to start when windows starts.
Well this is very easy to do with the following steps:
- When you downloaded all the software you added Python 2.17 and NSSM (The Non-Sucking Service Manager)
- Install Python 2.7.17 in your C:\Python27
- Extract NSSM and copy the nssm directory to C:\nssm
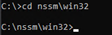
- Next we are going to open a command prompt and run as administrator, to do this in the search type cmd and on the Command Prompt right click and run as Administrator
a. Once the cmd window opens type *cd *

b. Navigate to the nssm directory C:\ nssm\win32
c. Install Plex as a service: Command: nssm install Plex

d. The NSSM service installer window opens
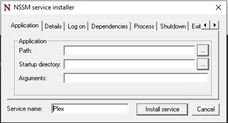
i. On the Application tab, enter:
For Windows 32-bit:
Path: C:\Program Files (x86)\Plex\Plex Media Server\Plex Media Server.exe
Startup Directory: C:\Program Files (x86)\Plex\Plex Media Server
ii. On the Details tab, enter:
Display Name: Plex Media Server (or whatever you would like the service to display as)
Startup Type: Automatic
iii. On the Logon tab, enter:
Choose “This account” radio button.
If that does not work, then select Local System account instead
Enter the username under which Plex should run. If you are in a domain, enter your username as: DOMAIN\Username. If you are on a standalone workstation (most likely) then enter your username as: .\Username.
Enter your password.
vi. In the Service Name box, enter the desired service name. I used “PMS” for a short name with the long name as the display name.
v. Click on Install Service.
vi. If you don’t get any errors, then you should now be able to star the Plex Media Server like a normal service.
vii. Under services scroll down till you see your Plex service name in my case it’s Plex

Now every time your PC/server reboots your Plex app will auto start and you don’t have to remote into your Plex server and start automatically.
Final word:
The Plex support is non-existent and being a Plex Pass user I can figure out most things by myself and find the relevant info when I need to but this experience struggling through migration with my Plex server being off line for a total of 4 days was not a pleasant experience.
- I would like to see that Plex add support and ticketing system for advanced issues like in my case. I am sure that their customer base warrants some kind of support.
- Their documentations is not very complete and the hassle to find what you are looking for does not make for a very nice experience.
On the pc upgrade
I need to just add that the memory upgrade was necessary for me as I stream content from Edmonton to Calgary, Quebec and South Africa that does not include the 5 devices we might use for streaming and at any given time I have between 2 and 4 devices streaming at the same time.
I have to say before the upgrade folks in SA had mixed results when it comes to streaming from Plex server after the upgrade a much more positive experience. This is not the best motherboard or fastest CPU very average when it comes to hardware:
CPU & Motherboard:


Memory:

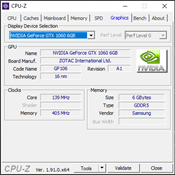
Graphic Cards:

I would like to see users with Plex Pass have a means of connecting with support when there are issues that require more advanced insight or direction. I still have an issue with this Phantom server that keeps showing up after a reboot on the Plex server software, but I am waiting on a response from a Plex tech.
As you can see there are many hurdles to overcome when migrating from one windows platform to the next. I hope this have been informative for you and make your migrations easier moving forward.
One application I have not touched on is Tautulli for Plex, I use it to notify my users of new content that have been added by means of a Tautulli created newsletter that gets emailed out. Love this application as it auto generates a news letter on a specific day(s) and time, then sends the generated letter.
here is the link for those who are interested: https://dailysysadmin.com/KB/Article/2650/installing-and-configuring-tautulli-for-plex-media-server-on-windows/
https://tautulli.com/#preview