Passthrough for video, just like you have it.
6 Channel - for AppleTV via a 5.1 Home Theater
2 Channel - for AppleTV via stereo TVs & iOS devices
Here’s the question: For the 2 channel audio track, do you prefer (a) Subler to downmix dts 5.1 to AAC 2.0 or (b) do you prefer Subler to transcode dts 2.0 to AAC 2.0?
Since this is unknown, I propose you do both, at least for the first movie. See how things sound, then delete the unwanted track(s) when you finalize things.
So…
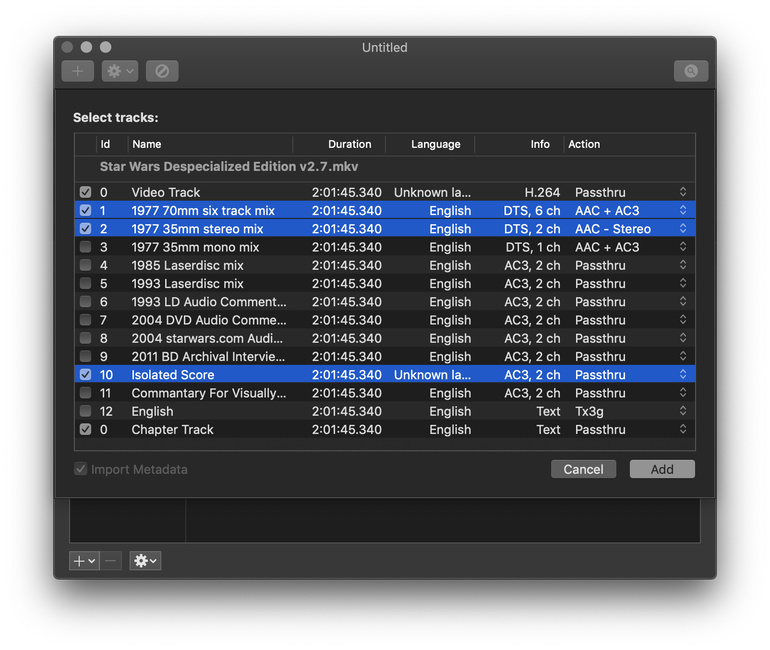
For DTS 6 ch, choose AAC + AC3
For DTS 2 ch, choose AAC - Stereo
You’ll end up with one AC3 audio track and two AAC tracks. Listen to both AAC audio tracks on appropriate devices, see which one sounds best, then delete the other AAC track.
2 Channel - Isolated Score for All Devices
This is up to you. Definitely passthrough the AC3 track for your home theater. If desired, you can add an AAC track for compatibility with older devices that don’t support AC3.
See notes below with respect to AAC audio and track order.
Advanced Tab Settings
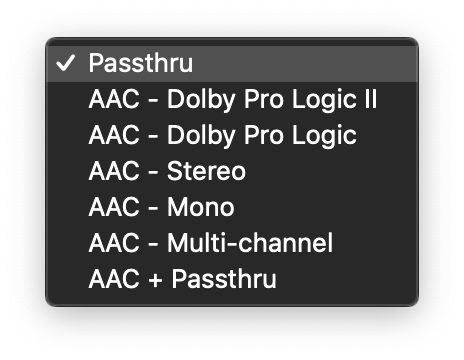
Convert: Go ahead and check the box for “AC-3 audio to AAC” and “Keep AC-3.” I think this just enables options on the pull down menus when importing audio tracks, so you can always override it. You can always uncheck it later if you don’t need it. You can also just delete the audio track from the file if it is not needed.
Downmix audio to: Stereo or Dolby Pro Logic II (it doesn’t matter).
Unless you have a specific need for Dolby Pro Logic II, then just choose stereo. Note that if you play a Dolby Pro Logic II audio track on a device that doesn’t support it, you get stereo, so in truth, it really doesn’t matter. DPLII is a way to deliver 5.1 sound over a 2.0 audio stream. Details at Wikipedia and Dolby.
Bitrate: Choose 320kbps instead of default 160kbps. 320kbps is the max rate supported by an AppleTV (and Subler) for AAC audio and will give you the best audio quality. I do not know if you can hear the difference on an iPhone, but you’ll definitely hear the difference on a decent home theater setup.
AAC Audio Note
AAC audio is suggested for compatibility with older devices that do not support AC3/dts/etc audio formats. Including AAC audio is the safe thing to do.
However, most current devices support AC3 audio - iPhone 6S (2015) and later, iPad Air 2 (2014) and later, AppleTV 1st Gen (2007), and every TV in the US with a digital TV tuner (AC3 audio is part of the ATSC standard for over the air digital TV). Also every Amazon FireTV device (2014+) and my Nexus 5X Andoid phone from 2015.
What this implies is that you could possibly forgo AAC audio altogether if all of your clients support AC3 audio.
Personally, I always include an AAC audio track. It does not take up much space and provides a fallback in case somebody whips out a device that cannot play AC3. Just wanted to make you aware of the option.
Definitely test with current clients before deciding to leave out the AAC audio.
Audio Tip: Audio Track Order
When you first import the audio/video tracks from the MKV, but before you perform a save for the first time, you can re-order the tracks (The ID column will have “na” instead of “1,” “2,” etc).
Suggest you put the AC3 audio track before (higher) than the AAC audio track. Also, in the Enabled column, check the box for the AC3 audio, but not the AAC audio (determines default, not whether or not track will actually play).
Reason: Many Plex clients ignore the settings for default audio and choose the first track they find with preferred audio language. So, to make sure your home theater auto-selects the AC3 5.1 audio track, put it first, followed by the AAC audio track. This avoids you having to manually select the 5.1 audio every time you play a movie in your home theater.
Using Star Wars as an example, you would have:
1 Video
2 AC3 5.1 version of "1977 70mm six track mix"
3 AAC 2.0 version of above track
4 AC3 2.0 passthru of "Isolated Score"
5 AAC 2.0 version of "Isolated Score"
6 Subtitles
7 Chapters
Subler Tip for iTunes: Organize Alternate Groups & Fix Audio Fallbacks
This does not matter to Plex. It helps if you want to import the movie into iTunes. After you have the tracks arranged as desired, from the Action pull down, select “Organize Alternate Groups” and then “Fix Audio Fallbacks.” This helps iTunes tell the difference between primary audio tracks, commentary tracks, etc. It also tells iTunes to try the AC3 audio first, then fallback to AAC if AC3 won’t play on the client. You can see/modify the results by highlighting an audio track then clicking on “Sound Settings.”
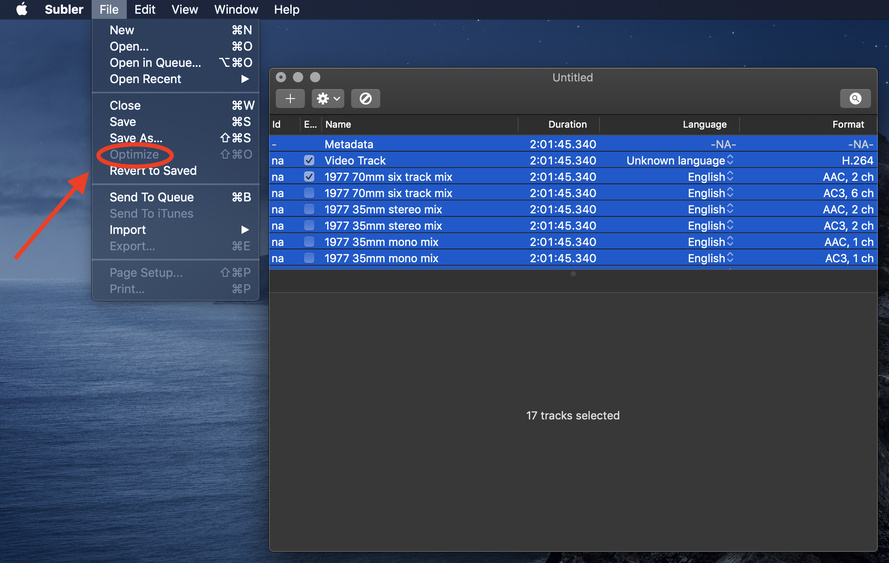
Subler Tip: Optimize
Be sure and Optimize the file. Do this as the last thing before you add the file to your Plex library (i.e. after adding audio/video tracks, metadata, etc). This re-organizes some bits to optimize streaming (See FAQ or Google “MP4 Fast Start”).
FYI XMedia Recode: If you have access to a Windows PC, take a look at XMedia Recode. It would probably make remuxing from MKV to MP4/M4V easier than using Subler. Remuxing is a basic part of XMedia Recode’s capability. Subler was really designed for other things, so using it for remuxing can be difficult at times (as you’ve found out). XMedia Recode’s UI takes some getting used to. But after the first couple of runs, you’ll find it easy to copy or convert tracks as desired. After you remux/convert as needed, you can then pull the file into Subler to add metadata and such.
Hope this answers your questions and is not too confusing. I didn’t mean to write War & Peace. I just started typing and this is the result. 
Cheers.


 , who cares? That’s how you learn. Just toss it in the trash and make another one.