I am trying to rip some of my BR collection to display them with plex directly.
I first used make mkv.
Now I have files from 10 to 25 Gb.
I started to try handbrake with a file of 15Gb
I ended up with a file of 9Gb when I expected more something around 3 or 4Gb.
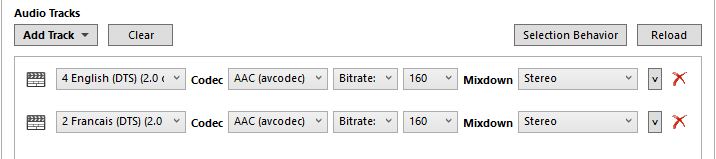
Can someone tell me which setting I did wrong. I show you here some captures of my actual settings:
The reason I use mkv and not mp4 is I want to include subtitles inside the file.
I try to extract them to make srt but somehow it seemed to long and complicate for me to do that but this is another story…
This is a follow up on another topic I started a while ago. Best way to archive my blu rays for plex reading
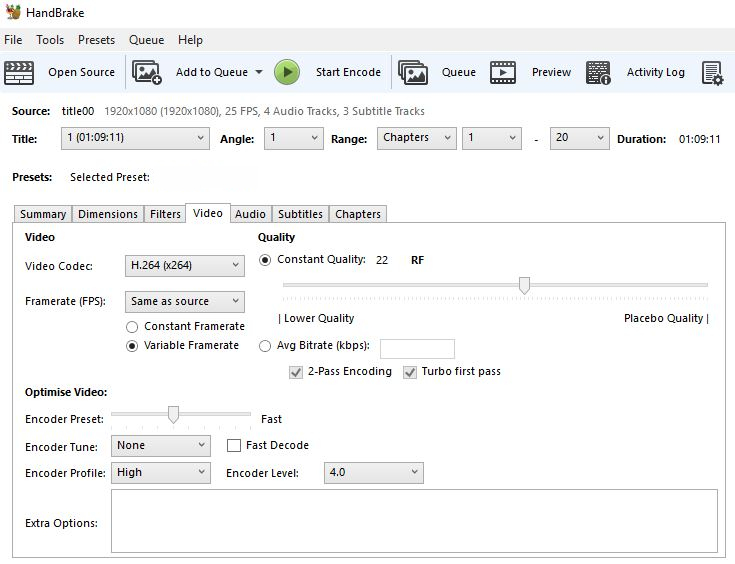
First of all, the size depends on your quality setting in the video pane. “20” is for blue ray a rather high quality setting, many people seem to be happy with “22.” Larger number means lower quality, and consequently smaller file.
Secondly, DTS sound streams are rather large. 0.5 GByte per language are a reasonable estimate. Do you actually need all the languages at that quality?
Plus the Speed setting needs to be turned “slower” if you want acceptable quality with lower bandwidth.
But yeah, the audio format plays a role. Blu-ray have larger audio streams. So try to reduce those “bigger” DTS formats to a DTS core stream.
Or throw away surround sound and go with AAC stereo.
Thanks both for your answers.
eckarth so for the quality you think I can go with 22 ? Is AAC the quality recommended for the languages that I need with lower quality ?
Otto when you say to change the sound to AAC how do I do that. In the codec it says AAC… if I stay with DTS core, I don’t see also where to change that setting.
The button which says ‘Auto-Passthrough’, change it to ‘AAC (avcodec)’
Same button. On those audio tracks, which say ‘DTS-HD’, change it to ‘DTS passthrough’
Another way to save a few megabytes, is to switch the ‘Encoder Profile’ from ‘Main’ to ‘High’
(on the ‘Video’ tab)
If you are processing Animation (hand-drawn [Looney Tunes] or cel-shaded [Rick & Morty], but not regular CGI-generated “3D-looking” [Avatar]) content, you can also set the ‘Encoder Level’ to a higher (5.x) value.
However, this comes at a price: older clients often don’t support anything above level 4.0. So these files will then trigger transcoding when played on older clients.
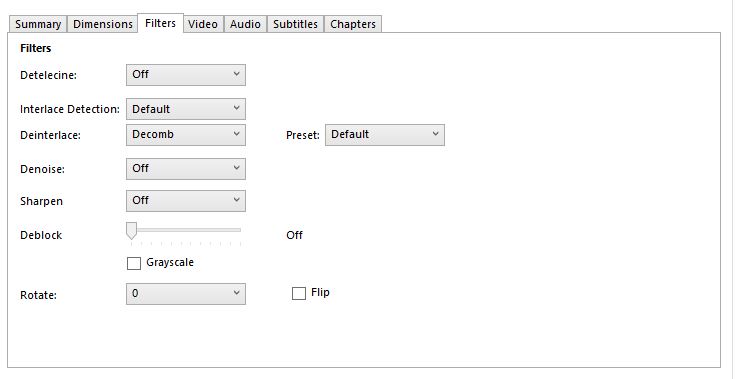
Also, if you are working with a poor quality transfer or old b&w film with a lot of noise or grain, try the Denoise filter (Filters tab). It can help clean up the video and you’ll also have a smaller output file.
Use the NLMeans & try Light with Tune = none. If the movie has an exceptional amount of noise/grain then try medium.
Encode a chapter or two both with and without the filter enabled, then compare file size and video quality.
Watch out for setting the filter too strong. It can remove too much information and the resulting video may appear too “soft” for your liking.
I’m not sure that extreme is necessary. Just the reduction in bit rate from DTS-HD to (for example) a 512kbps 5.1 AAC track would be huge, and there would still be usable surround in the future if he ever expands his system to more speakers. (That’s working under the assumption he doesn’t have them now)
Looking at the list, there are two DTS-HD MA’s and two DTS 2.0’s. Change them to two 512 kbps AAC 5.1’s and two 160 kbps AAC 2.0’s and that’s a ton of savings, and unless you have awesome speakers, it would be reasonably transparent. (That’s assuming that handbrake’s new AAC encoder really is improved, but I haven’t tested it yet)
This comes from personal experience: 8 years ago I did pro-logic AAC stereo on older Blu-Rays to save a little space, and I’m now correcting them all while saying “what was I thinking?”
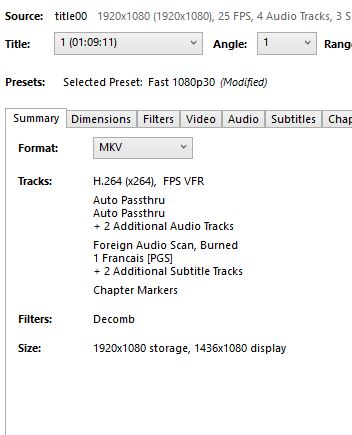
Here are the modified settings, does it seem better now ? I will try and tell you how many Gb is the ending file.
I thought at first that one audio track was a commentary but it seems the same audio track maybe I could get rid of 2 audio at of 4 if that is the case what do you think ?
OK about those DTS-HD tracks, but:
you cannot “passthrough” a DTS track as AC3. Set this to AAC.
There are often stereo versions of the regular audio on discs for compatibility reasons.
If those audio tracks don’t hold a commentary, you can get rid of them indeed.
Your ‘Encoder preset’ is still on ‘Fast’. Make it slower, or you will get a bigger file.
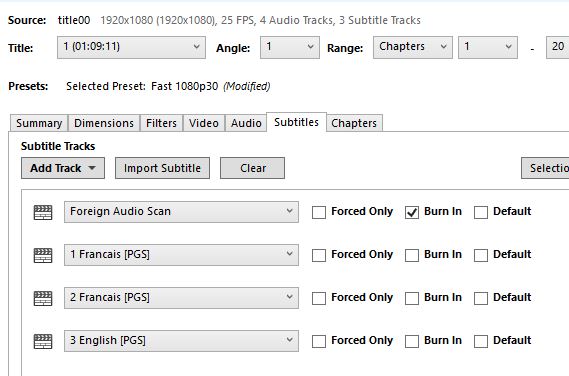
btw. you can disable the ‘foreign audio scan’ subtitle track. I haven’t seen a single DVD or Bluray where this produced something sensible.
Are the dts audio tracks the core part of the dts-HD tracks?
Did they look like this in MakeMKV (except 2.0 vs mono):
If so, then you can drop the dts-HD audio tracks to save space.
If a blu-ray has a dts-HD audio track, then it also has the same audio in standard dts format (also referred to as “dts core”). Unless you have a very good audio system it is difficult to hear the difference, especially for 2.0 audio.
Also, as @OttoKerner mentions, you can convert to AAC to save even more space.
And definitely change the Encoder Preset from Fast to something with higher compression (Medium / Slow / Slower / Very Slow). Encoding time will increase, but so will compression efficiency, so the output file will be smaller. There is no “correct” setting, just how long you are willing to wait for Handbrake to process things.
FYI, you’ll see the same thing with TrueHD audio. A Blu-ray that has TrueHD audio will also have the same audio in AC3 format. If your audio system does not support TrueHD, then just rip the AC3 audio.
Thanks both of you for your answers.
I had an error during the process and ended up with a 65Mb file ^^
So I guess have to try it again.
I have put now the encoder preset on medium and kept only the AAC
I have now a file that is 3,7Gb On the screen it seems okay, bu I will take Otto’s advice and try to display it on a big screen to see the difference.
Do you know if there is a software that let you display the two files to compare them (don’t know if such a software exists)…
Anyway, I wanted to continue with another file but was not sure which audio to select.
I have a homecinema with 5.1 speakers so I wanted to keep a good sound but when I looked at all the tracks I was confused …
I thought of keeping the DTS 5.1 and get rid of the DTS HD but not sure which code I have to use ?
and for commentaries what do you recommend ? I know on that one there are 2 diffrent commentaries tracks in english also so these don’t really need to be 5.1…
One last question: if I want to keep a few extras, should I lower the video and sound quality ? Do yourself keep some extras like documentaries about the film ?
I recommend you to keep the DTS ‘core’ component from the main movie audio.
If you have a DTS-HD audio track, change the drop-down selector in Handbrake to ‘DTS passthrough’ (and not ‘DTS-HD passthrough’). This will only keep the DTS ‘core’ (which is present in all DTS “dialects”.
I usually avoid transcoding audio (except from PCM to Flac), because all other transcoding types are a “lossy” affair and will reduce the fidelity of the audio too much for my taste. Movie sound is usually bad enough (unless you invest in the storage to keep the DTS-HD MA track), so IMHO further tampering with it isn’t doing any good.
Good audio adds to the immersion into a movie, a fact ppl tend to overlook.
Commentary tracks are rarely more than stereo, so you could just keep them in their original format. If that is still too much storage for your taste, transcode them to AAC with 192 or 224 kbps.
Extras I only keep for movies I personally care about.
And even then I reduce them to 720p, RF 20 to save some space.
I do keep their original audio format, though. (I am that snobbish. )
Ok so I keep the DTS HD then and not the 5.1 and seled DTS HD passthrough
I do keep their original audio format, though. (I am that snobbish.
ah ah funny
what I have realized about extras is that I like to know they are there but in fact I really rarely whatch extras…
although I rememeber a great doc about the shooting of Shining in the dvd of Stanley Kubrick a while ago so sometimes you can really find great stuff there ! could start a topic about the best extras
Last night was trying to do a test rip when the power went off at the middle of the night !! argh
Guess will have to wait again to see a result…
One must be very patient…
Also I am a bit afraid of deleting original 25Gb file since I don’t know if in the future this will be considered a little space, but right now I guess I have no choice this is taking way too much space on my disks…
It will not hurt to leave it enabled, but you can disable it for most things.
It is only needed for interlaced video, which is usually found on recordings of pre-HD TV shows and the occasional old movie disc.
Analyze the MakeMKV output file with MediaInfo. In the video section of the report, if you see Scan type: Progressive then you can disable the filter. If it says Scan type: Interlaced, then leave it enabled.
Thanks again to both of you, I followed your advice.
I tried it with a 28Gb file that ended up 4.1Gb.
Now I think I have to watch it all to see how it feels…
Can someone explain me what the Foreign Audio Scan means in the subtitles section ? And why sometimes I have like 4 subtitles which seem to be the same ?


 )
)