Edit - 11-Dec-24 - Added a paragraph on how to update node.js just in case for those who run the script and the node doesn’t update for them.
Edit - 20-Mar-24 - Updating node.js v16 to V20
Edit - 17-Jan-24 - Updating the Questions section for the script
Edit - 5-Dec-23 - Updating the Guide to include a link to a more recent guide I wrote that uses the script from @odinb1 to help speed up the install process. Here is the link to that post. Install Plexamp on Raspberry Pi - Easy Setup Guide with Desktop - No SSH
I have also included the whole text below for ease of use/finding the info. I left the old original guide in tact way at the end of this updated version for historical purposes and/or for those who may need to use Plexamp 4.5.3 and/or older hardware. Or for those who just want to go down memory lane
________________
Intro
Install Plexamp on Raspbery Pi With a Mouse and Keyboard - Desktop - Easy Setup Guide
Intro
A guide for those who want to make their very own Plexamp music streamer out of a Raspberry Pi and fill your soul with that sweet Plexamp music goodness. For those who are more comfortable in a desktop environment, and don’t mind running Plexamp with a head. This guide is geared towards music fanatics who want the best out of their Plex music collection but are beginners or have little to no experience with Raspberry Pi OS, Linux or command lines. By the end of this guide you will have a fully functioning Raspberry Pi with Plexamp running on it.
VERY IMPORTANT: Headless Plexamp Pi is configured to User=Pi. Keep that in mind as you progress. Also before you can install Plexamp you first need to install Raspberry Pi OS. The easiest method to install Raspberry Pi OS is to use the official installer. The official installer can be found on the official Raspberry Pi webpage. If you haven’t installed that yet please go do that first and then come back to this guide. Note: Might be a good idea when installing Raspberry Pi OS to use a unique user name. If you try to use Pi as the user name, you might get an error from the installer saying that this name should not be used or can’t be used, you might not.
I am going to assume you have a working compatible Raspberry Pi with Raspberry Pi OS 64Bit installed and you are staring at a screen that looks something like the image below for Debian Bookworm:

Or something like this for Debian Bullseye
Plexamp works on both Bullseye and Bookworm.
Background Info
Node V20
For Plexamp 4.10.0 and up Node V20 is needed by Plexamp.
So depending on what OS you are using it is a good idea to start with a quick check to see what node.js is installed if any. And if this is your first time using a terminal this is also a good way to ease into it with a simple command.
Open up a terminal and check to see what version if any are installed. The terminal app icon is in the top desktop menu bar ![]() . Open the terminal program and type in the following code exactly as you see it below:
. Open the terminal program and type in the following code exactly as you see it below:
node -v
You should get “not found” on a fresh install. But you may not. It depends. I got nothing because this was a fresh install.
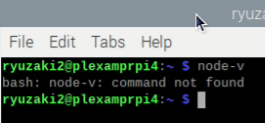
This is a good sign that node.js has not been installed. So we are starting from scratch on this. You can install node.js 20 and Plexamp by using a bash script that was written and is maintained by a Plex community member.
Using a Script to Install
Forum member @odinb1 has written a script to automate the process of installing Headless Plexamp (many thanks).
The script is for use on a headless system. This means a Raspberry Pi without a keyboard, mouse and monitor. But lucky for us, the script can still be used on a Raspberry Pi with a desktop environment, mouse and keyboard setup. The script speeds up the process and takes care of everything for you. The difference between the headless and desktop environment is that the headless version you have to SSH into the Pi from another computer to set it up. Some might find the SSH part a bit intimidating or confusing and a major hurdle and stop there. This guide you don’t need to SSH into the pi. Different approach same end result.
For more details on the script. The script and instructions can be found here: Bash Plexamp Installer. Go check that out and read through the github to have an idea.
Using The Script
First thing in the terminal we need to change to root. To do this we input the following line of code.
sudo -i

Now that we are root we can run the script. Just copy and paste the line of code below into the terminal, hit enter and the script will do its thing:
bash <(wget -qO- https://raw.githubusercontent.com/odinb/bash-plexamp-installer/main/install_Plexamp_pi.sh)
And when its loaded up, it should look like this in the terminal.

The script is a question and answer and is pretty straightforward. Just follow along with each prompt and answer the questions. But for those who are unsure or have never done this before see below:
Script Questions:
-
Do you want to change the hostname?
What this is asking you is what do you want the device to be named so you can find it on your network. The default is raspberrypi. -
By default, installation will progress as user Pi, unless you choose to create/change to a different user. Do you want to create or change to a new or different user for the install (currently Pi)?
If you want to change names type Y and hit enter otherwise type N and hit enter. -
Do you want to change timezone? Just above this question the system will show you the current settings if correct type N and then hit enter.
-
Do you want to install and set vim as your default editor?
If you don’t know what vim is then select N. -
Do you want to disable IPv6?
If you don’t know what that means then select N. -
Do you want to configure your hifiberry hat (or clone)?
This question is to setup any audio hats you installed on your pi. If you don’t have a hat than say No. In my case I have a Digi+v1.0. Excellent and cheap hat. So I am selecting y.
If you say yes here you will be given a list of hat models to choose from, pick the one that is yours and hit enter. Mine is 5. The script will then say continue with 9 or choose again. Type 9 then hit enter. -
Do you want to configure your allo HAT (or clone)? Same as above. If you have allo Yes if you don’t No.
-
Do you want to configure your JustBoom HAT (or clone)? If you have a JustBoom hat then select yes if not then n.
-
Do you want to configure your audiophonics Hat (or clone)? Sames as above. If you have audiophonics Yes if yo don’t No.
-
Do you want to configure HDMI as default audio-output?
The script will give you some warnings here. Read them and follow instructions. If you don’t have a hat you should say yes to this as the 3.5mm output is pretty rough to listen to. (side note: With a hdmi audio extractor you can convert the hdmi signal to rca audio or optical and feed your amp/dac that way.). -
Do you want to prep for upgrade to new version of Plexamp-Linux-headless-v4.x.x, only run if you are upgrading.
This question is for when you want to update/upgrade Plexamp. You can select No here because this is a fresh install. If you are updating/upgrading then select Y. -
Do you want to install/upgrade and configure Node.v20? Needed if you are upgrading from older versions of Plexamp that are older than 4.9.x. We checked for node.js at the beginning of this guide. If your version is a smaller number than 4.9.x or node.js was not installed at all, then the answer here is yes. Type Y and hit enter. The script is going to do alot of things here and you will see text moving down the page. Don’t touch anything just let it do its thing till the next question pops up.
-
Do you want to install and configure? Or it might say Do you want to install and configure Plexamp-Linux-headless-v4.x.x?
This is asking if you want to install Plexamp and you should say Yes here. Unless your having second thoughts about listening to music or using the worlds greatest music app?
-
Do you want to run full OS update?
If you just installed the OS there shouldn’t be any updates, or very few. Say, Yes to play it safe, it shouldn’t take that long if you are coming from a fresh install. Might be several minutes if you didn’t update during the Raspberry Pi OS installation process.
A bunch of code will go by, once it stops, you will see a message in text that says:
–= End of Post-Plexamp-script, please reboot for all changes to take effect==–.
Keep in mind you are still in root which means you can reboot the system by simply typing reboot in the terminal and hitting enter:

or you can go to the raspberry pi icon in the top left and then select logout then select reboot. Once you are back at the desktop, some minor configuration is needed. Open the terminal again.![]()
In a fresh terminal you should see your username@hostname.

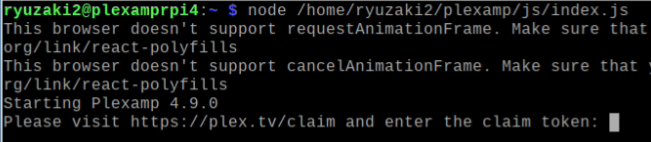
Plexamp should be installed now but it is not signed in, not running and it hasn’t been claimed yet. So Now you need to get Plexamp running as a service and claimed. We can get it running by typing in the following line of code:
node /home/USERNAME/plexamp/js/index.js
Note: USERNAME is your username.
You may or may not see some errors here. If you see the words “Starting Plexamp 4.x.x” and then some weird errors its ok to ignore the errors. Plexamp is running. If you see something that says cannot find module then you may have copied and pasted wrong, or typed something by mistake or forgot to replace USERNAME with your username.
You may also see some errors and maybe even Node.js is less than v20. If Node.js is less than 20. You may need to manually update node.js. To update node.js you will need to run the following command in the terminal:
curl -sL https://deb.nodesource.com/setup_20.x | sudo -E bash -
A bunch of text will go by and then at the end and you will see something that says to install node.js run this command.
sudo apt install nodejs
or
sudo apt-get install nodejs -y
After installing node.js v20 then run the Starting Up Plexamp command from above once again and see if you get to starting plexamp and claim your token prompt.
Claim the Token
In the terminal you should see something like this;
Open the web browser ![]() on the Raspberry Pi and go to the website, it will prompt you to sign in. Sign In, and then copy and paste the claim code it gives you into the terminal and hit enter. It will ask you to give the player a name. There should be some more random errors you can ignore these and then it should end with a message that Plexamp is now signed in and ready!.
on the Raspberry Pi and go to the website, it will prompt you to sign in. Sign In, and then copy and paste the claim code it gives you into the terminal and hit enter. It will ask you to give the player a name. There should be some more random errors you can ignore these and then it should end with a message that Plexamp is now signed in and ready!.
Starting up Plexamp
Plexamp may be signed in and ready but it is not started up yet. To start up the plexamp services we need to input the following line again:
node /home/USERNAME/plexamp/js/index.js
This should result in the terminal displaying the sentence Starting Plexamp 4.x.x with a random error and then a small white block. This means Plexamp is running and we can access it from a web browser now.

Using Web Browser to Get to Plexamp UI
We can now safely reach Plexamp from a web browser per Elan’s instructions item 4. Open a web browser on a different device than the Raspberry Pi, so from your PC or Mac and enter http://<ip.of.pi>:32500 or http://<Hostname-of-pi.local>:32500 and you should be greeted with a nice welcome splash screen and then another authentication sign in screen. Authenticate and you should now be seeing Plexamp. It should work like normal at this point. If you don’t know what your IP address is don’t worry. You can simply type your hostname.local and it should work just fine. The welcome screen I got looks like this.

Setting up Plexamp to start as a background service on startup
Plexamp runs in the background as a service so you won’t see it. But you do need to go to the terminal again and type in a few more lines of code to set this up. You only have to do this once. Since we are using plexamp with a desktop and a head, we need to do this extra step. Make sure you are in the plexamp directory before you input the following lines.
Go to the terminal if you are not there already. You need to be in the plexamp directory. You will know if you are in the Plexamp directory if you see ~/plexamp $. if not then type the following:
cd plexamp
Once in the plexamp directory copy/paste or type in the following code to setup autostart plexamp service
$ sudo cp plexamp.service /lib/systemd/system/
$ sudo systemctl daemon-reload
$ sudo systemctl enable plexamp
$ sudo systemctl start plexamp
No Sleep Till Brooklyn
Last thing, since we are running with a desktop the screen is set to go blank by default. Before you place the Pi out of site. We need to disable screen blanking in the raspberry pi settings. Go to preferences > raspberry pi configuration and tick the box to disable screen blanking. This is essential for anyone using HDMI out for their audio.
Conclusion
Thank you for reading through and I hope this guide helps those who are not as experienced with the raspberry pi or scripts or linux. Setting up and running a headless unit is a bit daunting I hope this guide has made it less intimidating and more familiar by staying in a desktop environment.
Updating Plexamp Pi to Newer Versions Using The Script
Updating Plexamp Pi is very easy with the script, just run the script again from the terminal just like you did for install and it should take care of the rest. That’s it done. Move on. Super thanks to odinb1 for the script.
--------------------------------------------------------------
Updating Plexamp Pi to Newer Versions Using the Desktop
If you don’t want to run the script you can also install an update by downloading the headless version and copy and paste the files in the plexamp folder. Go to the official download page and grab the latest version Plexamp.com Downloads

After Downloading you should have the following file in your downloads folder. File name in picture below is cut off but this is 4.6.2.. It doesn’t matter what version here. These are older pics but the process is the same.

Right click the compressed file and choose Extract Here a folder named plexamp should appear.

Before we do anything with this new version of Plexamp. Its a good idea to make a backup of your current plexamp folder. Simply copy the current plexamp folder and paste it into the documents folder and name the file folder Plexamp 4.6.1 or whatever the version is at the time. Ignore the version in the picture below:

Now with a safe backup open the plexamp folder that you just extracted in the downloads folder and copy everything EXCEPT the plexamp.service file. The reason we are not copying the plexamp.service file from the update is because the plexamp.service file uses Pi as the default username. If you have a different username then Pi, Plexamp won’t work. If your username is Pi then you can safely copy.

With the 6 out of 7 files copied simply paste and overwrite these files into your plexamp folder that is already in your home directory and restart your Pi. Plexamp should be running with the version you downloaded in this case Plexamp 4.6.2. Unless something has gone horribly wrong. ![]() If it has gone wrong just copy your backup into the folder, restart and try again.
If it has gone wrong just copy your backup into the folder, restart and try again.
That concludes the current guide as of 5-Dec-23. The older version of the guide is below. Enjoy and happy Plexamping.
_______________
Edit - Below is the original guide on installing Plexamp Pi 4.5.3. The below guide might be out of date for most everyone using Plexamp Pi newer than 4.5.3. However if you are still running on older hardware/software this may work for you or may be what you need. Use the guide instructions above, as there have been several updates and a better way to install Plexamp via a script. I am keeping this here for historical purposes.
Intro
Plexamp Pi With a Desktop - Setup Guide for Plexamp on the Raspberry Pi
A guide for those who are more comfortable in a desktop environment and don’t mind running Plexamp with a head. This guide is geared towards beginners. I am not an expert at the command line, but I fight my way through it. If you have limited command line skills but still want to setup a Plexamp Pi than feel free to read through my guide. This should take about 1 hour or less to get everything setup.
I am going to assume you have a working compatible Raspberry Pi with Raspberry Pi OS 64Bit installed and you are staring at a screen that looks something like this:
VERY IMPORTANT: The Plexamp Pi software is auto configured to User=Pi. Keep that in mind as you progress.
Getting Plexamp and Instructions
On the Raspberry Pi open up the Web Browser ![]() and navigate to the Plexlab Forums.
and navigate to the Plexlab Forums.
From the Plexamp Release Notes forum post, download the current version of Plexamp. This guide is built on Plexamp Version 4.3.0. But should work for future versions. EDIT: As of Plexamp 4.5.x Plexamp rPi is available along side the official releases and a Raspberry Pi headless version can be downloaded from Plexamp.com. Official installation options will be coming in the future. Until then the instructions we need to follow are over in the forum post Plexamp on the Raspberry Pi.
EDIT: as of Plexamp 4.5.x Node.js 16 is needed. If you are installing versions lower than 4.5 then continue to use Node.js 12. If you want to check to see what version is currently installed then at the terminal type in the following
node -v
EDIT: Installing / Updating node.js
If you are updating from node.js 12 to node,js 16 you may get some errors and might need to trouble shoot. Depending on the situation might be easier to grab another microsd card and start with a fresh install
First up is item 0 in the instructions from Elan. We need to install Node.js to the Raspberry Pi, which we can do easily by opening up the terminal and inputting two lines of code. The terminal app icon is in the top desktop menu bar ![]()
In the terminal input the following line of code.
curl -sL https://deb.nodesource.com/setup_12.x | sudo bash -
EDIT: or for Plexamp 4.5.3 use the following line for node.js 16
curl -sL https://deb.nodesource.com/setup_16.x | sudo bash -
You might get a warning that says this version is deprecated. EDIT: You can still install 12, or 16. Stick with 12 if you are installing Plexamp rPi lower than 4.5.3 use node.js 16 for Plexamp rPi 4.5.3. Wait 20 seconds and installation of the repo will begin on its own.

To install Node.js and npm input the line below:
sudo apt-get install -y nodejs

Installing Plexamp:
Download Plexamp if you haven’t already. In the downloads folder, right click on the plexamp file and choose extract here.

Now you should have a folder named plexamp. Move this plexamp folder to the home/[your user name] folder.

Now the Plexamp folder is in the correct location.

The next step in Elan’s instructions at item 3 is to run Plexamp from the terminal to start it up and claim the server for the Pi.
STOP RED LIGHT - EDIT: FOR VERSION 4.5.3 AND LOWER ONLY
Before we claim the server, we need to open the plexamp.service file and change some things. The reason for the changes is to fix/stop errors and issues that pop up with the desktop version of Raspberry Pi.
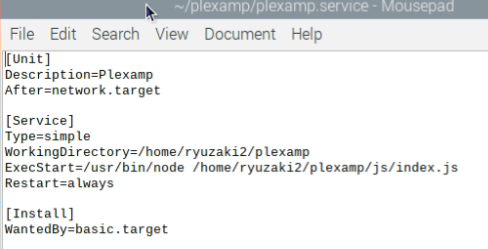
FOR VERSION 4.5.3 AND UP The plexamp.service file still needs to be changed slightly, but not as drastically, so the changed file should only need you to put your username in all the spots that have pi. Should look something like the following when you are done:

GREEN LIGHT GO - EDIT: FOR VERSION 4.5.3 AND LOWER ONLY
In the plexamp folder there should be a file named plexamp.service. Right click and open with text editor. On first open, the file should look like this:

In the file we have to make a few key changes:
Change 1: After=network.target
Change 2: Delete Requires=network-online.target
Change 3: Delete the User=Pi line completely.
Change 4: WorkingDirectory= /home/[your user name]/plexamp
Change 5: ExecStart=/usr/bin/node /home/[your user name]/plexamp/js/index.js
Change 6: Restart=always
Change 7: WantedBy=basic.target
After the changes the file should look like this:
Time To Claim The Server for the Raspberry Pi
Now we can go back to the terminal and claim the server with some lines of code per Elan’s instructions.
In the terminal we need to change directories to get to the js folder. A simple cd plexamp will work.
![]()
This puts us in the correct folder for the next lines of code to work.
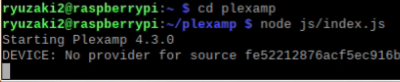
node js/index.js
Starting Plexamp.
Please visit https://plex.tv/claim and enter the claim token:
At this point, open the web browser on the Raspberry Pi and go to the website, it will prompt you to login. Login, and then copy and paste the claim code it gives you into the terminal and hit enter. It will ask you to give the player a name. There should be some random errors you can ignore and then it should end with a message that Plexamp is now signed in and ready!.
Starting up Plexamp
Plexamp may be signed in and ready but it is not started up yet. To start up the plexamp services we need to input the following line again:
node js/index.js
This should result in the terminal displaying the sentence EDIT: Starting Plexamp 4.3.0 or Starting Plexamp 4.5.3 depending on which version you installed with a random error and then a small white block. This means Plexamp is running and we can access it from a web browser now.
Using Web Browser to Get to Plexamp UI
We can now safely reach Plexamp from a web browser per Elan’s instructions item 4. Open a web browser from your PC or Mac and enter http://<ip.of.pi>:32500 and you should be greeted with another authentication screen. Authenticate and you should now be seeing Plexamp. It should work like normal at this point.
Start Plexamp on Boot - EDIT: FOR VERSION 4.5.3 AND LOWER ONLY
The cherry on top is to set it up so that on each boot Plexamp starts up automatically. Because we are running Plexamp with a desktop we have to do this differently than Elan’s instructions. We have to create a folder at: ~/.config/systemd/user/ and put a copy of the plexamp.service file in this location. The .config folder is a hidden folder. To make the .config folder visible, click on the home folder. Then right click anywhere on the white space in the home folder and select show hidden.

The .config folder should be visible now.

Open the .config folder and create the folder systemd. Open the systemd folder and create the folder user. After these folders are created copy and paste the plexamp.service file from the plexamp folder into the /home/[your username]/.config/systemd/user folder.

Back at a fresh terminal we are now ready to create the auto start.
At the terminal input:
systemctl --user enable plexamp.service
systemctl --user daemon-reload

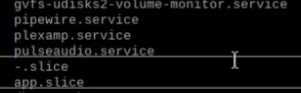
Now we reboot. After reboot, we can check to see if the services are running by going back into the terminal and typing
systemctl --user
This will give a long list of things if you hit arrow down and scroll you should eventually see plexamp.service in the list. If it’s there than Plexamp is running. Only thing left now is to crank up some tunes.
Start Plexamp on Boot - EDIT: FOR VERSION 4.5.3 AND HIGHER
Follow Elan’s instructions at number 5 which says to:
Copy the plexamp,service file from your /home/[your username]/plexamp and put that into the /lib/systemd/system/ folder. You will need root access to copy this here. So you can do this from the command line. And then enable and start the service. This should set it up to auto start on boot.
$ sudo cp plexamp.service /lib/systemd/system/
$ sudo systemctl daemon-reload
$ sudo systemctl enable plexamp
$ sudo systemctl start plexamp
No Sleep Till Brooklyn
Last thing, since we are running with a desktop the screen is set to go blank by default. Before you place the Pi out of site. We need to disable screen blanking in the raspberry pi settings. Go to preferences > raspberry pi configuration and tick the box to disable screen blanking. This is essential for anyone using HDMI out for their audio.
HiFi Berry / Digi+ / Clone PiHats
To get the audio to work we have to tweak some of the config files so plexamp can use the pihat. On hifi berry website there are configuration documents to follow. Follow these and set up your configs and plexamp should then see the piHat.
HiFi Berry Config Linux 4 and Higher
Conclusion
Thank you for reading through and I hope this guide helps those who are not as experienced with the raspberry pi. Setting up and running a headless unit is a bit daunting. One of the reasons I made this guide was so I don’t forget how I got it to work. :).
Updating Plexamp Pi to Newer Versions
Updating Plexamp Pi is very easy now that there is an official download available on Plexamp.com Downloads

After Downloading you should have the following file in your downloads folder. File name in picture below is cut off but this is Edit: Plexamp 4.5.3:
Right click the compressed file and choose Extract Here a folder named plexamp should appear.
Before we do anything with this new version of Plexamp 4.5.3. Its a good idea to make a backup of your current plexamp folder. Simply copy the current plexamp folder and paste it into the documents folder and name the file folder plexamp 4.3.0 or whatever the version is at the time.
Now with a safe backup open the plexamp folder that you just extracted in the downloads folder and copy everything EXCEPT the plexamp.service file. The reason we are not copying the plexamp.service file from the update is because the plexamp.service file in the old version, in this case Plexamp Headless is modified for use on the Pi with a desktop GUI:
With the 6 out of 7 files copied simply paste and overwrite these files into your plexamp folder that is already in your home directory and restart your Pi. Plexamp should be running with the version you downloaded in this case Plexamp 4.5.3. Unless something has changed or gone horribly wrong. ![]() If it has gone wrong just copy your backup into the folder and restart.
If it has gone wrong just copy your backup into the folder and restart.
