Server Version#: 1.40.0.7775
Player Version#: 10.8.0.5554
Hi everyone, I may have found a potential solution to a problem I have been struggling with for a while, and have seen plenty of others struggle with too, without a good solution. The main problem concerns transcoding 4K Dolby Vision TrueHD 7.1 REMUX video files to any watchable quality. Theres a bit of preamble explaining my situation, feel free to skip it, but may provide some context as to whether or not this solution will work for you. This is directed towards Windows users, but I’m sure someone familiar with cross-platform usage would be able to adapt a similar solution for linux and mac.
Server specs:
OS - Windows 11 Pro
MOBO - Asrock Z790 Pro RS WiFi
CPU - Intel i5-13600
GPU - Nvidia RTX A2000 12GB
Memory - 4× Corsair Vengeance DDR5 32GB (128GB)
Storage - 3x M.2 NVMe SSDs, 8x 7200RPM HDD (150TB total, no RAID)
Optical Drive: LG Blu-Ray Writer
Network Adapters: 2x WiFi 6E AX210 adapters, 1x 2.5Gbit Ethernet adapter
Internet Speed: 1000/50mbps
Background on the issue
I installed a dedicated graphics card about 4 hours before I was due to travel to Europe for 3 weeks, expecting it to just work. Things were working well with just my CPU, but Plex doesn’t support HDR Tone Mapping with integrated Intel graphics yet, and as my Plex server is getting more users from family and friends who have finally adopted it, I needed some extra hardware to offload CPU usage. The problem was I had no testing time until I got to Europe, started a stream in 1080p 12mbps and got nothing but buffering. This happened to the whole family, having to settle on movies being streamed at 720p 3mbps. A friend who was still in the city I’m from was streaming perfectly at 15mbps bitrate, so I put it down to it being the distance, routing, and all that networking jargon for the loss of streaming capacity. This didn’t happen when I went to Thailand a year and a half ago, but it was a different computer, though much older and only using WiFi at the time. So when I got back home it appeared to work well, and I pretty much concluded that it had something to do with the distance from Australia to Norway (and possibly a part of it was).
I first noticed that it wasn’t just a distance issue when a family member had extreme buffering issues remotely on his iPhone. He had to use the lowest quality video to even play it at the expense of not being able to see the picture. At their house, where he was streaming from, I recreated the issue by watching the same TV show, which was a 4K Dolby Vision HEVC codec file with TrueHD 7.1 audio and subtitles. As a test, I tried a different movie I knew worked (and I had transcoded it from their house flawlessly a couple of months ago) with the same resolution, DV HEVC, and the same audio codec. This movie also had buffering issues every 5 - 10 seconds, transcoding to 1080p 12mbps. I tried both the TV show and the movie on my Android phone, and reproduced the exact same issue.
I tested their internet and rebooted everything, cleared cache data, the works, but still no luck. Watching almost anything else was without issue, as I watched a 1080p non-HDR movie later that night, but all 4K HDR/DV movies, regardless of the audio codec, failed to play through without buffering.
What temporarily resolved this issue was disabling “use hardware acceleration when available” and “use hardware accelerated video encoding” from the PMS settings area under the “Transcoder” tab. The previously problematic TV Show and movie worked perfectly transcoding to 1080p 12mbps doing this, but meant my CPU was doing all the work. “HDR tone mapping” was still left enabled, even though it wouldn’t be doing anything since Intel isn’t yet supported for Windows.
I had more time to test the settings when I got back to my own home where the server is and updated the GPU driver, changed the fan settings (it was 40ºC+ weather the last few days), and uninstalled all software that was not necessary, but to no avail. Direct play worked, even with the TrueHD audio codec needing to be transcoded, so that ruled out some possibilities. However, as soon as I transcoded it to 1080p 12mbps on my local network, the buffering issues started again. When I transcoded it to 1080p 8mbps it played smoothly, so there was obviously something going on with either 1) both our mobile app settings, since I set up his phone; 2) GPU settings in the Nvidia control panel; or 3) a possible network issue since my setup is very niche and unique.
So my findings and solutions that have seemingly fixed the issue are below:
1. Change the client app’s subtitle burn in settings:
I had read a lot that burning in subtitles “is very CPU intensive”, “NEVER burn in subtitles”, “NEVER transcode 4K content”, etc., but so many of these forum posts are 4+ years old, with the commenter running on old hardware from 2012, but even my high-end PC from 2016 (which is mid-to-low tier by today’s standards) transcoded 4K HDR effortlessly, so transcoding 4K HDR today in 2024 is not as big as a deal as it was back then.
So first try changing the “Burn Subtitles” setting to “Only Advanced Formats” and disabling “Override included subtitle style” in your mobile app or Plex client device, which worked in combination with the next two fixes. This might be all that is needed to fix this issue for you to get things working, but if you’re still having issues, continue reading.
2. Change the Nvidia Control Panel settings:
Firstly, you’ll need to have the “Nvidia Control Panel’’ application installed if you want a graphical user interface to change the settings instead of using command-line prompts, unless that is your preference. If you already have the control panel installed you’re all set to start changing the settings. Otherwise, in order to download the “Nvidia Control Panel” application for Windows, you have to download your Nvidia GPU driver from here: Nvidia Drivers
You can download the latest driver for your card if your current driver is out of date, but if you don’t want to update your driver version for whatever reason, and you do NOT have the “Nvidia Control Panel”, just re-download the same driver version you have, and reinstall it. When installing, make sure to select the “Custom Install” option and NOT the “Express Mode”. This will let you download the driver and the “Nvidia Control Panel” option, along with other optional drivers that may, or may not, be needed, or wanted, for your setup (i.e. Audio drivers). Keep in mind that all previous settings for the driver and software will be reset, so proceed with caution if that is going to affect any other applications on your server that rely on preset settings that you set up (you will know if this will affect you, so if you’ve never manually adjusted settings for your driver you can continue without worry).
To a large degree, the settings you use will depend on the GPU you have, but there are some clear culprits that are, by default, automatically enabled within the settings that caused me issues. These guides helped me fill in some of the gaps for settings I had no idea about and what value set them to. All you have to do is determine if your GPU is older or more modern, and adjust your settings accordingly:
Nvidia Control Panel Setting Supplement
You can apply these settings globally, affecting all applications attached to the “Nvidia Control Panel”, or individually to just affect the Plex programs. You will probably have to add the Plex executables manually to the program list, otherwise (from my observations), these settings won’t apply and work when transcoding. I added the “Plex commercial skipper.exe", "plex media scanner.exe”, “plex media server.exe”, and “plex transocder.exe” programs to the list, but you might just need the transcoder executable - though adding them all won’t hurt.
I’ll go ahead and contradict a few of settings suggested in these articles that affected Plex and transcoding:
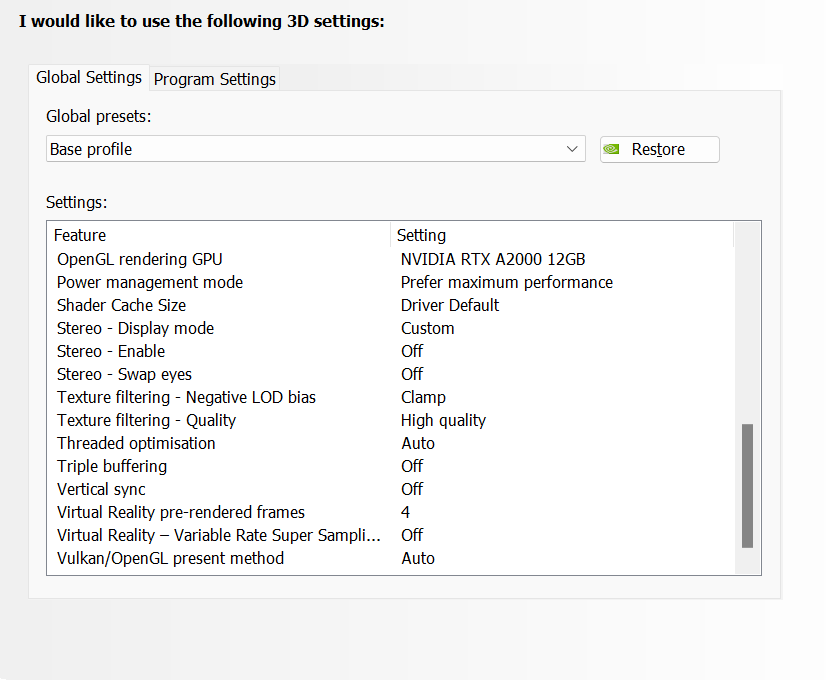
- Low Latency Mode - Set this to “Off”. This caused me the biggest problem when set on either "On” or “Ultra”
- Virtual Reality pre-rendered frames - I set this to “4”. The guide skips this, but this also caused issues if set lower
- *Ambient Occlusion - Nvidia automatically set this to “Quality” for me and has caused no issues, but both guides suggest turning this to “Off”, so might be a thing to test
- *Anisotropic filtering - Nvidia automatically set this to “x8” and a comment in one of the articles says “x16” worked better for them in a specific game, but both articles suggest turning this to “off”. I have had no issues with this setting at “x8”
- *Antialiasing - Gamma Correction - Nvidia automatically set this to "on” with another commenter suggesting that the article’s suggestion to turn it “off” broke their game. No issues so far with this “on”
- *Antialiasing - Mode - Nvidia set this automatically to “Enhance the application setting”, with Antialiasing - Setting set to “x2 (2xMS). No issues having this on so far, but the articles suggest turning it to “off”.
- Background Application Max Frame Rate - leave this "off”, haven’t tested it yet, but it might affect ffmpeg transcode speed (no source, just my guess)
- Max Frame Rate - set to “off” for the same reason as above
Below I’ve attached a picture of the settings I used. Some options might differ due to the difference in graphics card utilization of different applications, but hopefully this gives you some peace of mind that your settings are similar to settings that worked for me:


There is a setting in the top toolbar under the “Desktop” header called “Enable Video Editing Mode”. Whilst it sounds relevant and beneficial, leave it “disabled” as it is a legacy setting for Windows 7 (unless you are running Windows 7), and has no effect in Windows 8 and later. From my research, it has no beneficial effects, I’m not sure what enabling it would do to performance, but either it will change nothing or make it worse.

My graphics card also has an option to enable ECC memory within the “Nvidia Control Panel” settings. For my testing I left it “enabled”, and it worked well. I am going to run some tests after a week or so of stability to make sure that there are no problems with the current setup. Let me know if you’ve done any tests with ECC on with transcoding, and your results, as I wouldn’t use ECC for any other application, therefore, if it increases usage without a comparable quality change I would disable it.

3. Change the network adaptor configuration settings:
Now, if the above did not work, approach this next step with caution if you don’t know much about network adapter settings and if you use your Plex server for anything else that MUST be connected to the internet at all time. It’s probably best if you take a photo or screenshot of the settings before you change them so you can change them back if connectivity stops working after, but as far as I am aware, changing these settings won’t cause any permanent issues that can’t be resolved by reverting back to the old settings. I’ll go step-by-step to get to the Network Adapter Settings because everyone has a different level of knowledge on what settings there are and how to get to them, but if you know what network adapter your PMS uses, and you know how to access its advanced configuration settings, then you can just go ahead and skip these steps below:
- In the search bar (bottom left next to the Windows icon) type “View Network Connections” and click on that control panel setting
- A window will come up listing all of your network adapters, now you just have to determine which one your computer and Plex is connected to for internet
- If you don’t have any VPNs, VMs, or other virtual network adapters, then you just have to right click either the "Ethernet” adapter or the “WiFi” adapter depending on whether you use Ethernet to connect to the internet, or if you use WiFi
- After right clicking select “Properties” and another window will pop up
- In the current tab “Networking”, click the “Configure…” button near the top right; another window will pop up
- Click the “Advanced” tab, and depending on whether you’re using Ethernet or WiFi, the options are quite different
3a. Ethernet property changes:
Disable all of these settings:
- Advanced EEE
- ARP Offload
- Energy-Efficient Ethernet
- Flow Control
- Gigabit Lite
- Green Ethernet
- Interrupt Moderation
- IPv4 Checksum Offload
- Jumbo Frame
- Large Send Offload vs (IPv4)
- Large Send Offload vs (IPv6)
- NS Offload
- Power Saving Mode
- Priority & VLAN (set to Priority & VLAN Disabled)
- Receive Side Scaling
- TCP Checksum Offload (IPv4)
- TCP Checksum Offload (IPv6)
- UDP Checksum Offload (IPv4)
- UDP Checksum Offload (IPv6)
- Wake on magic packet when system… (mine was disabled already, so it may have function for your server if It is enabled
Other Options:
- Receive Buffer - 512 (max, default)
- Transmit Buffers - 4096
Optionally, I go to the “Power Management” tab and disable the “Allow the computer to turn off this device to save power”, so it always remains on.
Click OK to save and you’re done.
3b. Wifi property changes:
Disable all of these:
- ARP offload for WoWLAN
- Fat Channel Intolerant
- NS Offload for WoWLAN
- Sleep on WoWLAN Disconnect
- Throughput Booster
- U-APSD support
Either enable or set a value for the other options, or leave them as default.
Optionally, I go to the “Power Management” tab and disable the “Allow the computer to turn off this device to save power”, so it always remains on.
Click OK to save and you’re done.
—---------------
Hopefully one or a combination of these worked for you. Let me know if you see anything glaringly wrong with my settings, or if it simply doesn’t work and I can do some more testing