The Raspberry Pi foundation has just released an addon (HAT) that enables you to receive a DVB-T2 TV signal.
It also uses https://tvheadend.org to enable it to distribute over the network.
Is this something Plex could use/connect to?
The Raspberry Pi foundation has just released an addon (HAT) that enables you to receive a DVB-T2 TV signal.
It also uses https://tvheadend.org to enable it to distribute over the network.
Is this something Plex could use/connect to?
I posted somewhere else about this stick, I’m quite interested in it.
You might manage with tvhproxy which will make it appear as a hdhomerun on your network so Plex can use it
Following 
Very interesting. Following!
I was just thinking about it! I’m very interested by it! If it works, I will buy one.
un-official integration guide here
Got the HAT today, so will try this method tonight and report back…
I’m waiting for your results to order mine
So …
I also bought a Raspberry Pi 3 B+ specifically to run this on and followed the instructions from here
That all went absolutely fine. I have used the RASPBIAN STRETCH LITE as I am running it headless. And they didn’t state which version to use specifically.
Followed the unofficial instructions from The Pi Hut, that all seemed to go well too. I can see the channel list when I select LiveTVH from the Plugins section:
I can see the synopsis of the program on that channel currently:
But just get the spiny wheel of buffering death when I press play:
I also have a Five Ninja’s Slice, that I backed on Kickstarter, which has an Open Source Home Theater Software installed on it (Starting with ‘K’ ending in ‘odi’) and followed their instructions. Works with no issues at all.
I also tried the Android app on my OnePlus 3 but I just get:
So that’s where I am at right now. If I get time I’ll have more of a play over the weekend.
If anyone has any more ideas, let me know. I’ll be willing to do some tests.
Thanks for you explanation! In general, do you think it’s worth it?
Can you use it like a HDhomerun alternative?
Thanks for sharing.
To be honest I think its too early to say, as (I think) the board was only released a few days ago. Also I have not got/played with HDHomeRun.
But I would imagine that if it were to work (I may well have missed something, not ticked a box, have different settings to the Plex Server that was used in the instructions etc. ie my server is running CentOS 6.10 with a 4 core 3.60GHz Intel i3 and 4GB RAM as opposed to theirs running Raspian on a Pi for a start) then I guess it would work in a similar way.
But for £19.99 ($21.50) worth getting one just to have a play with. Plus the cost of a Pi if you don’t have a spare one!
Do you have a normal tuner that does work? That’s the same error I get on the latest PMS so I had to down grade Plex. Others have been getting the issue with supported tuners too.
I’ve got the rpi tv hat and am using it with plex. Installed tvheadend on the pi which was relatively straightforward and then opted for using it with tvhProxy. Installation of tvhProxy was a bit of a nightmare as initial documentation online seemed to be missing various pieces to make it work, but after a lot of digging about it seems to be working well Plex sees it as a HDhomerun device and gets on with it. I’ve had no issues, even with multiple restarts. Well worth a try if you’re on a budget and I’ve managed to watch multiple channels on different devices at the same time, well when I say multiple I mean 2, but to me that’s excellent. I should add that plex itself is running on a separate PC, not on the pi.
I figured instructions would be a bit rubbish in places. Glad it’s working well though, I’m planning on going for the same setup where Plex is on a separate pc. Are you on the latest version of Plex Server? I’m holding off updating mine until they fix live TV / recordings for various users.
Hi bugahdug, yes I’m on the latest plex server 1.13.9.5439.
So for me, I’m running mine on Linux, but live tv works fine and I recorded a couple of programmes last weekend, Doctor Who and Strictly, both came out very well. The only issue I have is with tvheadend and continuity errors. I think it’s a tvheadend problem, I’m running version 4.2.4 from the stretch default repo. Hopefully someone will update it to the latest soon. But for someone who was considering getting an hdhomerun on black friday, I’m happy and have saved a few £.
Hi @evanshaw, did you install tvhProxy on the Pi or on your server?
I have just followed the instructions here Install TVHeadend/ tvhProxy for Plex to use as a TV Tuner
and installed it on the Pi. Other than a few dependencies to install (git (Raspbian lite does not come with it preinstalled) and virtualenv), it went pretty well. I can see the Guide (so much better than the TVHeadend plugin):
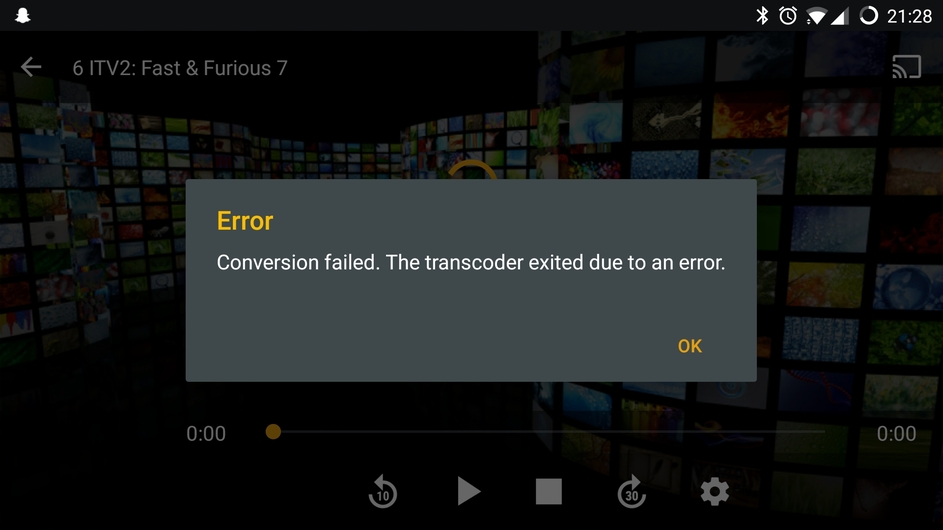
BUT… I still cannot get anything to play! I just keep getting the spinny wheel of buffering death. Then after a few minutes, I get the below error:
Hi Craigusus, yes I installed tvhProxy on the pi itself. Mine’s an rpi3 not the 3+ and it’s sending the data from itself to the server via Wi-Fi, so it’s not wired.
I did have a lot of bother with mine. Is tvhProxy definitely running? I had a lot of issues with venv, where it wouldn’t work.
systemctl status tvhProxy.service
I will do a quick internet search to see what I actually followed. Because I still think something’s missing from the one you posted, as that’s the one I originally followed too.
Found the link I followed, hopefully this will help others too: -
Let me know if this helps. Basically after the first link you posted that I followed too, I fould this one, scrapped the original tvhProxy setup and followed this one and it worked like a charm.
Thanks, @evanshaw, that did help.
I have now managed to get it working.
This time I used the full version of Raspbian, just in case the lite version was missing something.
I’ll try the lite version again later, maybe.
These are the (fairly comprehensive) steps I used:
(My only aerial feed is in my lounge so have to move Pi downstairs)
Install TVHeadend
SSH into Pi using your preferred SSH client
Update:
sudo apt update
sudo apt full-upgrade
Install Required Packages and add the Repository PGP key:
sudo apt install coreutils wget apt-transport-https lsb-release ca-certificates
sudo wget -qO- https://doozer.io/keys/tvheadend/tvheadend/pgp | sudo apt-key add -
echo "deb http://apt.tvheadend.org/stable raspbian-stretch main" | sudo tee -a /etc/apt/sources.list.d/tvheadend.list
Install TVHeadend:
sudo apt update
sudo apt install tvheadend
During the TVHeadend installation, you will be asked to choose an administrator account name and password. You’ll need these later, so make sure to pick something you can remember.
If you’d like to reconfigure these details later, you can run…
sudo dpkg-reconfigure tvheadend
In a web browser on a different computer:
Install TVH Proxy:
Go back to your SSH client
As the pi user:
sudo apt-get install -y git python python-pip python-gevent python-flask python-requests python-virtualenv
sudo useradd -m tvh -s /bin/bash
sudo su - tvh
As the tvh user:
git clone https://github.com/chkuendig/tvhProxy.git
cd tvhProxy
virtualenv venv
. venv/bin/activate
pip install setuptools --upgrade
pip install wheel
pip install -r requirements.txt
exit
As the pi user:
cd /home/tvh/tvhProxy/
sudo nano tvhProxy.py
Edit the lines:
'tvhURL': os.environ.get('TVH_URL') or 'http://plexlive:plexlive@192.168.1.172:9981',
'tvhProxyURL': os.environ.get('TVH_PROXY_URL') or 'http://192.168.1.172',
“plexlive:plexlive” is the username and password I used in the TVHeadend setup wizard above.
“192.168.1.172” is my Pi’s IP address. Change that to your Pi’s IP address.
I kept localhost in before and it didn’t work. Now, with the IP address, it seems to work!
sudo cp tvhProxy.service /etc/systemd/system/tvhProxy.service
sudo systemctl daemon-reload
sudo systemctl enable tvhProxy.service
sudo systemctl start tvhProxy.service
exit
Close SSH client, as no longer needed
Setting up Plex:
I think the only differences I have made from the previous attempts are the Raspbian version (full rather than lite) and using the IP address of the Pi rather than localhost in the tvhProxy.py file.
UPDATED 12/11/20 - Updated Git repo for tvhProxy to a recently maintained version
That’s brilliant, this shuld get people giving it a go.