Hi, I have connected an usb harddisk to my raspberry pi, and in the rasbian OS desktop interface I am able to browse the files nicely as expected. Plex however can’t see the drive.
But I am stuck very early as the output in the example and my output is not 1:1 identical and I have too little knowledge in this, I can’t figure out what is what.
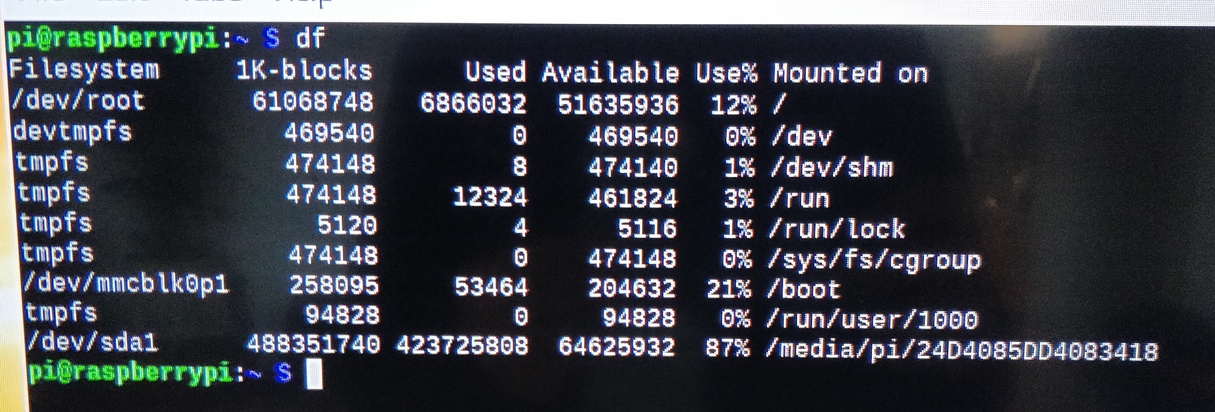
From what I’m seeing your new drive is /dev/sda1. I’m guessing that the /media mountpint from your screen snapshot is raspbian’s auto mountpoint. Looking at Chuck’s guide, now you need to get the UUID of the drive, create the mount point you are going to use in the long term (/media isn’t good per the guide), and update your fstab so it will mount there automagically every time at boot.
Disclaimer: I haven’t done this on raspbian, but this is my best shot. Chuck does a “sudo sh” to become “root”, where I typically do a “sudo” before the commands. Either works, but if you do a “sudo sh” don’t forget you are root!
Find the UUID of the drive by executing “blkid /dev/sda1” (without the quotes.) Note the UUID and format (ext4, ntfs, etc) from the output.
Create a mountpoint. Chuck recommends “/disks”. If “/disks” doesn’t already exits, then you can create it by running “sudo mkdir /disks”. The sudo is needed because root (/) in raspbian is owned by user “root” and “pi” doesn’t have sufficient permissions.
Create a subdirectory of /disks that will be the actual mountpoint for the drive. This allows for other disks to be added in the future. So if you want your mountpoint to be “/disks/plexmedia” then do a “sudo mkdir /disks/plexmedia”.
Change the owner and permissions of the disks and plexmedia directory. “sudo chown -R pi:pi /disks”. Also change permissions “chmod -R 755 /disks”
(Edit) I recommend making a backup copy of fstab before editing. “sudo cp /etc/fstab /etc/fstab.bak”.
Update fstab so your new disk will mount automatically at every boot. Do a “sudo nano /etc/fstab” and add a line per the guide using the UUID and filesystem type from step 1. Chuck uses the vi editor, which I actually use, but if you aren’t that comfortable with Linux then nano may be easier for you.
I’ll turn it back over to the guide now. If you run into issue post again where you are!
I’ve created the /disks dir and set permission according to the guide and what you say. This should be verifiable at the last line in the most top terminal?
In the terminal below I have opened fstab in nano (also made a backup as you suggested). I am a little nervous editing this file, I don’t feel 100% confident what it should look like when I am done editing.
Do I need to comment out any of the current lines? or should I just add:
Add the line you specified to the end of what already exists in fstab. The line you specified looks right to me based on what you posted.
Don’t remove any lines from fstab! The first three lines that include /proc, /boot, and / are needed for your pi to function correctly! (Ok, so technically you could remove the comment lines that begin with “#”, but make it easy and just add the needed line at the end.)
Okay, so far so good. I believe I have edited the fstab file correctly.
Now when trying to:
# mount /disks/plexmedia
I get:
Mount is denied because the NTFS volume is alreadu exclusively opened. The volume may already be mounted, or another software may use id which could be identified for example by the help of the ‘fuser’ command.
I’m not sure how to use the fuser command or if that’s the recommended next step?
also… in the guide Chuck goes:
See where the disks are currently mounted (df) and unmount each
root@lizum chuck]# df
root@lizum chuck]# umount /run/media/chuck/Media-3
root@lizum chuck]# umount /run/media/chuck/Chuck2T
I think you are on the right track. Raspbian auto mounted that drive when you plugged it in, but not where we want or with the permissions we need. Try “sudo umount /media/pi/24D4085DD4083418” (going from your first screen shot where I’m seeing /dev/sda1 is mounted.) If that doesn’t work try doing a “df -h” again and look at the value of the “mounted on” column on the /dev/sda1 row. That’s what you want to unmount.
Alternately it may appear on your Pi’s desktop if you are running the GUI, and you might be able to click (or right click) and select “unmount”. (Sorry for the ifs. I can’t remember for sure if Raspbian does this.)


 works like a charm now! very happy