DSM 7 + Packaging 2.0 + Docker – The How-To
This How-To (FAQ) will demonstrate how to setup
- a
pms-dockercontainer - which uses the new packaging (
/PlexMediaServer/AppData) structure used in PMS 1.24.2.4973 and above (DO NOT USE BETA 1.21.0.3744) - and is fully interoperative & non-destructive of the Native app. (you can run either either as you wish.)
A. Get the UID/GID values from DSM 7 for use with PLEX_UID & PLEX_GID
- Create a Scheduled Task - User script
a. Run once
b. Email you the output
c. usernameadminis fine.
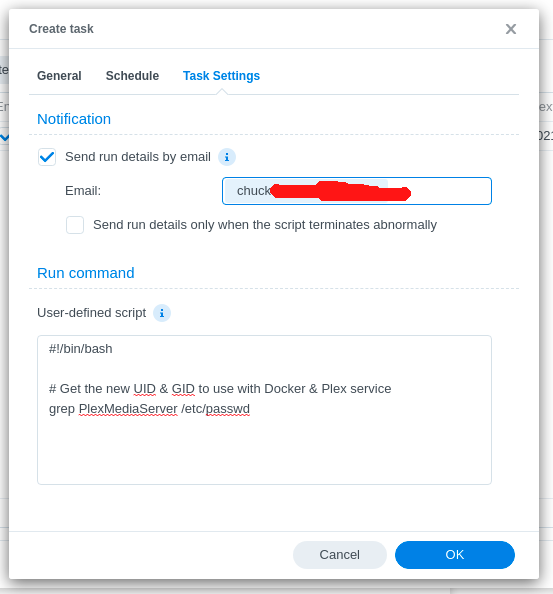
- In the email, you’ll see lines which looks like this:
chuck@ds418:~$ id PlexMediaServer
uid=297536(PlexMediaServer) gid=297536(PlexMediaServer) groups=297536(PlexMediaServer),937(videodriver)
chuck@ds418:~$
- The first number (297536) is the value for
PLEX_UID. - The second number (297536) is the value for
PLEX_GID - The numbers shown here may not match your system. Use those which come from your system only.
Installation choice:
You now have two options; without and with hardware transcoding.
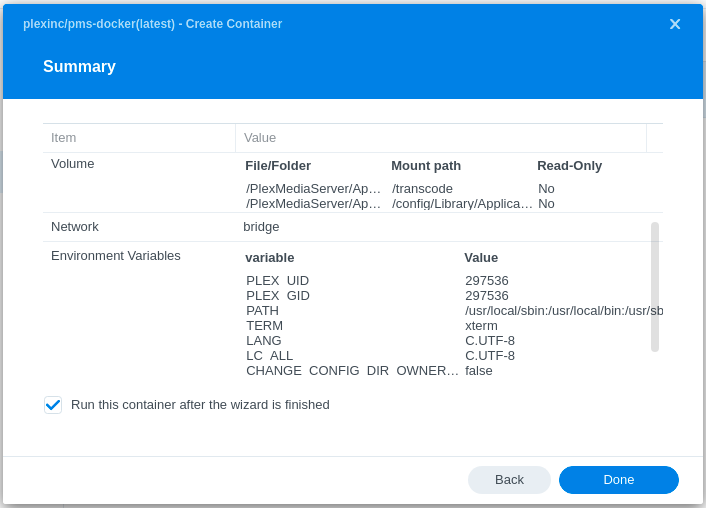
B. Create your new container (No hardware transcoding)
- Download the image
- Create the container using these specific settings
-
Volume map:
/PlexMediaServer/AppData→/config/Library/Application Support -
Volume map:
/PlexMediaServer/AppData/tmp→/transcode
-
Environment variable:
PLEX_UID= value we obtained above -
Environment variable:
PLEX_GID= value we obtained above -
Modify variable:
CHANGE_CONFIG_DIR_OWNERSHIPtofalse


C. Network
- Set your network as you wish. Best choice is to use Host network - NOT bridged.
D. Apply the settings then Confirm
)
E. Done
That’s it. DSM 7, with new Packaging 2.0, using the native data without change.
With this configuration, you can stop docker, start native and continue without change.
Hardware transcoding (direct hardware passthrough) is prohibited by Synology in the GUI.
The resolution of this is to use Docker compose or Docker run and add the clause --device /dev/dri:/dev/dri to the container spec.
Method 2 - Alternative - (using docker run)
This method provides full access to the hardware and overlays your existing PMS installation.
The native DSM 7 PMS app must be installed to use this method but be in the STOP state.
Substitute your actual values in the environment variables where appropriate.
Use PLEX_UID & PLEX_GID for pms-docker
You may use PUID & PGID for others.
Add additional /volumeX mappings as needed.
sudo docker run \
-d \
--name plex \
--network=host \
-e TZ="EST" \
-e LANG="en_US.UTF-8" \
-e PLEX_UID=297536 \
-e PLEX_GID=297536 \
-h dockerplex \
-v /var/packages/PlexMediaServer/shares/PlexMediaServer/AppData:"/config/Library/Application Support" \
-v /var/packages/PlexMediaServer/shares/PlexMediaServer/AppData/tmp:/tmp \
-v /var/packages/PlexMediaServer/shares/PlexMediaServer/AppData/tmp:/transcode \
-v /volume1:/volume1 \
-v /volume2:/volume2 \
--device=/dev/dri:/dev/dri \
plexinc/pms-docker:plexpass
After docker run is completed,
- Synology Docker UI will provide control and all normal Synology functions.
- Your Docker container will IMMEDIATELY assume the identity of your native Synology app + HDR Tone Mapp support.
Please remember – Don’t try to run both at the same time ![]()