(Re-)Claiming a QNAP based Plex Media Server:
Note: When browsing towards your QNAP, you need to use the IP Address of it.
If in doubt, you can see it in QFinder

PMS Status
Before we start, we need to make sure that the Plex Media Server (PMS) is not claimed
To check, browse to http://<IP_OF_QNAP>:32400/identity
In your browser, it should respond with something like:

claimed="1"indicating that the server is already claimedclaimed="0"indicating that the server needs to be claimed
If claimed is 0 then read ahead, and if not, first try and restart PMS from within QNAP App Center, and if it still shows as claimed, you need to follow the instructions here, and note the following:
- Use the PlexData share to access the file is recommended, and it’s located in the root of that share
- Before changing the
Preferences.xmlfile, make sure you have a backup of it! - If using Windows, we strongly recommend you use like Notepad++ to edit the file
Claim PMS
- Claiming PMS via a browser Normal
- Claiming PMS via a browser Remote (SSH Tunnel)
- Claiming PMS via 3rd. Party
- Claim PMS via another 3rd. Party script
Claim PMS via a browser
Claiming a PMS server via a browser is the easiest way of doing it, but bare in mind
-
Both the workstation used, as well as the QNAP, must have an IP Address in the same IP range, and it also must be in what is known as
Private Address Space, meaning the IP must resides in one of the following ranges:- 10.0.0.0 - to - 10.255.255.255
- 172.16.0.0 - to - 172.31.255.255
- 192.168.0.0 - to - 192.168.255.255
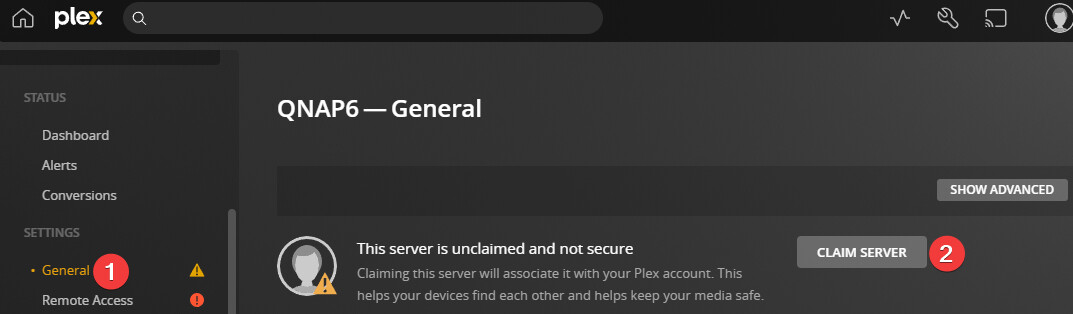
If above condition is meet, you should be able to browse to http://<IP_OF_QNAP>:32400/web and then select the settings:

In here, select General (1), and claim the PMS (2)
Claim PMS via a browser on remote/non private IP (SSH Tunnel)
For QNAP official guide to using SSH, look here
If your workstation and QNAP is not in the same IP range as listed above, or you are not using Private Address Space (Recommended), then you’ll need to tunnel your browser in an SSH tunnel
For details, see https://support.plex.tv/articles/200288586-installation/#toc-2 and read On a Different Network
And after browsing towards the QNAP, follow the same instructions as for normal browser claiming
Claim PMS via a 3rd. Party tool
To use a 3rd. Party tool, we recommend you start by making sure that the PlexData share is enabled
Download ClaimIt , and save it in the root of your PlexData share
Then we need an SSH connection to the QNAP, and this depend on the workstation OS and version of that
- Mac: simply open a terminal, and type:
ssh admin@<IP_OF_QNAP> - Linux: Simply open a terminal, and type:
ssh admin@<IP_OF_QNAP> - Windows 11: Simply open a power-shell window, and type:
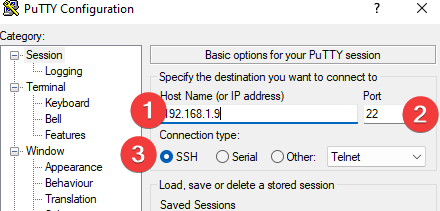
ssh admin@<IP_OF_QNAP> - Older Windows versions: Download and use Putty
- IP of QNAP
- Leave port as 22
- Make sure SSH is selected
You’ll most likely get prompted with a warning asking about a key, so accept it
Then you’ll see :

Select Q for quit, followed by Y for yes
- Type:
cd /share/PlexDataand press enter - Type:
chmod +x claimpms.shand press enter - Type:
./claimpms.shand press enter
Follow the instructions, and when asked for an IP address, type 127.0.0.1
If you have 2FA authentication enabled, then when entering your password, simply enter the 2FA code right after that, and with no space between them
Claim PMS via another 3rd. Party script
You can also use this tool