FAQ 27 - Migrating an existing PMS from DSM 6 to DSM 7
NOTICE: DSM 5 → [ DSM 6 ] → DSM 7 First Step
If you first started using Plex with DSM 5, then upgraded to DSM 6, because of a change internal to DSM 6, you will need to perform this step before you start the DSM 7 upgrade.
If you never used DSM 5, or deleted the Plex share sometime during DSM 6, you can skip this step and continue with the normal upgrade steps
- Rename the existing
Plexshared folder toPlex.old - Create a new
Plexshared folder - Move the entire contents of
Plex.old→Plex
What you’ve done creates a shared folder which DSM 6 didn’t upgrade.
DSM 5 didn’t support “Full Control” mode. DSM 6 introduced this.
With DSM 7, we need Full Control mode for the Plex share due to the added restrictions of DSM 7.
Upgrading PMS from DSM 6 → DSM 7
DSM 7 no longer allows us to go find the metadata directory and use it across volumes before starting PMS (This is the lack of “root” privilege blocking). As such we require the following two conditions are met we will attempt to automatically migrate you;
-
You have an existing DSM 6-created PMS installation and PMS is installed on the SAME STORAGE VOLUME as the “Plex” shared folder (this is critical)
-
You have an existing DSM 6-created installation and PMS is uninstalled and reinstalled on the same volume as the existing Plex share.
If you do not meet either of the above conditions we will warn you and advise you.
Scenario 1: Plex Media Server is NOT installed on the same volume as Plex share
- If PMS is installed on a volume other than the
Plexshare’s volume, you will be notified to make your system comply with the new requirements.
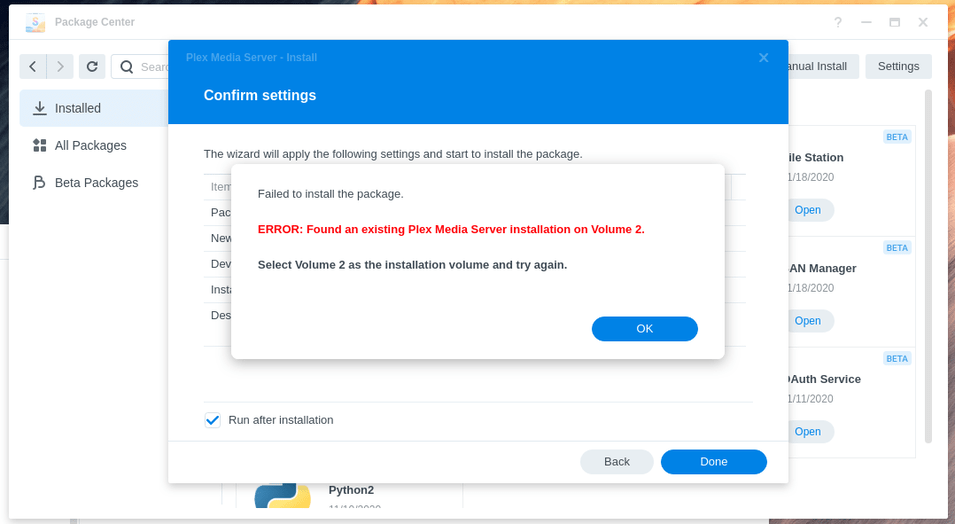
- At this point, Uninstall the failed package

-
When re-installing, instruct Package Center to install PMS on the same storage volume as the
Plexshare. (Check this in Control Panel - Shared Folders if uncertain). -
You can now proceed to the next section of instructions in Scenario 2.
Scenario 2: Plex Media Server installed on the same volume as the Plex share
-
If PMS is installed on the same volume as the
Plexshare we will detect this and attempt to automatically migrate your Plex Media Server library/preferences to the new DSM7 location. -
Migration Bootstrap (This failure is expected during during first installation)
When you first install Plex, because the username and permissions mechanism have changed in DSM 7 to PlexMediaServer, DSM won’t have the proper privileges set. You will need to assign them.
- During install / upgrade, it will fail and give you this message:

- Change the shared folder permissions using
a. Open Control Panel
b. Shared Folders
c. EDIT the Plex share
d. Permissions tab
e. Click Customize
f. Check all Administration
g. Check all Read
h. Check all Write
i. Click Done
j. Check ‘Apply to this folder, sub-folders, and files’.
j. Click Save (Applies shared folder permission changes)
k. – Now wait until all changes are applied
l. Click Save again to return to the Shared Folders app.

NOTE: “PlexMediaServer” must have Full Control. Repeat the steps above until DSM shows Full Control for user PlexMediaServer.
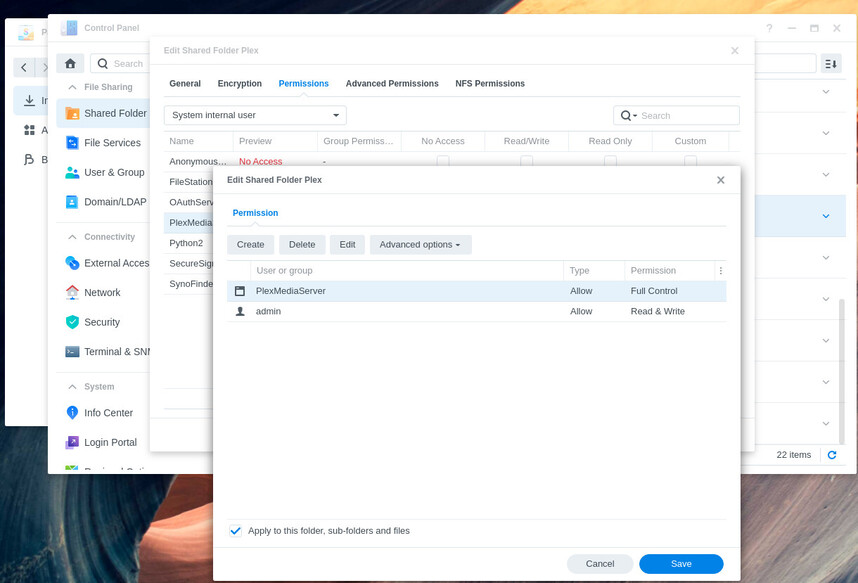
- Propagate this change throughout the shared folder
a. Check Apply to this folder, sub-folders, and files (Important)
b. Click OK
c. Wait for permissions to be applied to all the files. (2 minutes/1000 items)
Here is a screen capture with everything open and all boxes checked.

When DSM returns to the Shared Folders app, Phase 1 is complete.
You may now continue with Stage 2
Stage 2
- Uninstall the failed PMS package..and Install again.
a. If you attempted Repair, and PMS shows installed, use Remove all data option.

-
PMS will again check all permissions are in order.
-
If they are not. you will be instructed to contact us here in the forums for additional support. Otherwise, you will see Installing while all permissions are changed, symbolic links are checked, and your data moved to the new storage location.
-
If the installer finds no issues with ownership or permissions, it will begin actual migration. The protracted “Installing” spinner is the actual migration in progress.
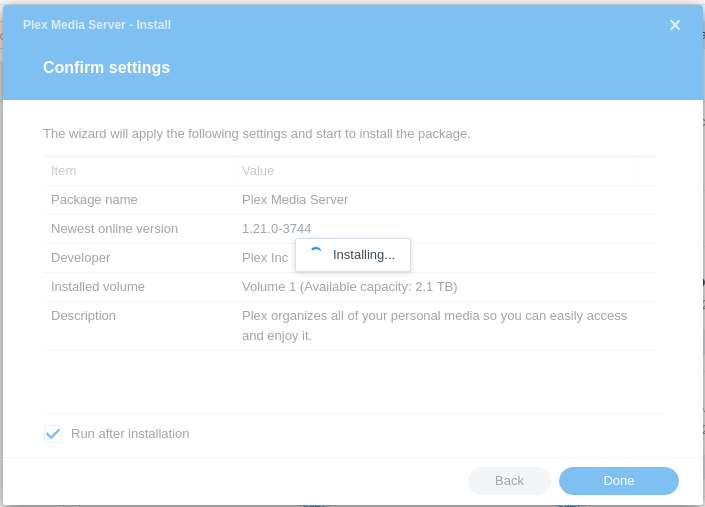
- Migration is not instantaneous. AFTER a significant delay (about 1 minute per 1000 items indexed by Plex) you will now see the final message telling you that your Plex installation has been migrated to DSM 7 and what you still need to do to grant access to your media.

Alternative installation using Claim Token ( Docker container style )
This method supports claiming a server which is:
- Remote
- On a non-RFC 1918 network
- Credentials compromised due to hard server reset or password changed incorrectly.
To use:
- Select the option
- Click “Get Claim Token”
- Authenticate with Plex.tv
- Copy the token string
- Return to the installer,
- Paste the token string into the window
- Click Next
(the token is valid for 5 minutes so do not delay)

NOTES:
The migration requires about 1 minute for every 1000 items indexed by Plex.
During this time, we:
a. Correct all malformed agent entries from older PMS versions
b. Assign all new permissions for user PlexMediaServer
Upon completion,
-
Your Plex Media Server files will have been relocated to the new storage area.
-
All other Plex-created information files and directories created by Plex in the
Plexshare will be removed if possible. -
There is no risk to any media you may be storing in the Plex shared folder.