Installation & Setup of Plex Media Server on Synology

Installation and Setup of Plex Media Server on Synology

This How-To is in multiple parts to make it easier to find whichever specific step you’re looking for.

If you’re new to Plex then reading this thread in sequence is probably the best approach.

This will show you how to install Plex on your Synology and then suggest a couple ways you can organize your media.

Please remember,

  • You’re always free to do it any way which makes sense to you.
  • We only ask you take the common pitfalls into consideration.
  • Doing so will save you and the support staff hours of frustration.

There are only a few major steps to setting up Plex on a Synology NAS.

The most important aspect of all this is to avoid the trouble spots where you can cause yourself headaches.

Introduction

  1. How is Plex Media Server structured on Synology
  2. Pitfalls to avoid

Steps:

  1. Organizing your media
  2. Installing Plex Media Server (the software)
  3. Granting Plex access to your media
  4. Starting Plex and performing initial configuration
  5. Adding media to (Creating library sections on) your Plex server

DSM 6 uses the Plex shared folder and username 'Plex`

DSM 7 uses the PlexMediaServer shared folder and username PlexMediaaServer

Notice This How-To is in draft form. Please excuse any errors or omissions.

5 Likes

How is Plex Media Server structured on Synology

Synology DSM hides their AppStore from all applications which make adding Plug-ins and log file access difficult. To overcome this limitation, and to overcome a Package Center limitation which prevents downgrading without uninstalling. Uninstalling an app would remove an application’s private data. We therefor decided to make a Shared Folder to hold all your metadata so it survives the removal/reinstallation process. The Plex share (or PlexMediaServer share) solves this problem and a few more.

In all, the Plex share (PlexMediaServer shared folder on DSM7) provides us a working space where we can:

  1. Persistently store all the downloaded and generated information for all your posters, metadata, and other customizations (Collections, Playlists, etc).

  2. Keep Plex itself from writing to areas of your Synology media storage that you don’t want it writing to.

  3. As Plex evolves, when changes are required, we know everything is safely all in one location and isolated from your media files. We can safely do what we need without impacting your content.

  4. Make recovering from problems easier. Initially, the Plex share was hidden. When it was hidden, if you had a problem and PMS wouldn’t start, you were required to do a lot of command line typing. That was unacceptable. It’s for this reason we changed it so you can make it accessible when needed. By default, you won’t see it in File Station. This is by design. All we did is hide it there. The Plex share can be made accessible with a few mouse clicks. After that, you can readily access the Log files and resolve other problems entirely with the GUI.

During normal operation you won’t need to access the Plex share or ever concern yourself with it. The cases where you will need to access it in File Station are:

  1. Manually obtaining the Plex log files when something goes wrong and PMS won’t start.
  2. Installing / Removing Plug-in modules.
4 Likes

Prerequisites and Pitfalls to avoid

Prerequisites

  1. Your computer and NAS must be on the same LAN subnet.
    – You cannot access the NAS using a Synology Quick-Connect connection
    – You cannot access the NAS when it’s remote from you without taking special steps
    – The most important part of this setup presumes (requires) you to be on the same RFC-1918 Private Network (e.g. 192.168.x.x, 172.16.x.x - 172.31.x.x, or 10.x.x.x).
    For more information about networking: http://wikipedia.org/wiki/Private_network
    – Do not use Synology “QuickConnect” hyperlink to setup Plex on DSM 7. QuickConnect has been changed and now forces a remote FQDN reference. Plex’s default security blocks any attempt to perform setup from an ‘unknown remote sender’. Plex must see your browser as “Local”.

  2. You have created a Plex.tv account to associate with your server. If you’re reading this document, here in our forums, then you likely have one. Your Plex.tv account credentials will be needed to associate your new server with your account to it integrates with all your other devices.

Pitfalls to avoid

Here are some things you won’t know if you’re new to Plex or Synology.

  1. Don’t plug in all the ethernet adapters until after you have Plex configured and set the preferred adapter. (Settings - Server - Network - Show Advanced). Best results are to use LAN 1 only (on systems with multiple adapters) during initial setup.

  2. Don’t put TV series in with Movies or the reverse
    – Plex has media “scanners” which look at how your files are named.
    – Those scanners make assumptions based on which type of media.
    – If you put a TV series in with your movies, you’ll get crazy movie titles :slight_smile:
    – Always do you best to adhere to Plex’s naming rules. Poorly named or structured media makes Plex work harder to try and figure out what your intent is. While it’s usually very good, it can’t interpret everything.

  3. Do Not use the Synology pre-defined shared folders for Plex.
    – Synology’s Video Station, Audio Station, and Photo Station apps own them.
    – We have tried many ways to be compatible but there is something within DSM and Synology’s reluctance to share then.
    – Best advice is to not use them

  4. Please heed the warning to not place any media files anywhere in the Plex shared folder (DSM 6) or the PlexMediaServer shared folder (DSM 7). Many bad things can happen including loss of your media.

1 Like

Organizing your media

There are many ways to organize your media.

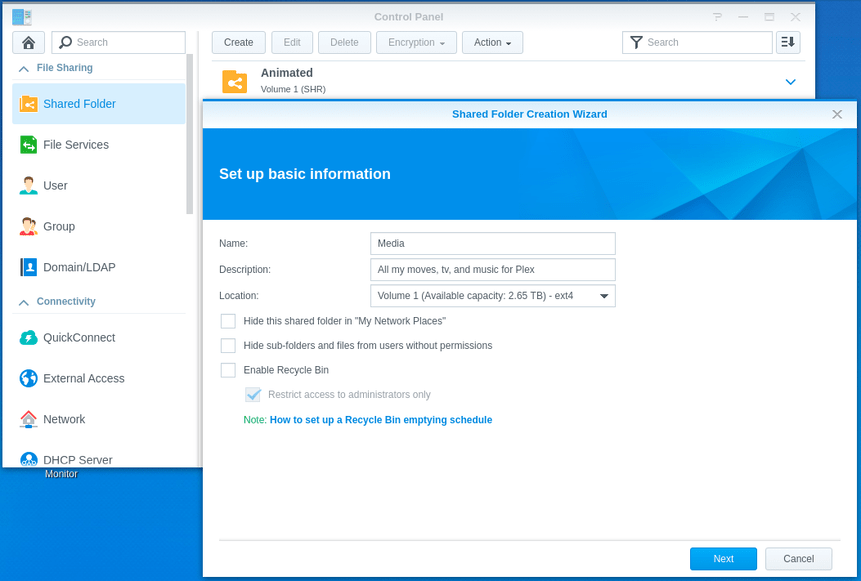
To create a shared folder,

  1. Open Control Panel → Shared Folders
  2. Click “Create”
  3. Follow the onscreen prompts.
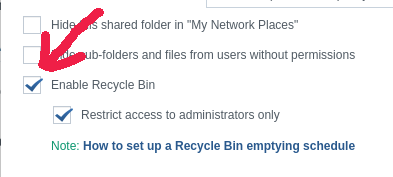
  • Decide whether you want the Recycle Bin or not, on the General tab. If you leave it on, it’s up to you to manage recycling of deleted files. When it’s off, deleting files reclaims the space immediately as you would expect.

  1. Set the appropriate permissions on the Permission tab during the last step.

Different methods commonly used for creating shared folders for use with Plex.

Method 1 - One shared folder for each Library section

You can create a shared folder for each type or even each library section you plan to make (e.g. “Movies”, “Children’s Movies”, “TV”, "Music’, “Photos”, “Holiday videos”. The important point here is that you create a structure and organize in a way which works best for you!

Method 2 - One shared folder for all media with sub folders

  1. Another equally common method is to create a “Media” share.
  2. Under that share, create folders for each type of media. This is where you’d use the “Movies”, “TV”, “Children’s Movies”, etc, just as you would if discrete shares.

It doesn’t matter which method you use. Use whichever makes most sense to you.

We urge you to NEVER USE the predefined video, music, or photo shares that Synology created. These shares are owned by Synology’s Video Station, Audio Station, and Photo Station products. To avoid accidental confusion, there is no harm in deleting them.

Note: If you’ve loaded your media but don’t like how it turned out and want to make changes, you can reorganize it using File Station or you can use a more powerful technique (detailed in the Syno FAQ). Whatever your decision, as long as you avoid the Synology shared folders and make names which work best for you then all is good.

WARNING:

Synology claims permanent ownership of the video, photos , and music shares even when their products (Video Station, Photo Station, and Audio Station) are not installed.

Plex claims ownership of “Plex” (DSM 6) and "PlexMediaServer (DSM 7) shared folders.

It is for this reason, we URGE you to create your own shared folders for your media.

Not only does this let you structure the Synology and Plex to how you think about media but also avoids the perpetual conflicts you’d face if you used their default shares.

Storing media in the Plex (DSM 6) or PlexMediaServer (DSM 7) share

Do NOT store media in the

  • Plex shared folder on DSM 6
  • PlexMediaServer shared folder on DSM 7

These shared folders are for PMS use only.

When a mistake is made (which happens very frequently) PMS starts monitoring itself (inotify slots) and PMS breaks.

The transcoder will stop working.

If you have media in these shared folders incorrectly. please move it now.

3 Likes

Installing Plex Media Server

WARNING: PMS is no longer updated in Package Center.

You can use Package Center if you’re really stuck to get started with but urge you to update from https://plex.tv/downloads as soon as is convenient.


Plex can be installed from Synology’s Package Store or by “Manual Install” method where you download from Plex first.

Downloading from Synology is easier but it will always be a few revisions behind what’s available directly from Plex. This is because Synology updates at a slower pace.

Downloading and installing from Synology

1. Searching for it in Package Center

2. Downloading from Synology

Downloading from Plex and performing “Manual Install” method

  1. Go to Plex’s download page http://Plex.tv/downloads and select the version for your Synology (Control Panel - Info Center)

  2. Upload from your computer to your Synology.

Click “Manual Install”

Find the file on your computer and click “OK”

Downloading/Uploading is complete
When Package Center is done receiving the file, it will automatically start preparing for installation.

The first thing it will ask is where to install Plex. Most of us have only one storage volume on the NAS at this point so “Volume1” is the right choice. If you made 2 or more volumes, you can select which one Plex is installed on in the drop-down volume selector.

Installing the software (Select installation volume)

Ready to install the software

At this point, It’s recommended to not let Plex start automatically after package installation. This is because you still have a little bit of work to do.

Installation is almost complete but don’t let it start yet. We have some work to do.

3 Likes

Creating Shared Folders

If you don’t have existing shared folders for your media, follow these steps
**If you already have your media stored how you want it, you can skip this step

DSM 7 NOTICE:

On DSM 7, “System Internal User” PlexMediaServer is used (change ‘Local User’ → ‘System Internal User’) when granting shared folder permissions.

  1. Open Control Panel
  2. Click Shared Folder → Click “Create” (at the top)
  3. Give it a name
  4. Decide if you want the Recycle Bin on or off. The recycle bin catches all deleted files. If you forget, you’ll think you’re losing space VERY quickly.

Next is the Encryption option. This is a personal choice.
BE FOREWARNED: If you activate this, Plex can’t see your media until you unlock it

**Confirm what DSM is about to create. You can go “Back” if you need.

Grant permission for Plex while creating the share

Granting Plex access to your media after creating the share(s).

We’re going to perform this step for each shared folder you’ve created (which is holding your media files) .

If you just created the Shared Folders then you’ll have already done this step and can skip over this part.

If not, we will grant user “plex” permission to “Read-Only” for now.

Synology provides us two different methods.

Use This form of “edit” (right click the share name)

Or this form of “edit”. This form is probably easier for most
(Highlight the share you want to edit. Click the ‘EDIT’ button at the top)

Check the “Read-only” box for “Plex”/“PlexMediaServer” on the “Permissions” tab. Then click “OK”.

Depending on how we decided to store our movies, We might need to make folders for them in our new “MyMedia” share.

  1. Open FileStation
  2. Open the new share name - Select it from the left panel.
  3. In the right panel – Right-Click – Create Folder

We’re done creating our shared folder and granting access to Plex.

2 Likes

Starting Plex Media Server for the first time

After all media shares have granted permission to Plex, we’re ready to start.

Prerequisite

  1. Open your browser
  2. Open the DSM desktop directly by using its LAN IPv4 address http://ip.addr.of.synology:5000
    a. (e.g 182.168.0.10:5000)
    b. WARNING: This cannot be done using remote desktop or DDNS
  3. Open Package Center
  4. Click “Installed Packages”
  5. Click “Plex Media Server”

Click “Run”.

  1. DSM will start Plex and let us know it’s “Running”.

  2. Depending on the model Synology NAS you have, it’s usually a good idea to give Plex about a minute to perform it’s First-Run where PMS creates all the directories and basic files, including the master database, it will use.

  3. As a general rule of thumb, when the CPU is again quiet (near zero), we can continue.

With your browser at this page in Package Center, Click “Open”

Your browser will open to the Plex startup wizard

Read the introduction and click “Got It”.

You will be asked to sign into your Plex account.

One authenticated. the Setup Wizard will start and guide you through the rest of the process.

It will ask a few basic questions:

  1. What friendly name do you want to give your server? By default, the Server is given the same name as the NAS. If this is ok then accept the default shown.

  2. Do you wish to enable Remote Access? Decide whatever is best for you. If you have special networking considerations to address first, it might be better to not enable it yet. You can always enable it later in Settings - Server - Remote Access

3 Likes

Adding media files - Creating library sections

When the server has finished the main first-run internal task it does before adding media (this can take a bit depending on speed of the NAS), it will display this page.

We’re now ready to start adding media “sections” (movies, tv, music, and photos)
Click “Add Library”

Select the type of Library* (Movies, TV, Music, Photos, or “Other Video” (Home Video)

Setting up the Animated Movies library section (this example)
Using the left panel selector,

  1. Select the volume the share is located on (usually volume1)

  2. See the list of shares in the right pane.

  3. Click “Animated”

  4. If the permissions for Plex are set correctly. All your content will show in the right pane just as it does below.

  5. Add the Movies section while we’re here.

This is all we want to create for now so click “NEXT”.

On the pages which follow, the wizard will ask a few other configurations about how you want PMS to operate initially. Feel free to choose as you wish. Everything can be changed later without ill effect.

When we’re done with the Wizard and happy with these initial settings, click 'DONE"

Watching the media populate

At this point, we return to the left panel and find our server.
This DS418 has two media shares defined (Animated Movies & Moves)

In this screenshot, Click “Animated Movies” (left pane) then “Library” (top panel)
We now can watch PMS scan our media and retrieve the metadata (orangle spinning circles)

Note: Linux does not store names in alphabetical order. It is normal to see media scanned in a random manner. What it’s really doing is scanning in the order the media was added to the folder.

2 Likes

All done!

We just completed setting up Plex Media Server on a Synology NAS.

Depending on model, you might want to let it finish this initial indexing. There are a lot of CPU resources being consumed. The best experience can be had when all metadata retrieval is complete.

You can also monitor the Synology Health: CPU utilization meter.

Other considerations & final comments

Photos and music take much longer to process. Music takes the longest.

When adding Photos and Music, try to add smaller sub folders (groups) at a time. Something less than 5000 individual items per ‘batch’ is a good rule of thumb.

note: Some users have reported over 10 days to scan their entire music library all at once (they are that massive)

There’s no limit to how many sub-folders PMS can use so don’t be afraid to organize & curate your media as much as you want.

Obtaining help

Please don’t hesitate to reach out to us in the forum for help if you need it.
Before you do reach out, we do ask

  1. Please do search (using the “magnifier” in the upper right) before creating a new thread. Most times, we’ll have answered your question for someone else.

  2. Plex has built-in logging so we can diagnose problems. The default is “DEBUG” logging enabled and “VERBOSE” logging is disabled. PLEASE do not change this. It doesn’t save any space (fixed size logs). Changing from the defaults without being asked only lengthens how long it take us to help you.

  3. Please present as much information as you can when you create your thread. The diagnostic logs ZIP file (Settings - Server - Troubleshooting - Download Logs) are almost always needed. Without this, we can only answer the most basic questions. Plex will download them to your computer. To share them with us, please drag & drop into the Reply window and allow enough time for the forum to show you a URL (hyperlink) as evidence the upload has completed.

4 Likes

Supplemental information:

If migrating from another PMS system, the following procedure also applies.

When migrating from Linux, Linux users will see the similarity (Linux → Linux) and should be able to adapt to this Mac/Windows centric procedure with ease.

WIndows migrations

Windows migrations require one additional step

1 Like