Note: This method mimmicks the “DSM 7 ‘migration’”. It is done this way to maximize automation and ensure a successful import.
Make certain to turn off / disable the following in Plex Settings > Server > Library before stopping PMS.
a. Scan my library automatically
b. Run a partial scan when changes are detected
c. Scan my library periodically
d. Empty trash automatically after every scan
Stop PMS on the source (Mac/Windows) machine
ZIP up the “Plex Media Server” directory.
Using FAQ #1, give yourself access to the Plex Share
If PMS is already running on the Syno, stop it. If not installed, Install it and then stop it.
Open File station
Navigate to Plex / Library / Application Support
Rename the existing “Plex Media Server” directory to “PMS.orig”
Drop your ZIP file and unzip so it unzips and takes its place as “Plex Media Server”
Right-click “Plex Media Server” and set the properties - owner as “plex:users” for “this folder, sub-folders, and files” (checkbox)
Using File Station
a. Navigate to Plex/Library/Application Support/Plex Media Server/
b. Delete everything found here. These tokens are incompatible with Linux. New will be created as needed without issue.
c. Details / How-To in this FAQ Synology FAQ - Questions, Answers, and How-To's - #27 by ChuckPa
Start PMS.
Now transfer the media locations (Edit each Media Library section in turn:
a. Add the new locations,
b. scan files
c. observe duplicates showing (good),
d. when all duplicated
e. Edit the section’s folders again and remove the original locations.
f. Advance to the next Library section and repeat until done.
When all sections have been edited,
a. Scan files one final time
b. Empty Trash
c. Clean Bundles
d. Optimize database
When happy everything has transferred, delete the ZIP file.
FAQ 19: Setting permissions to allow Plex access to media files
Before beginning, it’s important to remember one key point; Plex doesn’t have any special privileges on Synology except for being able to access the Video Transcoding acceleration hardware. It cannot read any of your files unless you expressly grant permission. This is a fundamental principle of Linux (which Synology uses for DSM)
Because of how Synology grants permission, access to files is broken into two different elements and, as the direct result, may take 3 forms
The file(s) were copied onto the NAS from external media
The file(s) were copied onto the NAS using a SMB/NFS user account
The file(s) were copied onto the NAS using a third party utility/program.
In almost all cases, granting access to user Plex in the Control Panel - Shared Folders (app) is all that’s needed. However, sometimes, because of the different ways media files might have been copied, they need permission adjustments to work in the Synology/Plex environment.
This FAQ shows the different steps you might have to take to change permissions for Plex to see the media.
For DSM 7 - Grant permissions for “PlexMediaServer” For DSM 6 - Grant permissions for “Plex”
The most common, which is also a required step, and easiest to do, is grant access to the Shared Folder where the media is being stored. Always do this step first.
a. Control Panel
b. Shared Folders
c. EDIT the share containing the media
d. Permissions tab
e. Check the box (Read only or R/W) to grant Plex access.
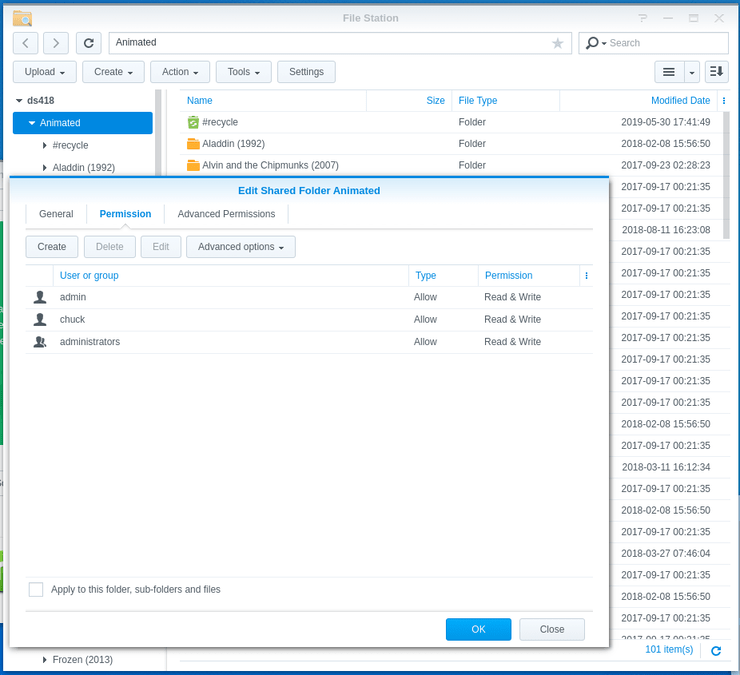
The second most common, but also most confusing, is when permissions are mixed due to where the media files originated. Only do this step as needed and only to the degree it’s needed.
(DSM 6 shown here. Use PlexMediaServer for DSM 7)
Check the share’s (or movie/tv series’) Properties
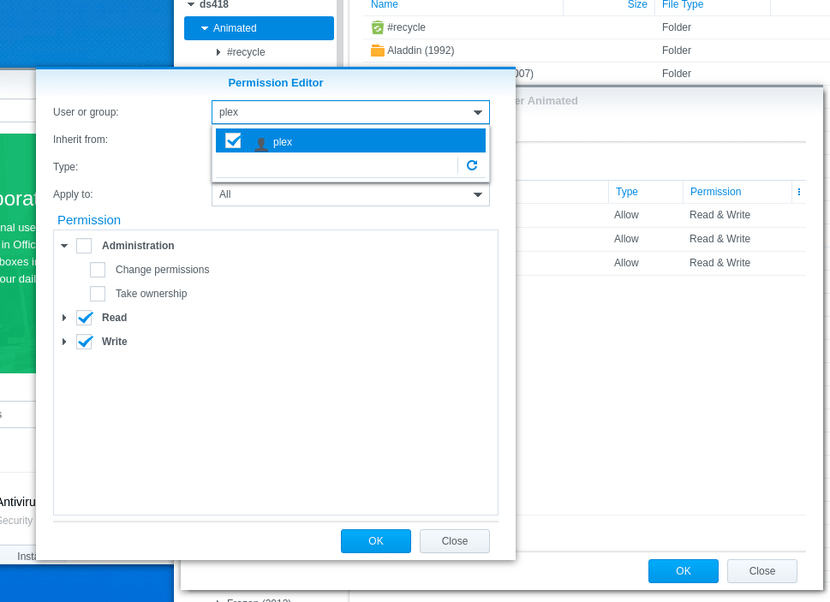
If user “Plex”/“PlexMediaServer” isn’t listed, we will need to add it to the list of username (top box), and then check the access permission boxes (Read permissions block & Write permissions block)
It is possible, as you add media, you will again encounter individual files which aren’t seen. By applying the last part of this procedure surgically on those folders/files, you can open up their permissions and allow Plex to see them.
This still seems to be effective for some customers with low bitrates, LiveTV buffering, or DVR signal strength issues
For versions below 1.21.0
This shouldn’t be necessary but is until such time as Intel is able to fix the problem.
the best choice is to configure PMS to bypass it by editing your Preferences.xml file
Install the Synology Text Editor (Required)
Stop Plex
Open File Station and navigate to Plex / Library / Application Support / Plex Media Server
Right-click Preferences.xml and Open in Text Editor
On the bottom line, scroll to the right.
Bfore the closing /> type VaapiDriver="i965" .
It will appear as : VaapiDriver="i965" />
Preceding and succeeding space is required.
Save the file
Restart PMS
WARNING: REMOVE this preference when playing HEVC HDR encoded with Level 5.0 and above. The i965 initialization will fail. HW transcoding will fall back to SW and fail to transcode.
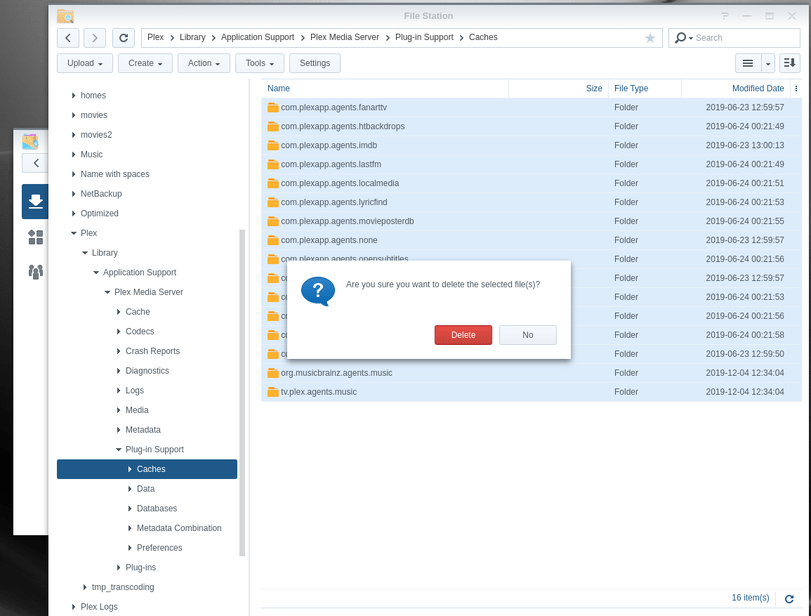
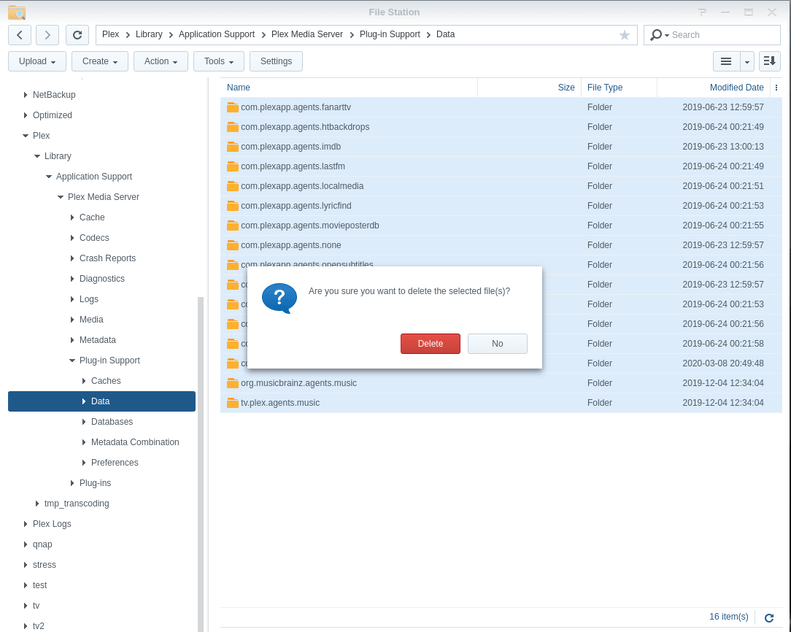
After moving (ZIP file – which can take a long time due to the number of files being moved) your Plex server from a Windows platform to any Linux platform, you must remove all the leftover Windows files which are known to cause problems.
The two important areas to purge are:
Plex / Library / Application Support / Plug-in Support / Caches
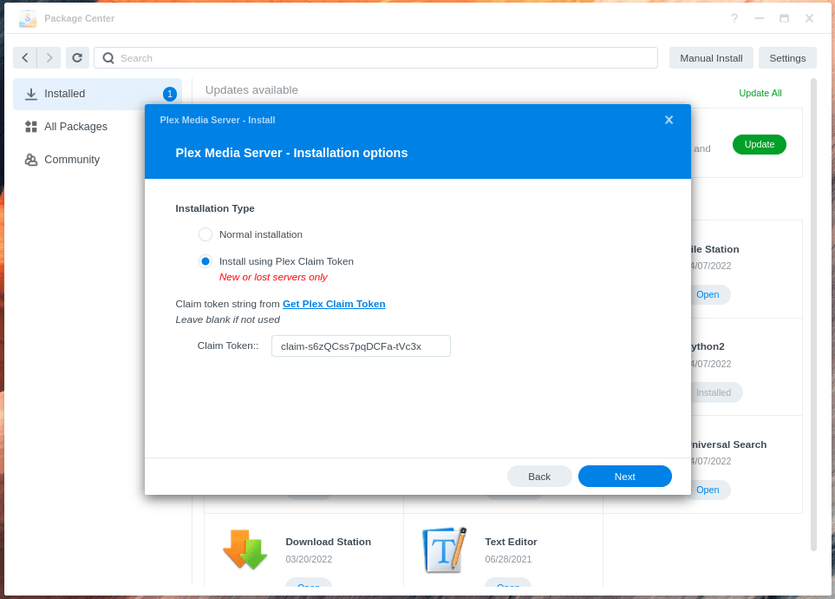
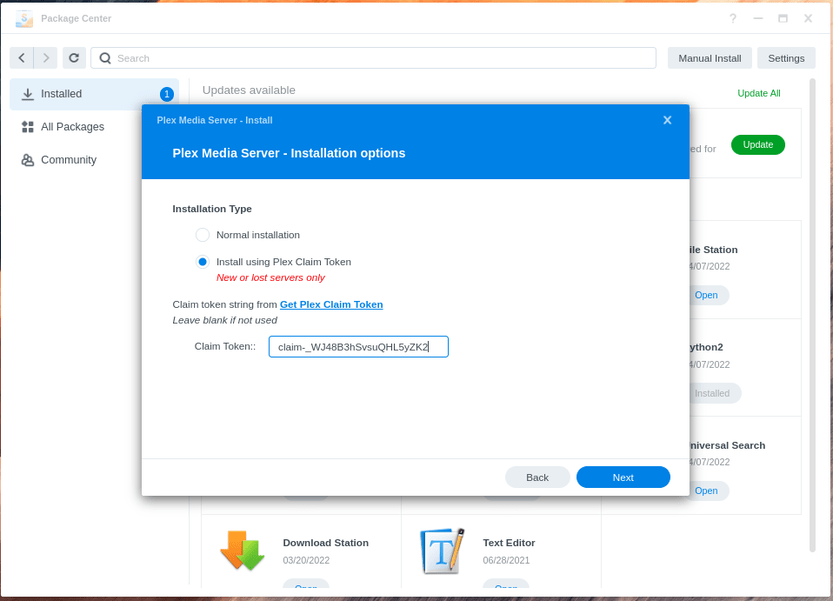
Install the same version package again,
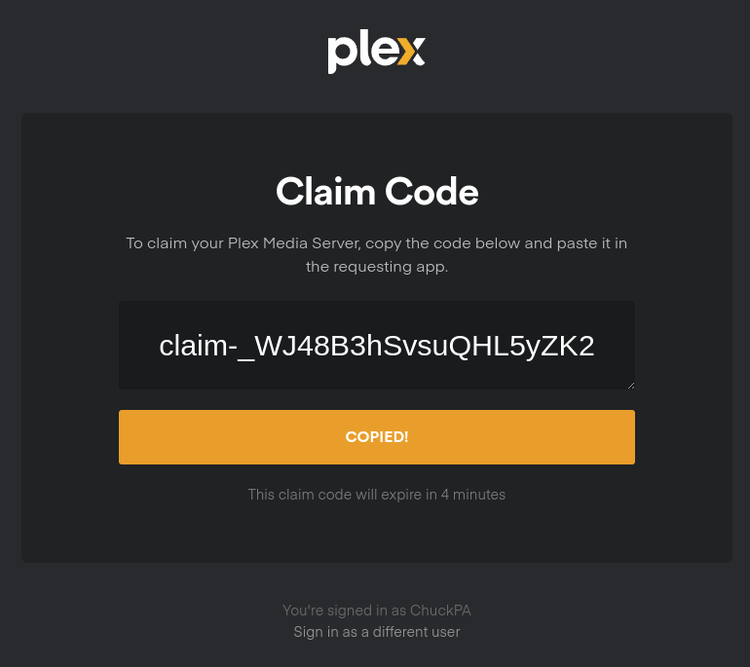
– Plex Claim Token method
– Click “Get Plex Claim token”
– Browser will open and show claim-xxxx token
– COPY the token to browser (do not waste time. Token expires in 5 minutes)
– Return to installer window
– PASTE into token window on installer form
– Click NEXT & DONE and continue installation
– Installation will take 15-30 seconds longer as installer and Plex.tv setup new credentials
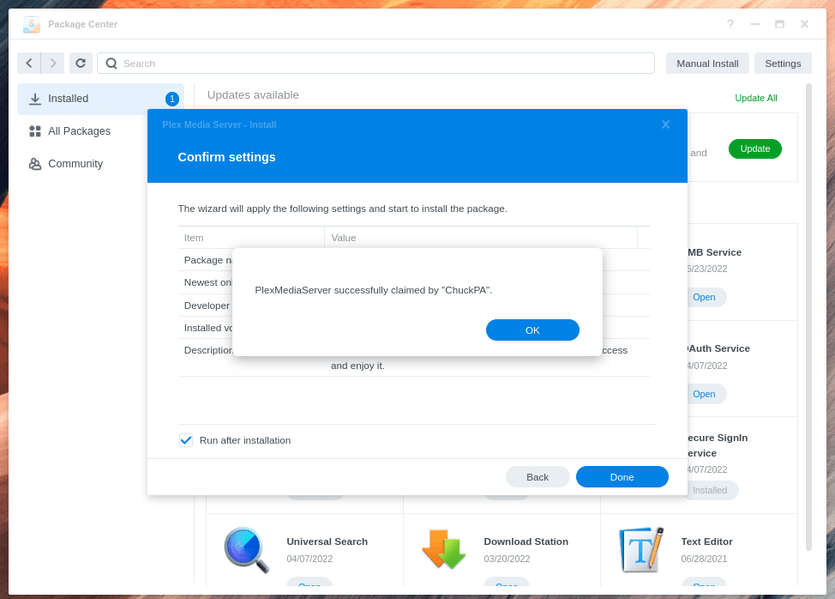
– Installer will show success or failure. Success will confirm using your Plex account username when done.
This ONE TIME -
– Open an incognito window
– Open http://lan.ip.of.syno:32400/web
– IGNORE the “not hosted by Plex” message and proceed.
– Sign in
– Go to the left panel and select your server
– Let the browser and server resync
You may now close the browser tab and use PMS normally.
Restart any player devices so they update with the new server credentials.
DSM 6 -
Use this procedure (Soft reset) when:
You receive the nasty “No Soup For You” message
You’ve changed your Plex password and now have trouble accessing the server.
WARNING
If you can use SSH-tunnel, use it. Do not use VPN. Use of a VPN forwards your IP as the “Referrer-IP” which PMS will always detect as remote which locks you out when it’s unsecure.
Might offer the setup wizard.. Skip through it as appropriate
( No need to recreate shared folders unless you deleted the contents of the Plex shared folder)
When you arrive at the Dashboard, recheck your settings. All should be intact.
Fix as appropriate.
FAQ 23: Moving large amounts of data on Synology via GUI.
This FAQ is intended to be used in conjunction with this How-To
This FAQ is to help you get away from using the default Synology Video, Music, and Movie shares. Use of their shares will always conflict with Plex when Video station and/or Audio Station is installed. This FAQ helps you store your media in a neutral location both can work with.
This FAQ is provided AS-IS, without liability for any data loss (I hate legal clauses but necessary) so be sure you know what you’re doing as it is a “Full Power” tool.
While it does seem like a lot of work, it is only in the first-time setup.
This procedure is set to move ONE block of data at a time. If you need to move multiple blocks around, you will need run it multiple times. Keeping it this simplistic avoid mass damage from occurring.
When moving large quantities of items, you’ll quickly find File Station takes far longer “preparing” than you do to make the edits. WARNING:
Before proceeding:
If the source volume and the destination volume are different, make absolutely certain you have enough free space on the destination volume.
If you are moving to a new share, be certain to create the new share in Control Panel - Shared Folders first. Pay attention to the capitalization you use.
If source and destination volumes are the same, there are no disk space concerns.
a. If moving across volumes, you will need to make certain enough space exists on the new destination volume. ( This process does a copy-then-delete after method )
Make 100% certain there are no folder or file names which begin with a period (DOT) . character. The dot character (period) in Linux is considered a hidden folder or file and will be ignored (left behind).
How To Do This:
Control Panel
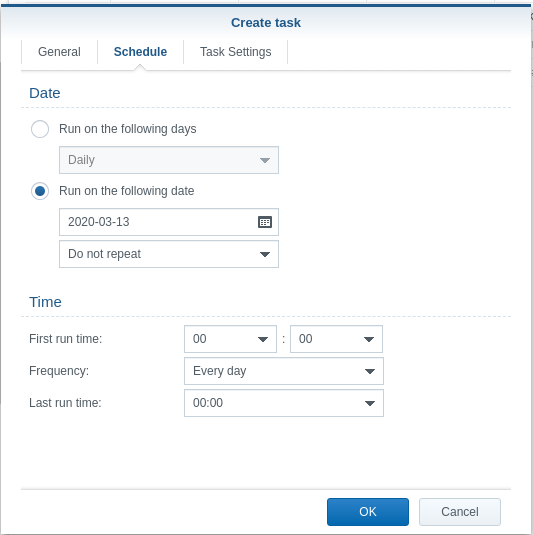
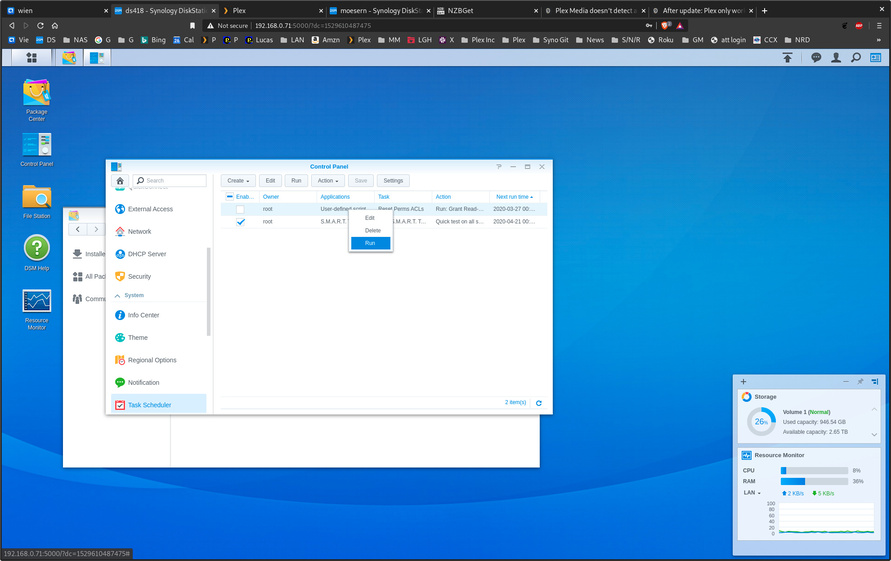
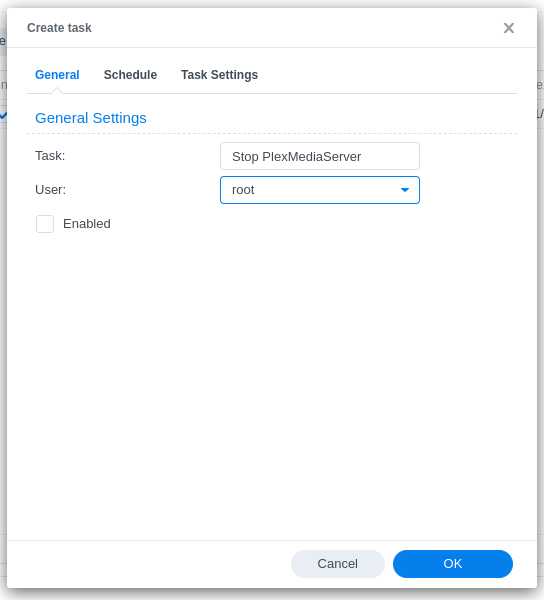
Task Scheduler
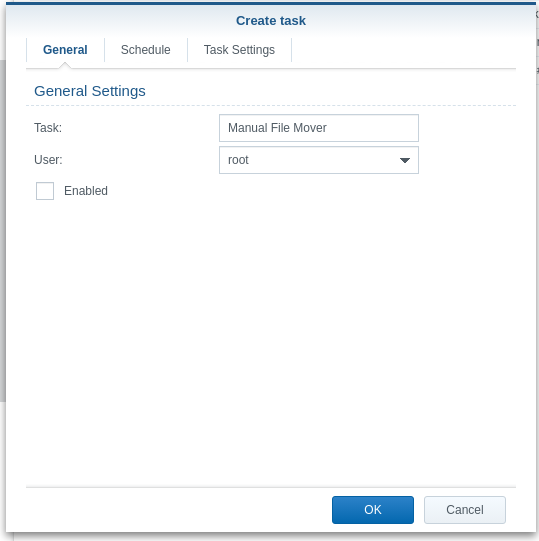
Create a scheduled task which is a User-defined Script
Under “Settings” copy and paste this text VERBATIM
#!/bin/sh
#
# Define the source and destination share names (Capital letters are critical)
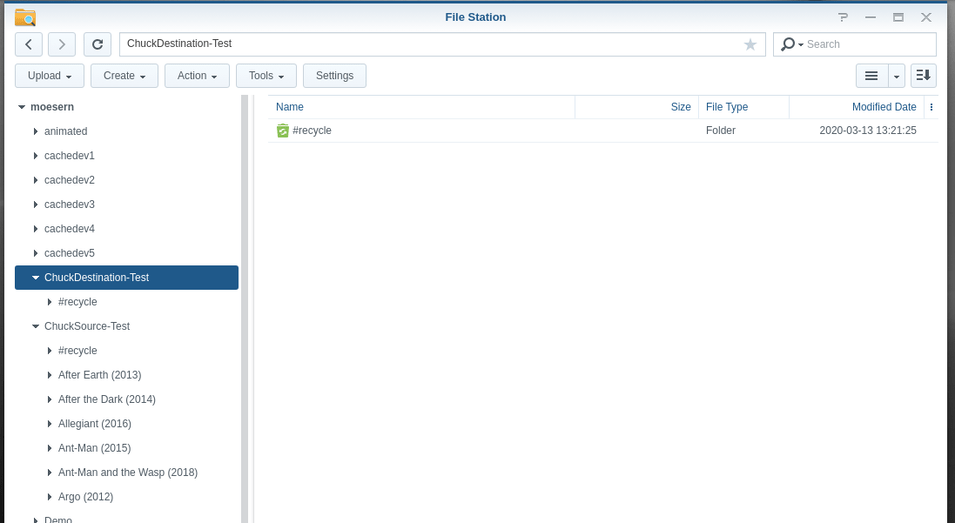
Source="/volume1/ChuckSource-Test"
Destination="/volume1/ChuckDestination-Test"
#
# It is important that the Destination exist before Enabling and Running this script
# If not created, the script will error.
# Check before moving
if [ ! -d "$Source" ]; then
echo \"$Source\" is not a directory or does not exist.
exit 1
fi
if [ ! -d "$Destination" ]; then
echo \"$Destination\" is not a directory or does not exist.
exit 1
fi
# Safe to move so do it.
mv -f "$Source"/* "$Destination"
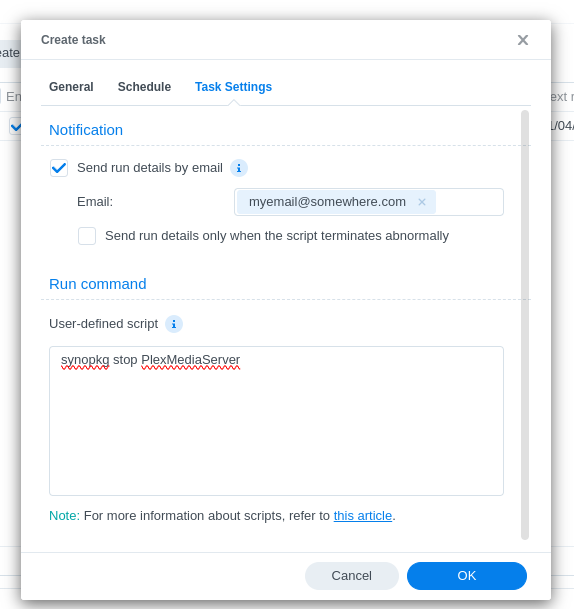
If you want the script output emailed to you, enter your email address
When complete, click “OK” to save it.
The script is now ready to edit for your use.
How To Use
In Plex:
Go to the Library section
Add the new shared folder (Destination) to the list of monitored folders)
Save it
Let it scan but come up empty
Go to Settings - Server - Library
a. Disable Automatic Scan
b. Disable “Empty Trash after every scan”
Now perform the move below
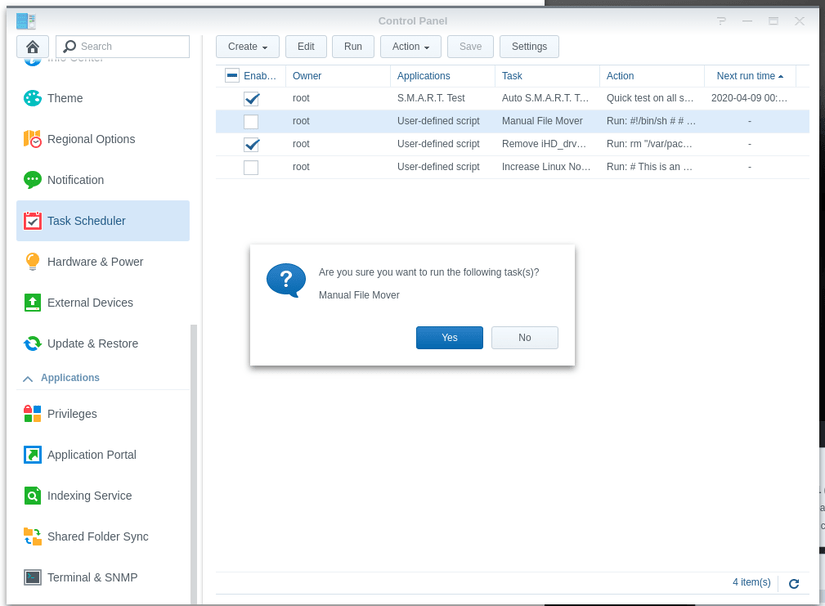
Performing the move
In the Control Panel - Schedule Tasks
Highlight the script and click “EDIT”
Go to “Settings”
Carefully edit the source and destination directory (folder) names to match your source and new destination shared folders.
Save (OK) the changes
Advise: Open FileStation so you can monitor the progress (use Refresh)
FAQ 24: Restoring Share Permissions to Default Settings
DSM 6 only
This FAQ/How-To is for those cases when the different applications in use on a Synology NAS have interfered with PMS operations so much that trying to sort out the root cause has become impossible.
It is in these cases, the best solution is to forcibly set them to a known base permission level.
Here is how to do it.
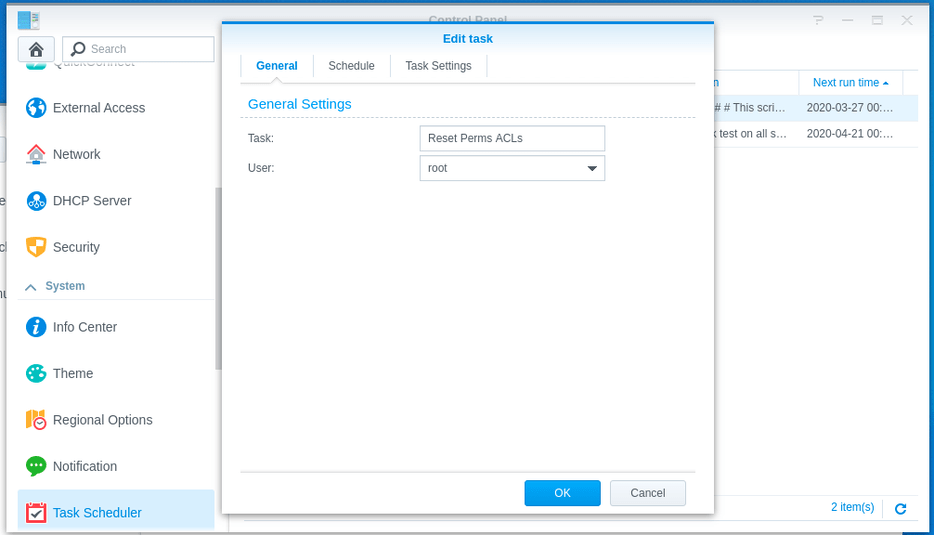
Control Panel - Scheduled Tasks
Create a “User defined Script”
DO NOT “enable” it (It is enabled by default). You want full manual control.
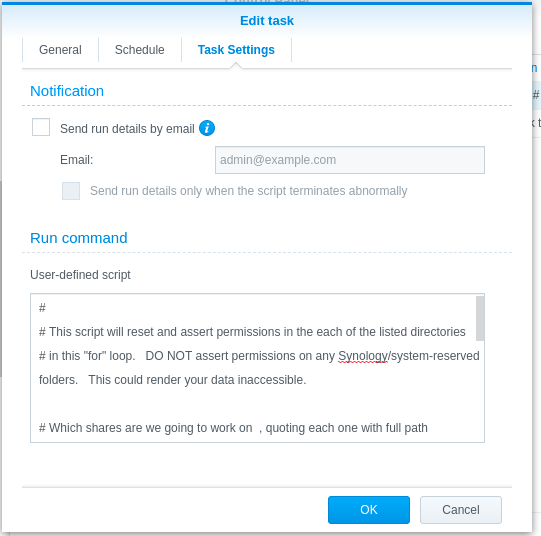
In the Task Settings tab, paste the script below (copy/paste from the browser) exactly as I have provided
Save (OK) it.
Now “Edit” it again → Task Settings.
Edit the line: for D in "/volume1/Animated", replacing my share pathnames with your pathnames. Multiple quoted paths may be listed on that line, separated by a space. The names are case-sensitive so please to be exact.
The script runs silently but you can opt to have it email you the output (in the other settings).
When happy with your edits, Save it again (OK).
The task is now ready to execute.
Run the task.
Review and re-add permissions to the share(s) using Control Panel - Shared Folders.
It is advised Operate on one share at a time until you are certain you understand what follow-on steps are needed.
After running the script, any special permissions which were previously granted to the listed shares will have been removed.
The default permissions assigned are:
The share owner (you?) will have full Read/Write access
Everyone else will have Read-Only.
Shared Folders or File Station can now be used to add/remove permissions as you deem appropriate.
#
# This script will reset and assert permissions in the each of the listed directories
# in this "for" loop.   DO NOT assert permissions on any Synology/system-reserved folders.   This could render your data inaccessible.

# Which shares are we going to work on
for D in "/volume1/Animated"
do

 # Do this only if the name ($D) is a directory (full folder path)
 if [ -d "$D" ]; then

  # Revoke all previous permissions to a sane value
  find "$D" -type d -exec chmod 755 {} \;
  find "$D" -type f -exec chmod 644 {} \;

  # Now assert Synology ACLs so the current file owner has control
  find "$D" -type d -exec synoacltool -add {} 'owner:*:allow:rwxpdDaAaRWcCo:fd--' \;

  # Grant Read-only to everyone else
  find "$D" -type d -exec synoacltool -add {} 'everyone:*:allow:r-x------R-c-o:fd--' \;

 fi
done
Click NEXT, NEXT, and DONE to continue installing.
After about 15 extra seconds, The installer will confirm you’ve installed the package again AND whether or not it is reattached. When reattached, it will show your Plex username.
Sign in, ignore the “Not Hosted by Plex” warning. Confirm everything is back.
Close this window and reopen normally. Claiming is complete.
DSM 6
This is written this for worst case (reclaiming may happen 2 ways - both are shown here). It will likely only need through step 16 but I’ve provided everything just in case.
Install the Synology Text Editor app (in Package Center - Search)
Remove the Synology (we will make it appear again in a minute)
Sign out of Plex/web (upper right corner)
Open File Station
Plex share / Library / Application Support / Plex Media Server
Right - click “Preferences.xml” → Open in Text editor.
Very carefully, remove the complete Name="Value" pairs,
a. PlexOnlineToken="-value-"
b. PlexOnlineUsername="-value-"
c. PlexOnlineMail="-value-"
d. PlexOnlineHome="value"
Save the file.
Right-click Preferences.xml again and make certain it is still owned by plex
Migrating from another PMS installaton to Synology DSM 7 requires a little bit of up-front work.
The basic procedure is:
Prepare the existing installation for copying
Create a “Plex” shared folder on DSM which will be the base share for importing.
Create the folders “Plex/Library/Application Support”
Copy the “Plex Media Server” folder and contents into “Application Support”
Manually set permissions of the Plex share, and all files in the shared folder, so it can be read by everyone (which also will include the new PlexMediaServer user when it gets created).
Now we will “Manual Install” Plex (DSM7) on the NAS.
As it installs, it will issue some initial errors because the permissions are not correct.
Follow the instructions given in the pop-up message.
When the installer is satisfied, it will begin “Installing” and sit there.
Let the DSM 7 installer do the heavy-lifting . (It will give instructions as it does its work)
You’ll know when it’s done. Plex/Migration.log will indicate “Cleaning” is complete.
Here we go
On the originating host PMS
Turn off all automatic updating
Disable “Empty Trash”
Save those settings
Stop Plex
(we’re about to clone it)
Create a ZIP file of the “Plex Media Server” folder (the one that contains all the metadata underneath it)
On DSM
Create a shared folder named Plex (case sensitive)
In that shared folder, create this structure (old DSM 6 'cuz it’s easiest)
Plex/
  Library/
    Application Support/
Copy the ZIP file to the “Plex/Library/Application Support” folder
Unzip the ZIP
After unzipping move the contents if needed to produce the following structure
Plex/
  Library/
    Application Support/
      Plex Media Server     <-- this will have come from originating machine
FAQ 27 - Migrating an existing PMS from DSM 6 to DSM 7
NOTICE: DSM 5 → [ DSM 6 ] → DSM 7 First Step
If you first started using Plex with DSM 5, then upgraded to DSM 6, because of a change internal to DSM 6, you will need to perform this step before you start the DSM 7 upgrade.
If you never used DSM 5, or deleted the Plex share sometime during DSM 6, you can skip this step and continue with the normal upgrade steps
Rename the existing Plex shared folder to Plex.old
Create a new Plex shared folder
Move the entire contents of Plex.old → Plex
What you’ve done creates a shared folder which DSM 6 didn’t upgrade.
DSM 5 didn’t support “Full Control” mode. DSM 6 introduced this.
With DSM 7, we need Full Control mode for the Plex share due to the added restrictions of DSM 7.
Upgrading PMS from DSM 6 → DSM 7
DSM 7 no longer allows us to go find the metadata directory and use it across volumes before starting PMS (This is the lack of “root” privilege blocking). As such we require the following two conditions are met we will attempt to automatically migrate you;
You have an existing DSM 6-created PMS installation and PMS is installed on the SAME STORAGE VOLUME as the “Plex” shared folder (this is critical)
You have an existing DSM 6-created installation and PMS is uninstalled and reinstalled on the same volume as the existing Plex share.
If you do not meet either of the above conditions we will warn you and advise you.
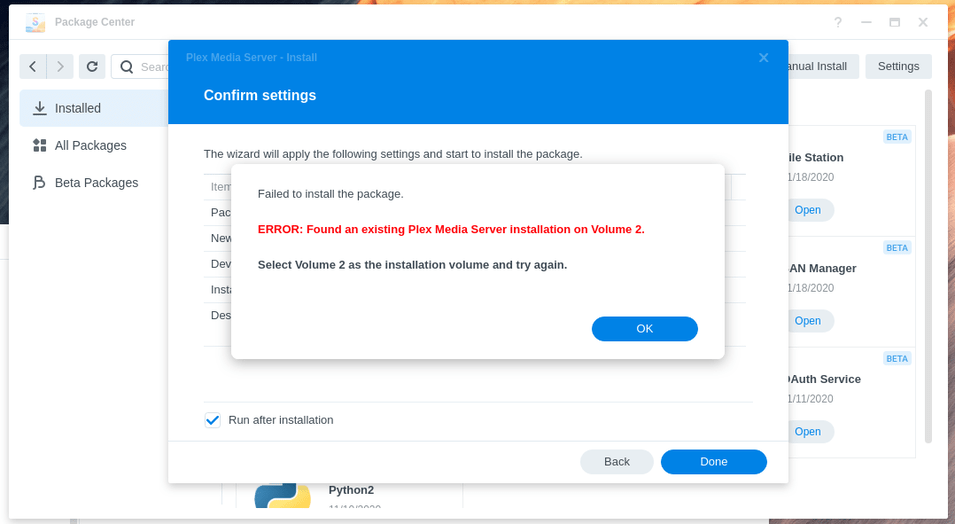
Scenario 1: Plex Media Server is NOT installed on the same volume as Plex share
If PMS is installed on a volume other than the Plex share’s volume, you will be notified to make your system comply with the new requirements.
When re-installing, instruct Package Center to install PMS on the same storage volume as the Plex share. (Check this in Control Panel - Shared Folders if uncertain).
You can now proceed to the next section of instructions in Scenario 2.
Scenario 2: Plex Media Server installed on the same volume as the Plex share
If PMS is installed on the same volume as the Plex share we will detect this and attempt to automatically migrate your Plex Media Server library/preferences to the new DSM7 location.
Migration Bootstrap (This failure is expected during during first installation)
When you first install Plex, because the username and permissions mechanism have changed in DSM 7 to PlexMediaServer, DSM won’t have the proper privileges set. You will need to assign them.
During install / upgrade, it will fail and give you this message:
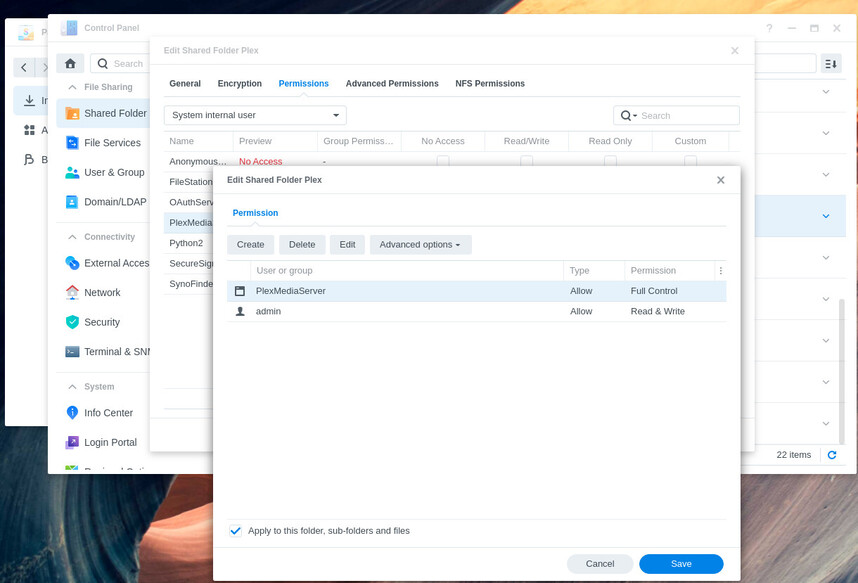
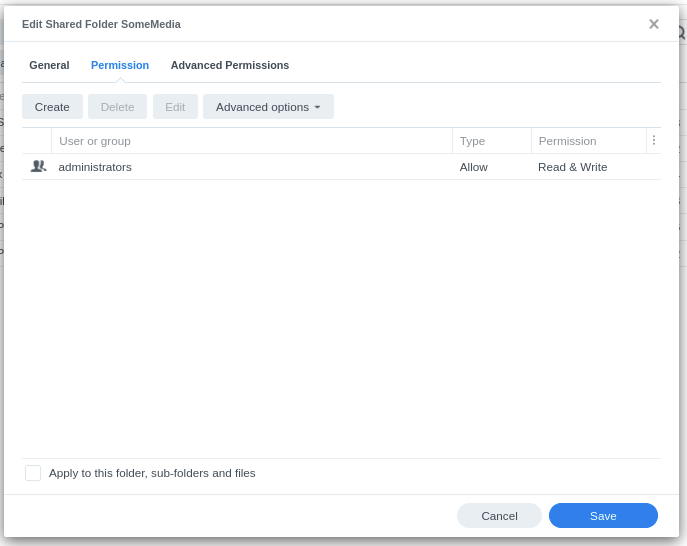
Change the shared folder permissions using
a. Open Control Panel
b. Shared Folders
c. EDIT the Plex share
d. Permissions tab
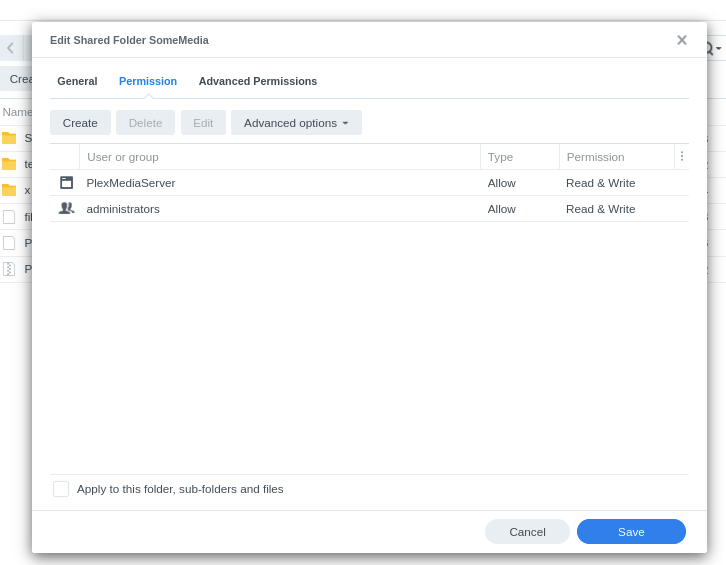
e. Click Customize
f. Check all Administration
g. Check all Read
h. Check all Write
i. Click Done
j. Check ‘Apply to this folder, sub-folders, and files’.
j. Click Save (Applies shared folder permission changes)
k. – Now wait until all changes are applied
l. Click Save again to return to the Shared Folders app.
Propagate this change throughout the shared folder
a. Check Apply to this folder, sub-folders, and files (Important)
b. Click OK
c. Wait for permissions to be applied to all the files. (2 minutes/1000 items)
Here is a screen capture with everything open and all boxes checked.
PMS will again check all permissions are in order.
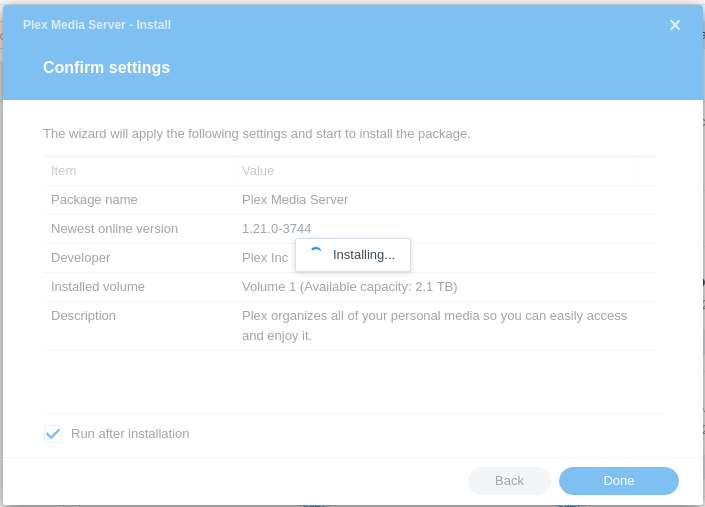
If they are not. you will be instructed to contact us here in the forums for additional support. Otherwise, you will see Installing while all permissions are changed, symbolic links are checked, and your data moved to the new storage location.
If the installer finds no issues with ownership or permissions, it will begin actual migration. The protracted “Installing” spinner is the actual migration in progress.
Migration is not instantaneous. AFTER a significant delay (about 1 minute per 1000 items indexed by Plex) you will now see the final message telling you that your Plex installation has been migrated to DSM 7 and what you still need to do to grant access to your media.
This How-To (FAQ) will demonstrate how to setup PMS, with HW transcoding and tonemapping support.
Two different methods are presented here
– First method is run via Scheduled Tasks which creates the Tone Mapping configuration
– Second method is for those NAS platforms (ARM based) which do not have HW transcoding capability.
Prerequisite - Get the PlexMediaServer UID/GID information
Get the UID/GID values from DSM 7 for use with PLEX_UID & PLEX_GID
In the email, you’ll see lines which looks like this:
chuck@ds418:~$ id PlexMediaServer
uid=297536(PlexMediaServer) gid=297536(PlexMediaServer) groups=297536(PlexMediaServer),937(videodriver)
chuck@ds418:~$
The first number (297536) is the value for PLEX_UID or PUID.
The second number (297536) is the value for PLEX_GID or PGID.
The numbers shown here may not match your system. Use only those which come from your system only.
Method 1 - Hardware Transcoding + Tone Mapping
A pms-docker container
Which uses the DSM 7 (/PlexMediaServer/AppData structure) shared folders.
And is fully interoperative & non-destructive of the Native app. (you can run either either as you wish.)
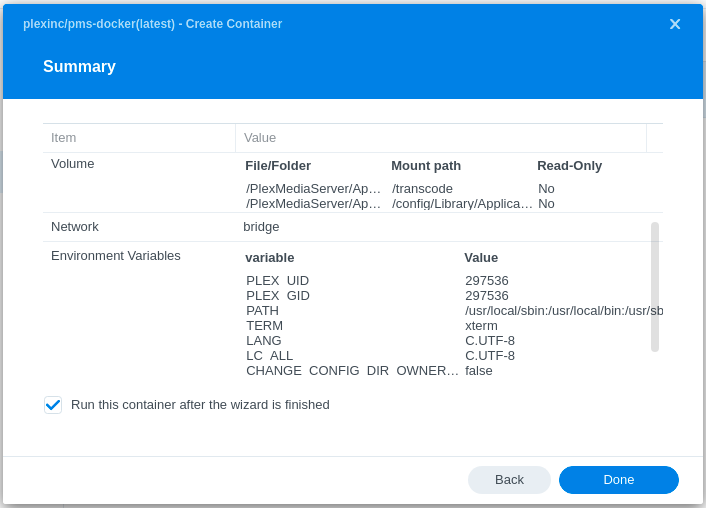
A. Create the HW transcoding container
Create a Scheduled Task , User-Script, run as root which creates the new container. Again, have it email you the results to confirm successful creation.
Substitute your actual values in the environment variables where appropriate.
Use “ID” and “GID” pulled from your system PLEX_UID & PLEX_GID
(You may use PUID & PGID for if you wish)
Task “Settings” are:
– Change /volume1/PlexMediaserver to the appropriate volume only if your PlexMediaServer shared folder isn’t on the default /volume1
Environment variable: PLEX_UID and/or PUID = value we obtained above
Envirohttps://forums.plex.tv/t/important-information-about-plex-for-smart-tvs-after-september-30-2021/746506nment variable: PLEX_GID and/or PGID = value we obtained above
Modify variable: CHANGE_CONFIG_DIR_OWNERSHIP to false
FAQ 29 - DSM 7 - Give PlexMediaServer access to your media
When you migrate to DSM 7, are installing a server for the first time, or just adding a new shared folder / sub-folder for media , folks forget to read the popup at the end of every installation which tells them about how to set permissions.
This FAQ shows in detail how to do what those instructions state.
When might you need to perform these steps?
When upgrading, changing permissions from Plex to PlexMediaServer is overlooked.
Installing Plex for the first time, new installations must also grant permission for PlexMediaServer to read your media.
You copied new media into existing shared folders but it’s not seen.
You have 3rd party media tools which don’t understand DSM 7 permissions system
To remedy this:
Open FileStation
Right-click on the shared folder → Properties
Permissions tab
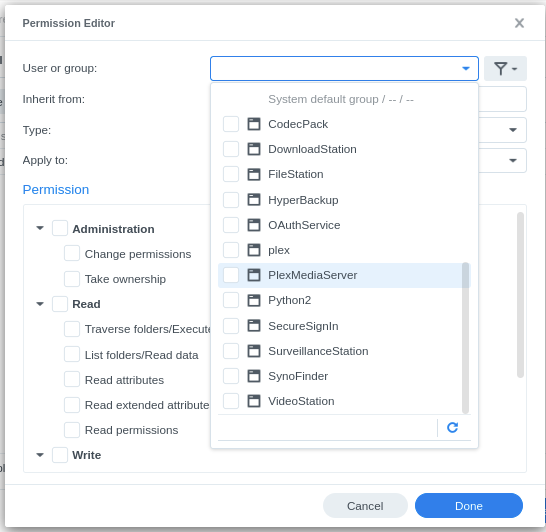
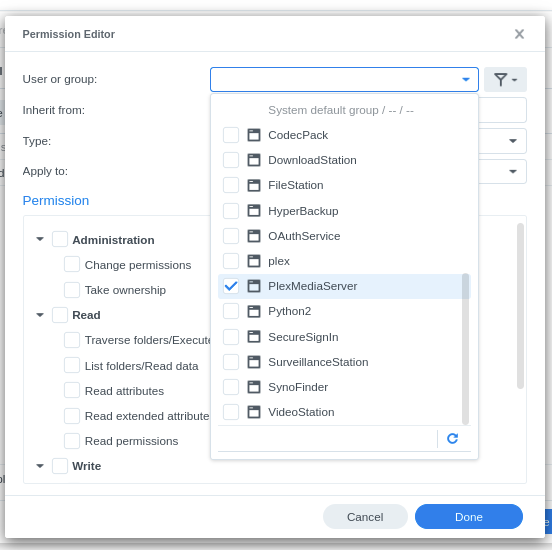
You won’t see PlexMediaServer listed so we need to CREATE a rule
FAQ 32: Repairing the PlexMediaServer shared folder
While DSM 7 manages the permission of the PlexMediaServer shared folder itself, it does not manage the permission of files placed inside.
This means any modification of permissions can cause PMS to fail.
Frequent causes:
Placing media in the shared folder – Which should NEVER be done. This is for PMS internal (metadata) use only.
Special allowed case of adding plug-ins but must be installed correctly.
One of the biggest confusion points with DSM 7 over DSM 6 is username change
DSM 6 uses regular username Plex
DSM 7 forced the name to be changed to System Internal User (application) PlexMediaServer
Mistaking these two leads to dire results.
In the event anything is awry in the shared folder (as viewed using FileStation),
an easy method to confirm all file system ownership and permissions are correct is to create and run this task in Task Scheduler.
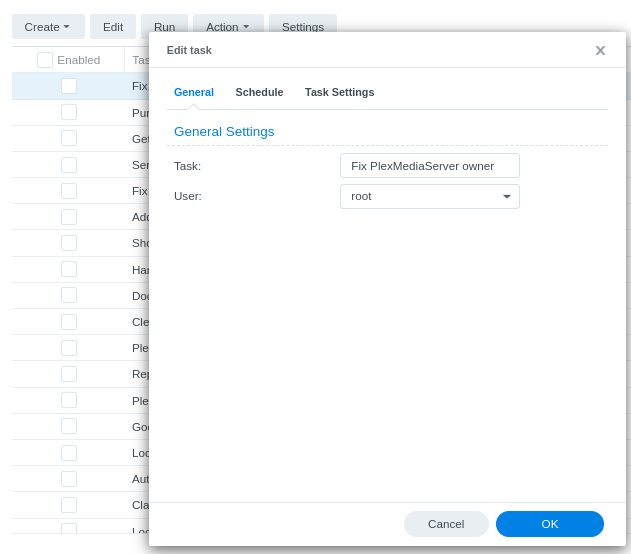
Create the task in Task Scheduler → User-defined Script
The recommended method of backing up PMS is to use Hyper Backup where the entire server’s files plus their ownership, permissions, including date/time stamp is preserved
This FAQ applies to those who want to backup only the databases.
Create a scheduled task → User Script
It must run as user: root
It emails you the results so you have confirmation
Set the ‘Dest’ folder (keep within quotes) to where you want the backup to go.
The body of the script is as follows:
#!/bin/sh
# Set destination (Set this value)
Dest="/volume1/My Shared Folder"
# Stop Plex
synopkg stop PlexMediaServer
Result=$?
if [ $Result -ne 0 ]; then
echo ERROR $Result when stopping PlexMediaServer.
echo Backup aborted.
exit 1
fi
# Dest exists ?
[ ! -w "$Dest" ] && echo ERROR: Cannot write to '$Dest' && exit 2
# Get into the databases directory (this is now volume independent)
cd "/var/packages/PlexMediaServer/shares/PlexMediaServer/AppData/Plex Media Server/Plug-in Support/Databases"
# Create filename using Date/Time (yyyy-mm-dd_hh-mm)
# Backup
tar cvzf "$Dest/Plex-Database-Backup_$(date +%Y-%m-%d_%H-%M).tar.gz" .
Result=$?
# Check result
[ $Result -ne 0 ] && echo ERROR Got exit code $Result from tar. Please check && exit
# Restart Plex
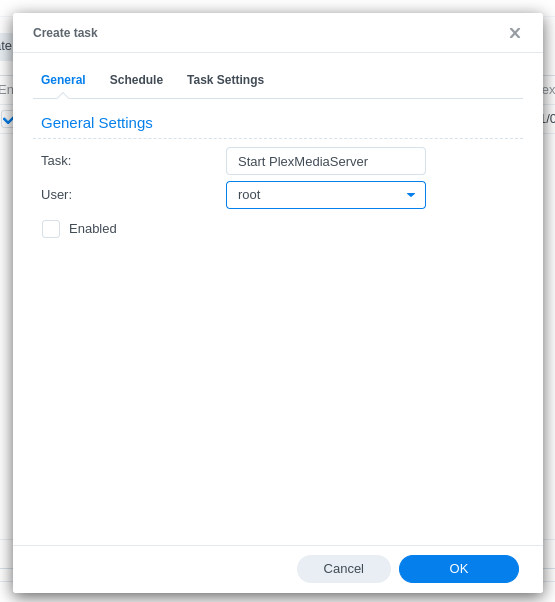
synopkg start PlexMediaServer
Server Version#: 1.41.0.8992 +
Player Version#: N/A
DSM 7.2.2 (Package Center) introduced a breaking change to how the SPK file is created and its internal contents. Normally, these type changes occur on major version updates however Synology, this time, released it in a minor update.
While the upgrade can be performed multiple ways, the safest (most reliable) method is:
Stop Plex
Uninstall Plex (select the first radio button – UNINSTALL ONLY; KEEP)