Synology FAQ - Questions, Answers, and How-To's

Synology Frequently Asked Questions

Table of Contents

Intro: Posting in the Plex Synology Forum

DSM 6 & 7 FAQ

Some of these FAQ apply equally to DSM 7 and 6. Others do not. Please read carefully before proceeding.

  1. Getting access to the Logs
  2. Have I installed the latest version…?
  3. Which version do I need, Intel or ARM?
    3a. Using Plex’s package signing public key - DSM 6
  4. LAN addressing requirements - RFC1918 specification for local LAN?
  5. First run & Setup
  6. Recommended Media Organization and Adding Media to Plex
  7. Reorganizing your media after it’s been indexed
  8. Uninstalling PMS - Reverting to a previous version
  9. Uninstalling PMS - Completely start over
  10. Reorganizing media without losing metadata (while PMS is running)
  11. Determining which package you need to download
  12. Default Plex file locations
  13. Manually obtaining log files
  14. Use SSH to access the Synology command line
  15. Claiming & Connecting to a troublesome Synology server
  16. Increase the number of folders Plex can monitor
  17. Recover from a corrupt database
  18. Moving PMS from Mac/Windows to Synology
  19. Setting permissions to allow Plex access to media files
  20. Bypassing the iHD video driver older Intel only
  21. After migrating from Windows to Synology
  22. When Server and Device credentials are out of sync (Hard & Soft Reset).
  23. Moving large amounts of data on Synology via GUI.
  24. Restoring Share Permissions to Default Settings
  25. Reclaiming your server - (after password reset, etc)

DSM 7 - FAQ

  1. Migrating (upgrading) from DSM 6 to DSM 7
  2. Migrating from Windows to DSM 7
  3. DSM Complains Port 32400 In Use When Installing Plex
  4. Give PlexMediaServer access to your media
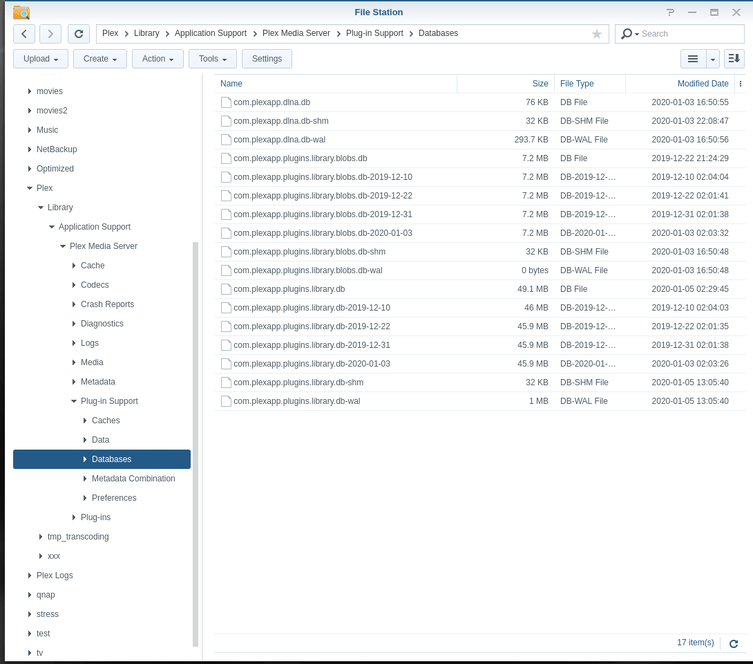
  5. Repairing a corrupted database using FileStation
  6. Reclaim or Reset credentials on DSM 7 (Not Authorized - Locked out)
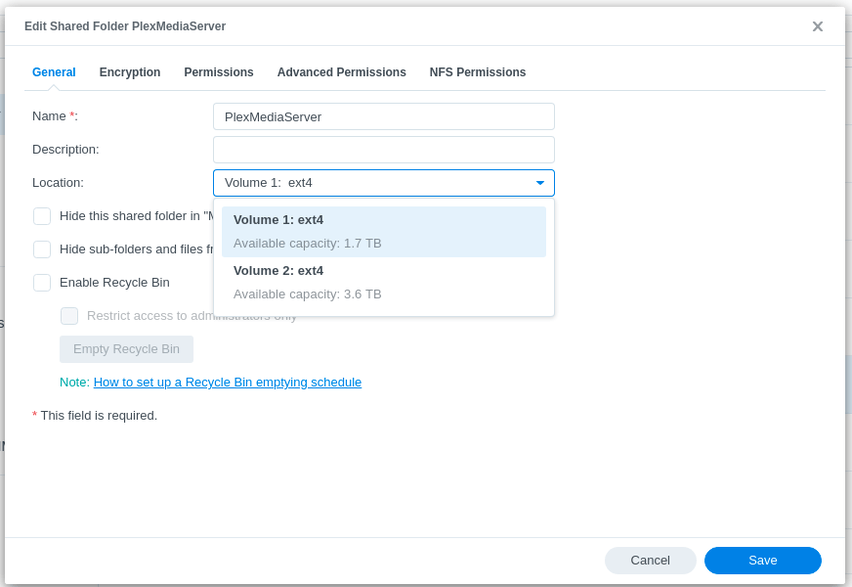
  7. Repairing the PlexMediaServer shared folder
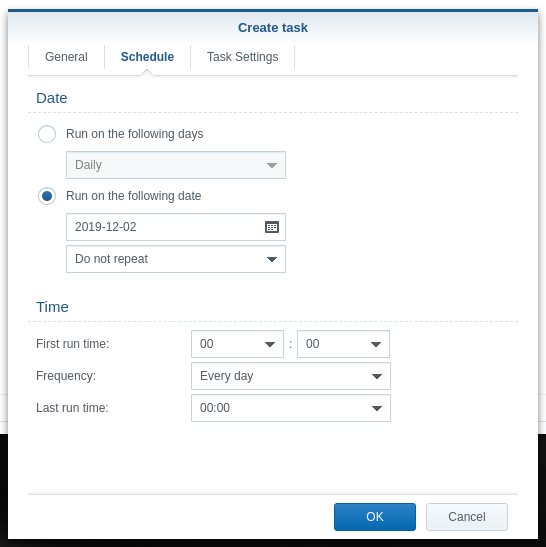
  8. How to backup just your PMS databases
  9. Upgrading Plex to DSM 7.2.2+
  10. DSM 7.1.1 Update 7 Start/Stop control

General info

For new DSM users:

7 Likes

Intro - Posting in the Plex Synology Forum.

When making a post in this forum, please provide as much information about your issue as possible and include the following details:

  1. NAS Model you have (e.g. DS1815+)
  2. DSM Version installed
  3. PMS version
  4. When creating the thread, affix the “server-synology” tag so we are notified of it and can find it easier.

Also include as much as possible of:

  1. Logfiles ZIP’d from your Synology
  • The log files, downloaded from Settings - Server - Troubleshooting - Download Logs if you can access it
    -or-
  • Manually ZIP’d “Logs” directory directly from the Plex share (if PMS won’t start)
  1. Description of what you see beyond “it doesn’t work” please. The more you can describe, and steps you’ve taken to date, the quicker we can get it working again

Go to Index

2 Likes

FAQ 1: Gaining access to the Plex logs or when PMS isn’t running / won’t start

Your Plex metadata, which is where the logs are stored, is stored out on /volume1 adjacent your content shares. It’s only hidden by default. To make it visible:

DSM 7

  1. Control Panel
  2. Shared Folders
  3. Highlight the PlexMediaServer shared folder
  4. EDIT
  5. “Permissions” tab
  6. Give your Synology username permission to “Read/Write” the share.
  7. Save.

To manually retrieve the logs:

  1. File Station
  2. PlexMediaServer share
  3. Navigate: AppData / Plex Media Server
  4. Right-click Logs
  5. Compress to Logs.zip
  6. Download the ZIP file (click it) to your computer.
  7. Upload it to your thread.

DSM 6

  1. Control Panel
  2. Shared Folders
  3. Highlight the Plex share
  4. EDIT
  5. “Permissions” tab
  6. Give your Synology username permission to “Read/Write” the share.
  7. Save.

To manually retrieve the logs:

  1. File Station
  2. Plex share
  3. Navigate: Library / Application Support / Plex Media Server
  4. Right-click Logs
  5. Compress to Logs.zip
  6. Download the ZIP file (click it) to your computer.
  7. Upload it to your thread.

Go to Index

2 Likes

FAQ 2: Is the latest version installed.

If you installed Plex from the Package Center then most likely, you do not have the latest version but sometimes that’s better off.
The Package Center is maintained by Synology and is always a few versions behind.

We suggest you visit https://www.plex.tv/media-server-downloads/ instead.

See # 3 below for installing manually.

Go to Index

1 Like

FAQ 3: Which version do I need to download, Intel or ARM?

  • The answer is dependent on the processor your Synology uses: The package you download should be the one specifically created for your model.
  • The specific CPU in your NAS, and its model number, can be found in the DSM Control Panel -> Info Center.

See also: What kind of CPU does my NAS have?

Go to Index

1 Like

FAQ 3a: Using Plex’s package signing public key (DSM 6 only)

We strongly advise you install the Plex Public Signing Key

You should also follow the above guide if you receive an error message that states ‘unknown publisher’ when installing the package.

To manually install Plex, open Package Center and click on Manual Install (top center of the window), the rest is straight forward, just follow the prompts.

After installation is complete, type http://Your.Synology.IP.Address:32400/web into a browser and hit enter. (e.g. http://192.168.0.23:32400/web)

See FAQ 4 for more details about addressing requirements.

Go to Index

1 Like

FAQ 4: LAN addressing requirements - RFC1918 specification for local LAN

Subnet Size	         IP Address Range	     Number Of Hosts
24-bit block	 10.0.0.0   -   10.255.255.255  (16,777,216)
20-bit block	172.16.0.0  -  172. 31.255.255  ( 1,048,576)
16-bit block	192.168.0.0 -  192.168.255.255  (    65,536)

Note: Any address outside of the ranges shown above are considered WAN (Internet) addresses. You cannot use a remote or WAN address to configure Plex unless you use a SSH Tunnel. (see below)

References:

Go to Index

1 Like

FAQ 5: First run & Setup

  • Prerequistes
  1. Install the Plex package in Package Center either manually from Plex or Synology
  2. Media on your NAS, named and ready for indexing per the Plex naming standards
    Naming Television series
    Naming Movie files
    Naming Home Videos
    Naming Music
  • Allowing Plex Access
    By default, Plex has no access to anything on your NAS. You must expressly grant that permission. To do so:
    a. Control Panel
    b. Shared Folders

  • For each of your media shares
    a. EDIT the share
    b. “Permissions” Tab
    c. Check the box for Read/Write or Read-Only as you deem appropriate
    – “Plex” for DSM 6
    – (System Internal User) "PlexMediaServer for DSM 7
    d. OK the change

You are now ready to setup Plex on your Synology.

  1. From your home LAN
  2. Open a browser to: http://ip.addr.of.synology:32400/web
  3. You will be greated by “Got It” (We found a server)
  4. Sign into your Plex account (or acknowledge ‘Claiming’ it)
  5. Proceed through the wizard to create your first media Library
    a. It is recommended to only create one at a time. Synology NAS systems are not that powerful. Give it time to process each to completion until you’re more familiar with how it all works together with your content.
    b. Do not ask PMS to index more than 5000 music tracks or audio at one time unless you are willing to wait a few days for it to complete. This is the limited CPU of the Synology causing the delay
  6. After adding a shared folder, ADD the type.
  7. You will arrive at the Dashboard.
  8. Go to that media library.
  9. Clicking “Library” (top center) will allow you to see your media being indexed and added.

Supplemental information:

  • It is strongly recommended you use an automated tool to help you name your media. It will save you, and the support staff, hours of frustration chasing down ill-named files

  • One of the defacto standard tools to use is FileBot. FileBot is licensed but, in the eyes of most, well worth the small license fee per year. FileBot is available for PC, Mac, Linux, and Synology directly (FileBot Node package)

  • To add FileBot to Synology:

  1. Open Package Center > Settings > Package Sources and add this address: https://get.filebot.net/syno/

  2. Package Center > All and install Node.js v8.

  3. Package Center > Community and install FileBot and FileBot Node

Note: FileBot currently requires a License which may be purchased from within the FileBot Node > Tools drop down menu.

Go to Index

2 Likes

FAQ 6: Recommended Media Organization and Adding Media to Plex.

  1. It is recommended you create a top-level Synology share for each major grouping of media instead of placing them in the default “Videos” share. “Videos” is utilized by Video Station and has been known to conflict with PMS. However you group your shares, they should be named to best serve your needs.

  2. Please do not place media in the Plex share. This share is created to store the metadata (internal information about your media). It is made accessible to only to allow diagnostics and support in the event PMS is not working correctly on your NAS.

  3. The names are entirely as you wish them to be. Some examples of top level shares are:
    a. Movies
    b. Movies (Dramatic)
    c. Movies (Holiday)
    e. Music (Classical)
    f. Music (Rock)
    h. Home Videos (Vacations)
    i. Home Videos (Projects)
    j. Workout Videos
    k. Family Photos
    l. Vacation Photos

Under each of these you will create the storage structure appropriate to the type as detailed in FAQ 5 above.

An example of how it will appear might be:

Movies/
 Avatar (2009)/
    Avatar (2009).mkv
    Interview with the Director-interview.mkv

  Weekend at Bernies (1989)/
    Weekend at Bernies (1989).mp4
 
Television/
  Star Trek The Next Generation/
    Season 01/
      Star Trek The Next Generation - S01E01 - Encounter at Farpoint.mkv

Music/
  Sweetback/
     Sweetback/ 
       01 - Gaze.mp3
       02 - Softly Softly.mp3
       03 - Sensations.mp3
       04 - Au Natural.mp3
       05 - Arabesque.mp3
       06 - You Will Rise.mp3
       07 - Chord.mp3
       08 - Walk of Ju.mp3
       09 - Be Happier.mp3
       10 - Come Dubbing.mp3
       11 - Cloud People.mp3
       12 - Powder.mp3

Vacation  Photos/
  2004 -  Italy/
      IMG_9034.JPG
      IMG_9035.JPG
 
  2007 -  Germany
       Berlin/ 
         Brandenburg Gate.JPG
         Kaiser Wilhelm Memorial Church.JPG

With your media now organized, you only need add the Share name (top-most level) to PMS. “Drilling down” into the sub structure will lead to mismatched media.

Using the examples above. knowing you can add as many shared folders to a Library type as you wish (the limit is only that of your available storage)

  1. “Movies” - Add:
    a. /volume1/Movies
    b. /volume1/His Movies

  2. "Movies (Seasonal) - Add:
    a. /volume1/Christmas Movies
    b. /volume1/Thanksgiving Movies

  3. “Vacation Photos” - Add;
    a. “/volume1/2007 - Berlin”
    b. “/volume1/2004 - Italy”

It is important to understand that PMS works with you to organize your media how you want it.

As long as it makes sense to you and PMS can understand your structure & naming, it will do the rest of the organizational work.

Go to Index

2 Likes

FAQ 7: Reorganizing your media after it’s been indexed.

As you add media, you may find that you want to reorganize it to what works better.
While performing this reorganization, your media library can look messy. If you keep track of what you’re doing on paper, or move only one section at a time, you’ll be fine.

  1. Preparation
    – Disable “Scan my Library automatically”
    – Disable “Run a partial scan when changes are detected”
    – Disable “Scan my Library periodically”
    – Disable “Empty trash automatically after every scan”
    – SAVE these changes.

  2. Stop Plex

  3. Move your files
    – Make any changes or physical media file moving you need to.
    – When you are done, proceed with the actual PMS configuration change

  4. Start Plex, Updating your PMS configuration to reflect the new structure
    – Edit each library section - Folders - ADD the new location (Do not remove the old yet) - SAVE the changes.
    – PMS will see the new location and begin scanning.
    – When completed, Edit the library section again. REMOVE the old media location.
    – Scan one final time.
    – Empty the Trash
    – Clean the bundles
    – Optimize the database
    – Wash - Rinse - (Repeat for each library section until done)

That’s it. Your media has now been moved to its new location(s) and PMS is updated to reflect this.

Revisit Settings - Server - Library and turn on those flags which you previously turned off.

Go to Index

3 Likes

FAQ 8: Uninstalling PMS - Reverting to a previous version

  1. Changing versions (up or down) does not lose your data unless you manually delete it
  2. Programs are stored in the App Store. Metadata is stored is the Plex share.
  3. Uninstalling the package from Package Center is 100% safe - except for any activities PMS may be performing.

The safest procedure is:

  • Stop PMS in Package Center
  • Uninstall PMS ( Uninstall + KEEP on DSM 7 )
  • Manually install the version you wish to use.
  • PMS will start again and, after a couple minutes to adjust itself again, will be fully operational.

This sequence is mandated by Synology.

Go to Index

1 Like

FAQ 9: Uninstalling PMS - Completely start over

DSM 7

  1. Uninstall the Plex package
  2. Select the “ERASE” option
  3. Restart DSM

DSM 6

  1. Package Center - Remove the Plex package
  2. Control Panel → Users - Delete user Plex
  3. Control Panel → Shared Folders - Delete the Plex share
  4. Restart DSM

Go to Index

1 Like

FAQ 10: Reorganizing media without losing metadata (while PMS is running)

  1. Disable the following options in Settings - Server - Library - Show Advanced and remember to Save the changes.
    a. Scan my library automatically
    b. Run a partial scan when changes are detected
    c. Scan my library periodically
    d. Empty Trash after every scan

  2. Move your media
    Make any configuration changes or physical media file moving you need to.
    When you are done, proceed with the actual PMS configuration change

  3. Updating your PMS configruation
    a. Edit each library section - Folders - ADD the new location (Do not remove the old yet) - SAVE the changes.
    b. PMS will see the new location and begin scanning.
    c. As each item is matched, a 2 will appear (duplicate) on each item already in your library . This is expected and desired proof everything is going as expected.
    d. When completed, Edit the library section again. REMOVE the old media location.
    e. Scan one final time. Observe the 2 being removed.
    f. Empty the Trash
    g. Clean the bundles
    h. Optimize the database
    i. Wash - Rinse - Repeat for each library section until done
    j. Return to Settings - Server - Library, Enable those options you previously turned off.

That’s it. Your media has now been moved to its new location(s) and PMS is updated to reflect this.

Go to Index

FAQ 11: Determining which package you need to download

  1. Control Panel - Info Center - This is confirm your DiskStation model number

  2. Look up the CPU https://www.synology.com/en-global/knowledgebase/DSM/tutorial/Compatibility_Peripherals/What_kind_of_CPU_does_my_NAS_have

  3. There are 3 architectures in use. Select the appropriate one below at Plex.tv/downloads
    a. Intel 64 bit
    b. RealTek RTD129x (ARMv8 - 64 bit)
    c. Marvel - ARMv7 - 32 bit)

Go to Index

1 Like

FAQ 12: Default Plex file locations:

  • Please do not place any media in any of the locations listed here.
  • DSM allows you create any shared folders you want for your media. PLEASE DO SO.

DSM 7

  • Plex support software - /var/packages/PlexMediaServer
  • Plex executables - /var/packages/PlexMediaServer/target
  • Plex Metadata - /var/packages/PlexMediaServer/shares/PlexMediaServer

DSM 6

  • Plex support software - "/var/packages/Plex Media Server"
  • Plex executables = "/var/packages/Plex Media Server/target"
  • Plex metadata folder - /volume1/Plex (not visible by default. No user data here)

The Plex installer supports installing Plex Media Server on any Volume you wish.
Select the desired installation volume in Package Center when installing.

You may move the Metadata directory to any DSM-supported volume using Control Panel - Shared Folders

  1. Stop Plex.
  2. Select the “Plex” (DSM 6) or “PlexMediaServer” (DSM 7) shared folder
  3. EDIT it
  4. Change “Location” to the desired volume
  5. SAVE the change.
  6. Wait for DSM to complete the relocation operation.

Example showing DSM 7

Go to Index

2 Likes

FAQ 13: Manually obtaining log files

Log files are maintained in the Plex share. This share is normally hidden by default because, under normal usage, there is no reason to access it.

In those cases where PMS won’t start, the share can be made visible to File Station in order to facilitate manual collection and posting in the forums for assistance.

Procedure to retrieve log files

DSM 6

Prerequisite: (Do this only once)

  1. Control Panel - Shared Folders
  2. EDIT the Plex share
  3. Permissions Tab
  4. Grant your Synology username permission to R/W the share.
  5. Exit Control Panel

Log file retrieval

  1. File Station
  2. Plex share
  3. Drill into Library / Application Support / Plex Media Server
  4. Right-click Logs
  5. Compress to Logs.zip
  6. Wait for this to complete.
  7. Download the ZIP file
  8. Upload / attach to your forum post as needed.

DSM 7

  1. Control Panel - Shared Folders
  2. EDIT the PlexMediaServer share
  3. Permissions Tab
  4. Grant your Synology username permission to R/W the share.
  5. Exit Control Panel

Log file retrieval

  1. File Station
  2. PlexMediaServer share
  3. Drill into AppData / Plex Media Server
  4. Right-click Logs
  5. Compress to Logs.zip
  6. Wait for this to complete.
  7. Download the ZIP file
  8. Upload / attach to your forum post as needed.

Go to Index

FAQ 14: Use SSH to access the Synology command line

  1. Control Panel
  2. Terminal & SNMP
  3. Enable SSH
  4. Sign into the NAS using PuTTy (Windows) or ssh (Mac & Linux)
  5. Open the SSH session
  6. Use your username & password
  7. Be greeted with the command line prompt $

Go to Index

FAQ 15: Claiming & Connecting to a troublesome Synology server

This FAQ is for those situations where the normal claim process has failed.
There are multiple techniques to accomplish this.

DSM 7

  1. Uninstall the package with the “Keep” option
  2. Reinstall the package , selecting the “Plex Claim Token” option
  3. Click “Get Plex Claim Token”.
  4. Browser tab will open and display a “claim-xxxxxxx” token string
  5. “COPY” the string
  6. Return to the installer window
  7. PASTE the claim-xxxxx into the small window on the form.
  8. Click NEXT until it starts installing.
  9. Installation will need an extra 15-20 seconds for the installer to communicate with Plex.tv and obtain new credentials for your server. After it receives the credentials, it updates your “Preferences.xml” automatically so the server is again connected to your account.
  10. The installer will confirm success or failure attaching. Success will include your Plex account username in the message
  11. Open an Incognito Browser Window.
  12. Connect http://LAN.IP.of.Syno:32400/web
  13. Confirm Sign in
  14. Confirm “Got it”
  15. Skip through wizard if presented
  16. Arrive at dashboard.

DSM 6

Normal Method 1

  1. Both Workstation (Computer performing the claiming) and the Synology MUST be on the same LAN subnet.
  2. In the browser, open http://app.plex.tv/desktop?secure=0

Alternative Method 2

This method has two parts. For those with DSM 7, you’ll recognize it to be the “Plex Claim Token” method.

The procedure is:

On Synology,

  1. Preparation
  • Create a scheduled task named “Claim Plex Server”, which is a “User Script”.
  • It runs as user ‘root’
  • The “Settings” tab is the script contents. Copy and paste this text
#!/bin/bash

# Make certain you have removed the following NAME="VALUE" pair
# from Preferences.xml  with Plex stopped

# Remove:  PlexOnlineUsername, PlexOnlineToken, PlexOnlineMail, PlexOnlineHome

# Save and Start Plex

# In your browser, open https://plex.tv/claim
# COPY the link to your browser
# PASTE the claim-xxxxxx value in the statement below .  
# Be careful of quotes

curl -X POST 'http://127.0.0.1:32400/myplex/claim?token=PASTE_TOKEN_HERE'

# Check the email from DSM.   It will tell if you successful or 
# give you the error to bring to the forums.
  • SAVE this Scheduled Task. We’ll come back to it shortly.
  1. Stop PMS

  2. Ensure the Synology Text Editor app is installed.

  3. Depending on DSM version , open Preferences.xml in the Synology text editor

  • DSM 6: Plex/Library/Application Support/Plex Media Server/Preferences.xml
  • DSM 7: PlexMediaServer/AppData/Plex Media Server/Preferences.xml
  1. Carefully remove the following Name="Value" pairs from Preferences.xml being careful not to damage any others or the punctuation then save the file.
  • PlexOnlineUsername
  • PlexOnlineToken
  • PlexOnlineMail
  • PlexOnlineHome (if it exists)
  1. Now start PMS. Do not open it. Let it sit idle

  2. Open Claim | Plex

  3. You will be given a claim-xxxxxx token. COPY this token into your browser.

  4. Quickly open the Scheduled Task settings again for ‘Claim Plex Server’

  5. Go to Task Settings, scroll down to where you paste the Token and paste the claim-xxxxx token into the comand.

  6. Save the task changes

  7. RUN the command.

  8. Wait for your email to arrive (takes 30-60 seconds depending on ISP)

  9. You should see a whole bunch of “Feature Flags” ending with </MyPlex>. This indicates your server has been claimed under your account.

Go to Index

2 Likes

FAQ 16: Increase the number of folders Plex can monitor

Applicable to all supported versions of DSM.

When the Linux ‘inotify’ table fills up, this will cause when Plex to stop automatically detecting new media you add to the server. It will also manifest when there are transcoder problems with Dolby audio codecs.

Linux has a default table size which is static. We can increase this at will.
On some versions it’s 8192. On newer kernels, the default is 65536 folders.

This is easy to increase but requires a bit of math.

  1. First, get the total number of directories in use for your media (movies, series, music, and photos). For each share containing media:
    a. File Station.
    b. Left Pane
    c. Right-click the share
    d. Properties
    e. Write down the number of folders it finds.

Example:

When done collecting the number of folders in use:

a. Add 32768 to the value
b. Divide by 32768
c. Add 1 to the the Integer result (No fractions here)
e. Multiply by 32768
f. Use this final result. (integer part only)
g. If the number of folders you are using is less than 8192, stop here unless you are about to add a lot more media.

Example: I have 208,244 directories (because I curate a lot of music and photos)

(208244 + 32768) / 32768 = 7.35  ->   7
7 + 1 = 8
8 * 32768 = 262144  (This is the value I use - room to grow)

We do this because we want a multiple of 32768 slots to be allocated. It allocates kernel memory on a memory boundary and allows for future growth.

Create a Scheduled task you will run ONE TIME -OR- when DSM updates and you need to increase the table again.

Here is how it will look in Task Scheduler:

  1. Create a Scheduled Task
  2. User defined script

a. Create the task

b. Declare it to run one-time Today only

c. Paste in the contents but use your values.

# Remove any previous s2s_watches_max entries (avoid clutter)
sed -i 's/^s2s_watches_max=.*$//' /etc/synoinfo.conf
sed -i 's/^s2s_watches_max=.*$//' /etc.defaults/synoinfo.conf

# This is an example only.   Use your actual result below to add the new value
echo 's2s_watches_max=262144' >> /etc/synoinfo.conf
echo 's2s_watches_max=262144' >> /etc.defaults/synoinfo.conf

When you’ve added your value and clicked 'OK",

  1. Run it
  2. Restart DSM (Required to activate)

WARNING:

Due to how Synology manages this capability, you are strongly urged to place ONLY those items which should be monitored in your media.

Cases have been found where “Sample” and “Example” files have been included or the media storage contains unnecessary extra folders.

Please curate your media with care.

Go to Index

5 Likes

FAQ 17: Recover from a corrupt database

On Synology NAS machines, we have direct GUI access to the database area.
We can use File Station to recover if PMS was previously able to make database backups

  1. Open Control Panel - Shared Folders - EDIT the Plex share
    a. Permissions tab
    b. Give your username R/W permission to the Plex share

  2. Open File Station

  3. Navigate to the databases folder

  • DSM 6: Plex / Library / Application Support / Plex Media Server / Plug-in Support / Databases

  • DSM 7: PlexMediaServer / AppData / Plex Media Server / Plug-in Support / Databases


4. If you have corresponding .wal or .shm for the main Database file, delete them

  1. Rename com.plexapp.plugins.library.db to com.plexapp.plugins.library.db-damaged

  2. Due to how Synology handles making copies of files (Skip or Overwrite only),
    a. Copy your most recent backup to another folder somewhere
    b. Rename it to add -copy to the name
    c. Move the renamed copy back here.

  3. Rename it to be the original, proper, name

  4. Right-click com.plexapp.plugins.library.db → Properties

  5. Set the owner to be plex . (It will have changed when you made a copy)

  6. Start Plex

  7. Scan Files to bring the database back into sync with your current media status

  8. When you are satisfied the -damaged file is no longer needed, you can delete it.

Go to Index

2 Likes